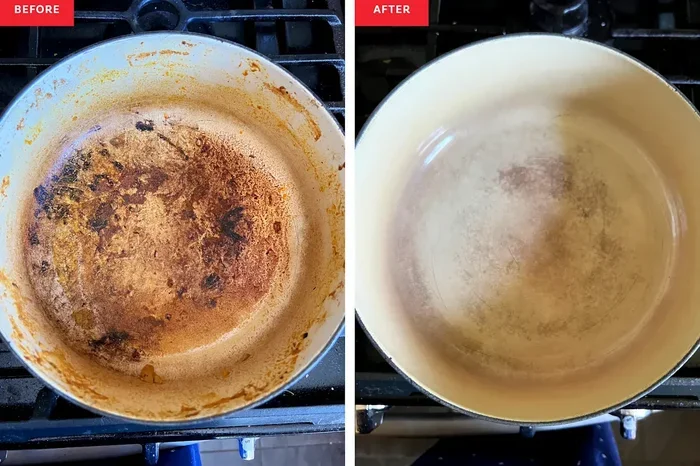
How To Clean Scorched Dutch Oven Quickly and Easily
Learning how to clean a scorched Dutch oven is easier than you think. With common household items like baking soda and vinegar, you can remove tough burnt stains in minutes. This guide covers proven methods that work for both enamel and cast iron Dutch ovens. You will also learn prevention tips to keep your pot looking great. Save time and money by cleaning your cookware the right way.
There is nothing worse than looking into your favorite Dutch oven and seeing a black, burnt mess at the bottom. Whether you simmer a stew too long or forget about something on the stove, a scorched Dutch oven can feel like a disaster. But here is the good news. You do not need harsh chemicals or expensive cleaners to fix it. With a few simple household items, you can bring your pot back to life.
In this guide, we will walk you through every method for cleaning a scorched Dutch oven. We will cover what causes scorching in the first place. You will learn the best tools and cleaners to use. We will share step-by-step instructions that actually work. And we will give you tips to prevent this mess from happening again. Whether your pot is cast iron or enamel-coated, this guide has you covered.
So grab your scorched Dutch oven and let us get started. By the end of this article, you will know exactly how to clean scorched Dutch oven surfaces quickly and easily. No stress. No hassle. Just a clean, ready-to-use pot.
Key Takeaways
- Baking soda and vinegar are the most effective and affordable cleaning agents for scorched Dutch ovens.
- Soaking the pot for several hours loosens burnt-on food and makes scrubbing much easier.
- Avoid metal scouring pads on enamel Dutch ovens to prevent scratching the coating.
- Regular seasoning of cast iron Dutch ovens helps prevent food from sticking and scorching.
- Low and slow heat is the best way to prevent scorching in the first place.
- Salt and oil paste works as a gentle abrasive for tough stains without damaging surfaces.
- Know when to replace your Dutch oven if the enamel is chipped or the cast iron is cracked.
📑 Table of Contents
Why Does a Dutch Oven Get Scorched?
Understanding why your Dutch oven gets scorched helps you prevent it from happening again. Scorching happens when food burns onto the surface of the pot. This usually occurs because of high heat or long cooking times without enough liquid.
The Role of High Heat
Dutch ovens are designed to handle high temperatures. They are heavy and hold heat very well. But this also means they can burn food quickly if the heat is too high. Cast iron Dutch ovens especially retain heat for a long time. Even after you turn off the burner, the pot stays hot. This can cause food to stick and scorch.
Not Enough Liquid
When you cook with too little liquid, the food dries out. Sauces, soups, and stews need enough liquid to stay at a gentle simmer. If the liquid boils away, the food left behind will burn. This creates those black, stubborn stains that are so hard to clean.
Leaving Food Unattended
Sometimes we get distracted. A recipe calls for stirring every few minutes, but we forget. Before you know it, the bottom of the pot is burnt. This is very common when making tomato-based sauces or sugary recipes. These foods are more likely to scorch because of their acidity and sugar content.
What You Will Need Before You Start
Before you dive into cleaning, gather your supplies. Having everything ready makes the process much smoother. Most of these items are already in your kitchen.
Essential Cleaning Supplies
- Baking soda — a natural abrasive and deodorizer
- White vinegar — helps dissolve burnt-on residue
- Dish soap — a gentle cleaner for everyday use
- Warm water — the base for most cleaning solutions
- Soft sponge or cloth — for gentle scrubbing
- Wooden spoon or silicone scraper — for removing loose debris
Optional but Helpful Items
- Coarse salt — works as a natural scrub for tough stains
- Hydrogen peroxide — adds extra cleaning power
- Denture cleaning tablets — great for deep soaking
- Non-abrasive scrubbing pad — safe for enamel surfaces
- Food-grade mineral oil — used for re-seasoning cast iron
Having these items on hand means you can start cleaning right away. You will not need to run to the store for special products. Most of these solutions are safe for both enamel and cast iron Dutch ovens.
Step-by-Step Methods to Clean a Scorched Dutch Oven
Now let us get to the main part. Here are the most effective methods for how to clean scorched Dutch oven surfaces. Each method works well for different levels of scorching. Try them in order from gentlest to strongest.
Method 1: The Baking Soda and Vinegar Soak
This is the most popular and effective method. Baking soda is a gentle abrasive. Vinegar adds acidity to help break down burnt food. Together, they create a powerful cleaning reaction.
Start by filling the scorched Dutch oven with warm water. Add two tablespoons of baking soda. Let it soak for at least one hour. For heavy scorching, leave it overnight. After soaking, pour in one cup of white vinegar. The mixture will fizz. This fizzing action lifts the burnt residue off the surface. Use a soft sponge to gently scrub the bottom. Rinse thoroughly with warm water. Your pot should look much better already.
Method 2: The Salt and Oil Scrub
This method works best for light to moderate scorching. It is especially good for cast iron Dutch ovens because it does not strip the seasoning layer.
Mix equal parts coarse salt and vegetable oil. You need enough to form a thick paste. Apply the paste directly to the scorched areas. Use a soft cloth or sponge to scrub in circular motions. The salt acts as a gentle abrasive. The oil helps lift the burnt food away. Wipe clean with a damp cloth. Rinse with warm water and dry completely.
Method 3: The Boiling Water Technique
This method uses heat to loosen burnt-on food. It works well when the scorching is not too severe.
Fill the Dutch oven with water until the burnt area is covered. Add one tablespoon of dish soap. Bring the water to a boil on the stovetop. Let it simmer for 15 to 20 minutes. The heat will soften the burnt residue. After simmering, remove from heat and let it cool slightly. Use a wooden spoon or silicone scraper to remove the loosened food. Wash with warm soapy water and rinse well.
Method 4: The Denture Tablet Soak
This might sound surprising, but denture tablets are excellent for cleaning burnt cookware. They contain mild cleaning agents that dissolve tough stains.
Fill the Dutch oven with warm water. Drop in two denture cleaning tablets. Let the pot soak for three to four hours. The tablets will fizz and break down the carbon buildup on the surface. After soaking, use a non-abrasive pad to wipe away the loosened stains. Rinse thoroughly. This method is very gentle and safe for all Dutch oven types.
Method 5: The Hydrogen Peroxide Boost
For really stubborn scorching, hydrogen peroxide can add extra cleaning power. This method works best when combined with baking soda.
Start with a baking soda paste. Mix three tablespoons of baking soda with a small amount of water. Spread it over the scorched areas. Pour a thin layer of hydrogen peroxide over the paste. Let it sit for 30 minutes. The combination will bubble and lift even the toughest burnt stains. Scrub gently with a soft sponge. Rinse clean with warm water. This method is powerful but still safe for most surfaces.
How To Prevent Scorching in the Future
Cleaning a scorched Dutch oven takes time and effort. The best approach is to prevent scorching from happening in the first place. Here are simple tips to keep your pot in great shape.
Use Low to Medium Heat
Dutch ovens are excellent heat conductors. They do not need high heat to cook food properly. Set your burner to low or medium. This gives you even cooking without the risk of burning. If you are using a stovetop, remember that cast iron heats up slowly. Give it time to warm up gradually.
Always Add Enough Liquid
When making soups, stews, or sauces, make sure there is enough liquid. The general rule is to keep food covered by at least half an inch of liquid. This prevents the food from drying out and sticking to the bottom. If the liquid level drops too low, add more warm water or broth.
Stir Regularly
Set a timer on your phone if you need to. Stirring every few minutes keeps food from sitting in one spot too long. This is especially important for tomato-based sauces and sugary recipes. These foods are more likely to scorch because of their chemical makeup.
Use the Right Cookware for the Job
Not every recipe needs a Dutch oven. Use it for dishes that benefit from heavy, even heat. For quick cooking tasks, a lighter pan might be better. Matching the right cookware to the right task reduces the chance of scorching.
Clean Soon After Cooking
The longer food sits in the pot, the harder it becomes to clean. As soon as you are done eating, fill the pot with warm water. Even a quick soak before washing makes a big difference. This prevents food residue from hardening into tough burnt stains.
Common Mistakes People Make When Cleaning a Scorched Dutch Oven
Even with good intentions, people often make mistakes that damage their Dutch oven. Here are the most common errors to avoid.
Using Steel Wool or Metal Scouring Pads
Metal scrubbers can scratch enamel coatings. They remove the smooth nonstick surface that makes cooking easier. Stick to soft sponges or non-abrasive pads. Your Dutch oven will last much longer.
Using Harsh Chemical Cleaners
Strong chemical cleaners can strip away the seasoning on cast iron. They can also damage enamel coatings over time. Stick to natural cleaners like baking soda and vinegar. They work just as well without the risk.
Soaking Cast Iron in Water Too Long
While soaking helps with scorching, cast iron should not stay wet for days. Prolonged water exposure can cause rust. After cleaning, dry your cast iron Dutch oven immediately. Apply a thin layer of food-grade oil to protect the surface.
Using Extreme Temperature Changes
Never plunge a hot Dutch oven into cold water. This causes thermal shock. It can crack enamel or warp the pot. Always let the pot cool down before washing it.
Ignoring the Staining
Some people think staining on cast iron is a problem. It is not. Dark stains on cast iron are normal. They are part of the seasoning process. Do not over-scrub trying to remove every mark. Focus only on actual burnt food and residue.
When Should You Replace Your Dutch Oven?
Sometimes a Dutch oven is beyond saving. Knowing when to replace it saves you from cooking in a damaged pot. Here are the signs that it is time for a new one.
If the enamel coating is chipped or cracking, stop using it. Chipped enamel can expose the cast iron underneath. This can affect the taste of your food and make the pot harder to clean. If the cast iron has deep rust that does not go away with cleaning, it is time to replace it. A warped pot that wobbles on the stovetop will cook food unevenly. If the inside is heavily stained and cleaning methods do not work, consider getting a new one.
A good Dutch oven can last for decades with proper care. But when it reaches the end of its life, it is okay to let it go. Invest in a new one and start fresh with better cleaning habits.
Conclusion
Cleaning a scorched Dutch oven does not have to be a frustrating experience. With the right methods and a little patience, you can remove even the toughest burnt stains. Baking soda, vinegar, and simple soaking techniques work wonders. Prevention is just as important as cleaning. Use low heat, add enough liquid, and stir your food regularly.
Remember, a clean Dutch oven cooks better and lasts longer. Take care of your pot, and it will take care of you for years to come. Now you know exactly how to clean scorched Dutch oven surfaces quickly and easily. Try these methods next time you face a burnt pot. You will be surprised at how well they work. Happy cooking and happy cleaning.
Frequently Asked Questions
Can I use bleach to clean a scorched Dutch oven?
No, you should avoid bleach. It can damage the enamel coating and strip the seasoning from cast iron. Stick to natural cleaners like baking soda, vinegar, and mild dish soap. These are safer and just as effective for removing burnt stains.
How long should I soak a scorched Dutch oven?
For light scorching, one hour of soaking is usually enough. For heavy burnt-on food, soak overnight. The longer the soak, the easier it is to scrub away the residue. Adding baking soda or denture tablets to the soak water boosts the cleaning power.
Is it safe to put a Dutch oven in the dishwasher?
It depends on the type. Enamel Dutch ovens are generally dishwasher-safe, but hand washing extends their life. Cast iron Dutch ovens should never go in the dishwasher. The harsh detergents and heat strip away the seasoning layer and can cause rust.
Will the staining on my cast iron Dutch oven ever go away?
Staining on cast iron is completely normal and harmless. It is part of the natural seasoning process. These dark marks do not affect the taste or safety of your food. Focus on removing actual burnt food and residue rather than trying to eliminate all stains.
Can I use oven cleaner on the inside of my Dutch oven?
It is best to avoid oven cleaner. The chemicals can leave a residue that affects the taste of your food. They can also damage enamel and seasoning layers. Natural cleaning methods work just as well without the risk. Baking soda and vinegar are safe alternatives that clean effectively.
How often should I re-season my cast iron Dutch oven?
Re-season your cast iron Dutch oven every few months or whenever you notice food sticking. A well-seasoned pot has a smooth, natural nonstick surface. Apply a thin layer of food-grade oil after cleaning and heat it on low for 10 minutes. This builds up the protective seasoning layer over time.