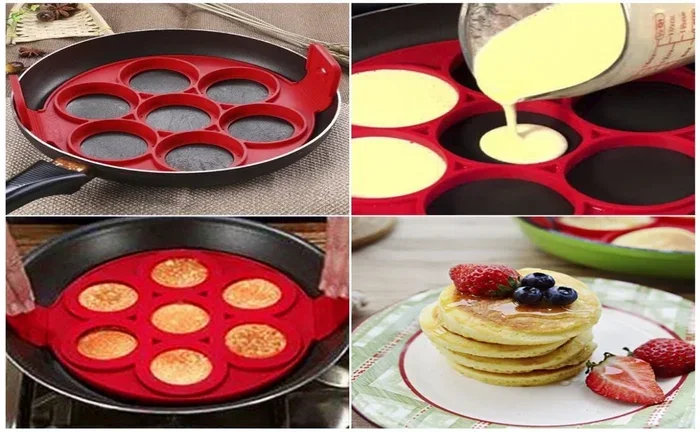
How To Make Perfect Pancakes With Silicone Molds In Oven
Making pancakes with silicone molds in the oven is one of the easiest and most fun ways to enjoy breakfast. This guide covers everything from choosing the right silicone bakeware to baking the perfect batch of fluffy, golden-brown pancakes. You will learn the best pancake recipe, oven temperature, and silicone mold care tips for consistent results every single time.
There is something magical about waking up on a Saturday morning and walking into a kitchen that smells like warm, buttery pancakes. For years, most of us have been stuck at the stovetop, hovering over a hot skillet, flipping pancakes one by one. It works. But it is slow. It is messy. And let us be honest, it is not always consistent.
Now imagine this. You mix up a simple pancake batter, pour it into silicone molds, slide them into the oven, and walk away. That is right. You walk away. While the oven does all the work, you can sip your coffee, set the table, or even get the kids ready for the day. When you come back, you have a tray full of perfectly shaped, evenly baked, fluffy pancakes ready to go. This is the beauty of making pancakes with silicone molds in the oven, and once you try it, you will never go back to the skillet.
Silicone molds have completely changed the way we think about breakfast. They are flexible, non-stick, and incredibly easy to use. Whether you are a beginner cook or a seasoned home chef, oven-baked pancakes offer a level of convenience and consistency that stovetop cooking simply cannot match. In this guide, we will walk you through everything you need to know. From picking the best silicone bakeware to nailing the perfect pancake recipe, we have got you covered.
Key Takeaways
- Silicone molds make oven-baked pancakes effortless: They are non-stick, flexible, and reusable, so you spend less time cleaning and more time eating.
- Choose the right silicone mold for your needs: Muffin-shaped, round, or character-shaped silicone molds all work great for different pancake styles.
- Master the batter consistency: The right pancake batter thickness ensures your oven pancakes come out fluffy and evenly baked.
- Temperature and timing matter: Baking at the correct oven temperature prevents burnt or undercooked silicone mold pancakes.
- Proper care extends silicone mold life: Cleaning and storing your silicone bakeware correctly keeps it in top shape for years.
- Creative toppings and add-ins elevate your breakfast: Fresh fruits, chocolate chips, and savory options turn simple silicone mold pancakes into a gourmet experience.
- Oven-baked pancakes are a game-changer for busy mornings: You can prep batter ahead and bake multiple batches with minimal effort.
📑 Table of Contents
- Why Use Silicone Molds for Pancakes?
- Choosing the Best Silicone Molds for Oven Pancakes
- The Perfect Pancake Batter for Silicone Molds
- Step-by-Step Guide to Baking Pancakes in Silicone Molds
- Oven Temperature and Baking Tips for Perfect Results
- Caring for Your Silicone Molds
- Creative Ways to Serve Oven-Baked Pancakes
- Frequently Asked Questions
- Conclusion
Why Use Silicone Molds for Pancakes?
If you have never tried baking pancakes in silicone molds before, you might be wondering what the big deal is. Why not just use a regular pan? The answer is simpler than you think. Silicone molds offer a whole range of benefits that make your morning routine easier and your pancakes better.
Non-Stick Performance Without the Hassle
One of the biggest headaches with traditional pancake cooking is sticking. You grease the pan, you wait for the right temperature, and you still end up with torn edges or broken pancakes. Silicone molds solve this problem completely. The material is naturally non-stick, which means your pancakes slide right out with almost no effort. No butter on the sides of the mold. No scraping. No frustration.
This non-stick quality comes from the way silicone is made. It is a smooth, heat-resistant material that food does not cling to. As long as you use a light spray or a tiny bit of oil, your silicone pancake molds will release baked goods effortlessly every time.
Consistent Shape and Size
When you cook pancakes on a stovetop, every single pancake turns out a little different. Some are too thick. Some are too thin. Some have uneven edges. With silicone molds, every pancake comes out the same size and shape. This is especially great if you are making breakfast for a family or hosting a brunch. Your pancakes will look professional and uniform, even if your baking skills are still developing.
Easy Cleanup
Let us talk about cleanup, because that matters just as much as cooking. Stovetop pancake pans can be a pain to wash. Stuck batter, greasy surfaces, and burnt residue all make the job harder. Silicone molds, on the other hand, are dishwasher safe in most cases. Even if you wash them by hand, the smooth surface releases residue easily. A quick rinse and they are ready for the next use.
Versatility in Shapes and Sizes
Silicone molds come in all sorts of shapes and sizes. You can find classic round molds, mini muffin shapes, character designs for kids, and even large rectangular molds for full-sized pancakes. This versatility means you can get creative with your breakfast recipes and keep things interesting morning after morning.
Choosing the Best Silicone Molds for Oven Pancakes
Not all silicone molds are created equal. When you are shopping for the right ones to bake pancakes, there are a few things you need to keep in mind. The wrong mold can lead to uneven baking, poor release, or even safety concerns.
Look for Food-Grade Silicone
Always make sure the silicone molds you buy are labeled as food-grade. This means they are free from harmful chemicals like BPA and are safe for food contact at high temperatures. Look for reputable brands and check the product description for safety certifications. Good-quality silicone bakeware will last for years without degrading or releasing any unwanted substances into your food.
Check the Temperature Rating
Not all silicone molds can handle the same oven temperatures. Most high-quality silicone molds are rated for temperatures between -40°F and 450°F. However, cheaper options may have lower limits. For pancakes, you will typically bake at around 350°F to 375°F, which is well within the safe range for most silicone products. Always check the manufacturer’s guidelines before placing your molds in a hot oven.
Consider the Mold Shape
The shape of your mold affects both the cooking time and the final texture of your pancakes. Here are the most popular options:
- Round muffin molds: These create thick, round pancakes that look like mini cakes. Great for a fun breakfast presentation.
- Standard round molds: Larger round molds produce pancakes similar to what you would make on a stovetop but with more even thickness.
- Character or novelty molds: These are perfect for kids and special occasions. Heart shapes, star shapes, and animal designs add a playful touch.
- Rectangular or square molds: These are ideal for making larger, sliceable pancakes that work well for brunch spreads.
Rigid vs. Flexible Molds
Some silicone molds are very flexible, while others have a sturdier construction. For pancakes, a slightly rigid mold works best. It holds its shape when you pour in the batter and when you move it in and out of the oven. Very floppy molds can spill or warp, which leads to uneven baking. Look for molds with a firm base but flexible sides for the best results.
The Perfect Pancake Batter for Silicone Molds
The batter is the heart of any great pancake, and baking pancakes in silicone molds is no different. But there are a few tweaks you should make to your usual recipe to get the best results in the oven.
A simple pancake batter requires just a few pantry staples:
- 1 cup all-purpose flour
- 1 tablespoon sugar
- 1 teaspoon baking powder
- 1/2 teaspoon baking soda
- 1/4 teaspoon salt
- 1 cup milk (or buttermilk for extra fluffiness)
- 1 egg
- 2 tablespoons melted butter or vegetable oil
- 1 teaspoon vanilla extract (optional)
The biggest mistake people make with oven pancakes is using batter that is too thick or too thin. Your batter should be pourable but not watery. Think of it as the consistency of thick cream. If it is too thick, add a splash of milk. If it is too thin, add a tablespoon of flour. The right consistency ensures your pancakes bake evenly and rise properly inside the mold.
How you mix your batter matters more than you might think. Overmixing develops gluten, which makes pancakes tough and chewy. Instead, mix your dry ingredients and wet ingredients separately, then combine them gently. A few small lumps in the batter are perfectly fine. In fact, they are a sign that you are doing it right. Resist the urge to stir until everything is perfectly smooth.
One of the joys of using silicone molds is that you can easily customize each pancake. Here are some ideas to try:
- Chocolate chip pancakes: Fold in a handful of chocolate chips for a sweet treat.
- Blueberry pancakes: Add fresh or frozen blueberries for a burst of fruity flavor.
- Banana nut pancakes: Mash in half a banana and sprinkle with chopped walnuts.
- Savory herb pancakes: Skip the sugar, add cheese and herbs for a delicious savory option.
- Apple cinnamon pancakes: Stir in diced apples and a teaspoon of cinnamon for a cozy fall flavor.
Step-by-Step Guide to Baking Pancakes in Silicone Molds
Now that you have your molds and your batter ready, it is time to bake. This step-by-step process will walk you through everything from preparation to the finished plate.
Start by preheating your oven to 350°F. This is the sweet spot for most silicone mold pancake recipes. Preheating ensures that the molds heat up evenly from the moment they go in, which leads to consistent baking and a beautiful golden-brown color on top.
Place your silicone molds on a baking sheet. This makes them much easier to handle when they are hot. Lightly spray the inside of each mold with cooking spray or brush with a tiny bit of oil. You do not need a lot. Silicone is naturally non-stick, so a light coating is all it takes.
Use a ladle or a measuring cup to pour the batter into the molds. Fill each cavity about two-thirds full. This leaves enough room for the pancakes to rise as they bake without overflowing. If you are making mini muffins-sized pancakes, a tablespoon or two per mold is usually perfect.
Place the baking sheet with the molds on the center rack of your oven. Bake for 12 to 15 minutes at 350°F. The exact time will depend on the size of your molds and your specific oven. You will know the pancakes are done when the tops are golden brown and a toothpick inserted into the center comes out clean.
Once the pancakes are baked, remove the baking sheet from the oven and let it cool for a few minutes. Silicone molds are heat-resistant, but the pancakes will be hot inside. After a brief cooling period, gently push the pancakes out from the bottom of the mold. They should release easily. If any stick, give the mold a gentle flex and they will pop right out.
Oven Temperature and Baking Tips for Perfect Results
Getting the temperature right is one of the most important factors in making great oven-baked pancakes. Too hot and the outside burns while the inside stays raw. Too cool and the pancakes come out pale and dense.
Most silicone mold pancakes bake best at 350°F. This temperature allows the batter to rise evenly and develop a light, fluffy texture without browning too quickly. If you prefer a more golden, slightly crispier exterior, you can increase the temperature to 375°F, but keep a close eye on them to prevent burning.
Here are some pitfalls that even experienced bakers fall into when making pancakes with silicone molds:
- Overfilling the molds: This causes the batter to spill over and creates a mess in your oven. Always leave room for rising.
- Skipping the preheat: Putting molds into a cold oven leads to uneven baking and longer cook times.
- Opening the oven door too often: Every time you open the door, the temperature drops. This can cause your pancakes to sink or bake unevenly.
- Using too much oil: A little goes a long way with silicone. Excess oil can make the edges greasy.
- Not letting them cool enough: Trying to remove pancakes while they are too hot can cause them to break apart.
Here are some expert tips that will take your silicone mold pancakes to the next level:
- Place a piece of parchment paper on the baking sheet under the molds. This prevents any drips from burning onto the sheet.
- Rotate the baking sheet halfway through baking for even browning.
- Let the batter rest for five minutes before pouring. This allows the baking powder to activate and creates fluffier results.
- Use a piping bag or squeeze bottle for precise pouring, especially with smaller molds.
- Brush the tops of the pancakes with a little melted butter right after baking for extra flavor and shine.
Caring for Your Silicone Molds
Your silicone molds are an investment in your kitchen. With proper care, they will last for years and continue to produce perfect pancakes every time. Here is how to keep them in great shape.
Most silicone molds are dishwasher safe, but hand washing is always a good practice. Use warm water and mild dish soap. A soft sponge or cloth is all you need. For stubborn residue, soak the molds in warm soapy water for a few minutes before scrubbing gently. Avoid using abrasive scrubbers or steel wool, as these can scratch the surface and reduce the non-stick performance over time.
When it comes to storage, silicone molds are incredibly flexible, which makes them easy to stack or fold up. Store them in a cool, dry place away from direct sunlight. Prolonged exposure to heat or UV light can cause the silicone to degrade. A kitchen drawer or a cabinet shelf works perfectly.
Even with excellent care, silicone molds will eventually show signs of wear. If you notice tearing, sticky residue that will not wash off, or a loss of non-stick performance, it is time to replace them. Fortunately, good silicone molds are affordable, so swapping them out is never a big deal.
Creative Ways to Serve Oven-Baked Pancakes
One of the best things about silicone mold pancakes is that they look fun and are easy to serve in creative ways. Whether you are making breakfast for yourself or hosting a weekend brunch, presentation matters.
Keep it simple and classic with a drizzle of maple syrup, a pat of butter, and a dusting of powdered sugar. These timeless toppings never disappoint and are perfect for kids and adults alike.
Top your pancakes with sliced strawberries, fresh blueberries, or banana rounds. Add a dollop of whipped cream for a light, airy finish that balances the warmth of the pancakes beautifully.
Pancakes do not have to be sweet. Try serving your oven-baked pancakes with a sprinkle of shredded cheese, chopped chives, and a side of scrambled eggs. This savory twist works wonderfully for brunch and is a hit with guests who want something different.
You can prepare pancake batter the night before and store it in the fridge. In the morning, simply pour it into the molds and bake. Cooked pancakes also freeze well. Let them cool completely, place them in a single layer on a baking sheet to freeze, then transfer to a freezer bag. Reheat in the oven at 300°F for about 5 minutes, and they taste almost as fresh as the day you made them.
Frequently Asked Questions
Can You Use Any Silicone Mold for Baking Pancakes?
Most food-grade silicone molds work well for baking pancakes, but it is best to choose molds that are rated for oven-safe temperatures up to at least 375°F. Avoid molds with thin or flimsy construction, as they may warp in the oven. Thick-walled, rigid silicone molds hold their shape better and produce more consistent results.
Do Silicone Mold Pancakes Taste Different from Stovetop Pancakes?
The taste is very similar, but the texture can be slightly different. Oven-baked pancakes tend to be more uniform in texture and slightly lighter throughout, since the heat surrounds the batter evenly. Stovetop pancakes often have a slightly crispier exterior and a softer interior. Both are delicious, and the difference is subtle enough that most people prefer the convenience of oven baking.
What Is the Best Way to Grease Silicone Molds?
A light spray of cooking oil or a thin brush of melted butter works best for greasing silicone molds. You do not need a lot. The natural non-stick surface of silicone means that even a minimal amount of grease ensures easy release. Avoid using too much oil, as this can cause the edges of your pancakes to become greasy.
Can You Make Pancake Mix in Advance and Store It?
Absolutely. You can mix your dry ingredients the night before and store them in an airtight container. In the morning, simply add the wet ingredients, stir, and pour into your silicone molds. This saves time and makes weekday mornings much easier. The batter should be used within 24 hours for the best rise and fluffiness.
How Do You Know When Oven Pancakes Are Done?
Oven pancakes are done when the tops are golden brown and a toothpick inserted into the center of the thickest pancake comes out clean or with just a few moist crumbs. Most batches bake in 12 to 15 minutes at 350°F, but oven temperatures can vary, so it is always a good idea to check a couple of minutes before the recommended time.
Are Silicone Molds Safe for High-Temperature Oven Use?
Yes, most high-quality silicone molds are safe for oven use up to 450°F. Always check the manufacturer’s instructions before using any silicone product in the oven. Avoid placing silicone molds directly on oven racks without a baking sheet underneath, as the flexible material can slump and cause spills.
Conclusion
Making pancakes with silicone molds in the oven is one of the simplest upgrades you can make to your breakfast routine. It saves time, reduces mess, and delivers consistent, beautiful results every single time. Whether you are cooking for one or feeding a whole family, silicone molds take the guesswork out of pancake making and let you focus on what really matters, enjoying a delicious meal.
The right silicone bakeware, a tried-and-true pancake recipe, and a little bit of patience are all you need to get started. From choosing the perfect mold shape to nailing the ideal oven temperature, every step in this process is designed to be easy and rewarding. Once you see how simple and satisfying oven-baked pancakes can be, you will wonder why you ever bothered with the stovetop at all.
So go ahead. Grab your silicone pancake molds, mix up a batch of batter, and let your oven do the hard work. Your mornings are about to get a whole lot better, one perfectly baked pancake at a time.