How To Make Perfect Ribs In The Oven With These Tips
Making perfect ribs in the oven is easier than you think. With the right rib rub, oven temperature, and a little patience, you can create fall-off-the-bone tender ribs that rival any barbecue joint. This guide walks you through every step, from choosing the best rack of ribs to nailing the caramelized bark that makes oven ribs so irresistible.
There is something magical about how to make perfect ribs in the oven. The kitchen fills with a smoky, sweet aroma. The meat slowly transforms into tender, juicy perfection. And when you finally bite into that first rack, you know every minute of waiting was worth it.
Oven ribs might sound simple, but there is real craft behind getting them right. Too hot, and the meat dries out. Too fast, and you end up with tough, chewy bites that nobody enjoys. The good news is that once you understand a few basic principles, you can make bbq ribs in your oven that taste like they came straight off a smoker.
This guide covers everything you need. From picking the right rack of ribs to nailing the perfect oven temperature, we have got you covered. Whether you are a beginner or a seasoned cook looking to refine your technique, these tips will help you serve tender ribs that your whole family will love.
Key Takeaways
- Low and slow is the secret: Cooking ribs at 275°F to 300°F ensures tender, juicy meat that pulls away from the bone effortlessly.
- Choose the right rack: Baby back ribs cook faster, while spare ribs offer more flavor and fat for a richer taste.
- Dry rub matters: A well-balanced rib seasoning with brown sugar, paprika, and garlic powder builds deep flavor before the ribs even hit the oven.
- Use the foil wrap method: Wrapping ribs in foil partway through cooking locks in moisture and speeds up the tenderizing process.
- Always use a meat thermometer: Internal temperature of 195°F to 205°F is the sweet spot for perfectly cooked pork ribs.
- Glaze at the end: A sticky rib glaze applied in the last 15 to 20 minutes adds a beautiful finish and bold flavor.
- Rest your ribs: Letting them rest for 10 minutes after cooking redistributes juices for a better bite every time.
📑 Table of Contents
- Why Oven Ribs Deserve a Spot on Your Dinner Table
- Choosing the Best Rack of Ribs for Oven Cooking
- The Perfect Rib Rub and Seasoning
- Step-by-Step Guide to Making Perfect Ribs in the Oven
- Tips for Fall-Off-the-Bone Tenderness
- Common Mistakes That Ruin Oven Ribs
- Expert Insights on Mastering Oven Ribs
- Conclusion
Why Oven Ribs Deserve a Spot on Your Dinner Table
Many people think ribs are only for the backyard smoker or the neighborhood barbecue pit. But oven ribs have some real advantages that make them worth trying at home.
Consistent Heat, Consistent Results
When you use a smoker, the temperature can swing. Wind, fuel, and weather all play a role. An oven gives you steady, even heat from every direction. This means your pork ribs cook more uniformly, with no hot spots or cool zones to worry about.
Convenience Without Compromise
Not everyone has a smoker or wants to spend hours outside in the heat. The oven brings the same low-and-slow magic right into your kitchen. You can monitor the ribs recipe closely, adjust as needed, and still achieve that smoked ribs texture and flavor profile.
Great for Any Season
Rain or shine, hot or cold, the oven works year-round. You do not need to wait for a summer cookout. How to make perfect ribs in the oven is a skill that pays off every single time you fire up the range, no matter what the weather says.
Choosing the Best Rack of Ribs for Oven Cooking
The journey to perfect ribs in the oven starts at the butcher counter. Your choice of meat sets the foundation for everything that follows. Not all ribs are the same, and each type brings something different to the table.
Baby Back Ribs vs. Spare Ribs
Baby back ribs come from the top of the ribcage, near the spine. They are smaller, leaner, and cook faster. These ribs have a mild, tender flavor that many people love. They are a great choice if you want fall-off-the-bone texture without a long cook time.
Spare ribs come from the lower belly of the pig. They are larger, fattier, and packed with more flavor. They take a bit longer to cook, but the extra fat renders down and creates incredibly juicy, rich meat. If you want bold, deep flavor, spare ribs are hard to beat.
St. Louis Style Ribs
St. Louis style ribs are spare ribs that have been trimmed to create a neat, uniform rectangular shape. They cook evenly and look beautiful when served. Many pitmasters prefer them for oven ribs because the even shape makes it easy to wrap and unwrap during cooking.
Comparison Table: Rib Types for Oven Cooking
| Rib Type | Cook Time | Flavor Profile | Best For |
|---|---|---|---|
| Baby Back Ribs | 2.5 to 3 hours | Mild, lean, tender | Quick cooks, tender texture |
| Spare Ribs | 3.5 to 4.5 hours | Rich, fatty, bold | Deep flavor, slow cooking |
| St. Louis Style | 3 to 4 hours | Balanced, savory | Even cooking, presentation |
| Beef Ribs | 4 to 6 hours | Hearty, beefy, robust | Big flavor, special occasions |
What to Look for When Buying
No matter which type you choose, look for a few key things. The meat should have a nice pink color. The fat layer should be white and firm, not yellow or greasy. Avoid ribs where the meat has pulled far away from the bone, as this suggests they have been sitting too long. And always check the date if you are buying pre-packaged bone-in ribs.
The Perfect Rib Rub and Seasoning
A great rib rub is the soul of how to make perfect ribs in the oven. It builds the flavor base that every bite delivers. The good news is that making a homemade rib seasoning is simple, affordable, and way better than anything from a jar.
Building a Balanced Rub
A great bbq ribs rub balances sweet, smoky, salty, and spicy elements. Here is a simple framework to follow:
- Brown sugar: Adds sweetness and helps create that beautiful caramelized bark.
- Paprika: Provides color, mild sweetness, and a subtle smoky depth.
- Garlic powder: Adds savory richness that complements the meat.
- Onion powder: Boosts the umami flavor and rounds out the seasoning.
- Cayenne pepper: Adds a gentle kick of heat without overwhelming the palate.
- Salt and black pepper: The foundation of any great seasoning blend.
- Cumin: Adds a warm, earthy note that elevates the entire flavor profile.
How Much Rub to Use
Use about one tablespoon of rub per pound of meat. Apply it generously on all sides, pressing it gently into the surface. The rub should stick without sliding off. For the best results, apply the rub at least one hour before cooking, or even overnight in the refrigerator. This gives the rib seasoning time to penetrate the meat and work its magic.
Quick Tip: The Mustard Binder
Before applying your rub, spread a thin layer of yellow mustard over the ribs. Do not worry, it does not taste like mustard when the ribs are done. The mustard acts as a glue that helps the rib rub adhere to the meat. It also adds a subtle tang that enhances the overall flavor.
Step-by-Step Guide to Making Perfect Ribs in the Oven
Now comes the fun part. This is where you put everything together and bring your ribs recipe to life. Follow these steps carefully, and you will be rewarded with tender ribs that have a gorgeous glaze and a perfectly textured bark.
Step 1: Prep the Ribs
Start by removing the membrane from the back of the rack of ribs. This thin, papery layer can be tough and chewy, and it blocks your rib seasoning from reaching the meat. Use a butter knife to loosen one corner, then grab it with a paper towel and peel it off. It should come away cleanly and easily.
Next, pat the ribs dry with paper towels. Moisture on the surface can prevent the rub from sticking and can interfere with bark formation. A dry surface means better caramelized bark and more flavor.
Step 2: Apply the Rub
Generously coat all sides of the ribs with your rib rub. Massage it in with your hands. Make sure every inch is covered. Place the seasoned ribs on a sheet of plastic wrap and refrigerate for at least one hour, or up to overnight for maximum flavor absorption.
Step 3: Preheat the Oven
Set your oven to 275°F. This low oven temperature is the key to how to make perfect ribs in the oven. It allows the collagen in the meat to break down slowly, turning tough connective tissue into silky, tender goodness. Do not rush this step by turning the heat up. High heat dries out the meat and defeats the purpose.
Step 4: Wrap in Foil
Place the ribs meat-side down on a large sheet of heavy-duty foil. Add a splash of apple cider vinegar or a small amount of apple juice to the foil. This adds moisture and a subtle tang that keeps the meat from drying out. Wrap the ribs tightly, sealing the edges so no steam escapes.
Place the wrapped ribs on a baking sheet and put them in the oven. Cook for about two hours at this stage. The trapped steam inside the foil creates a gentle braising effect that tenderizes the meat beautifully.
Step 5: Unwrap and Glaze
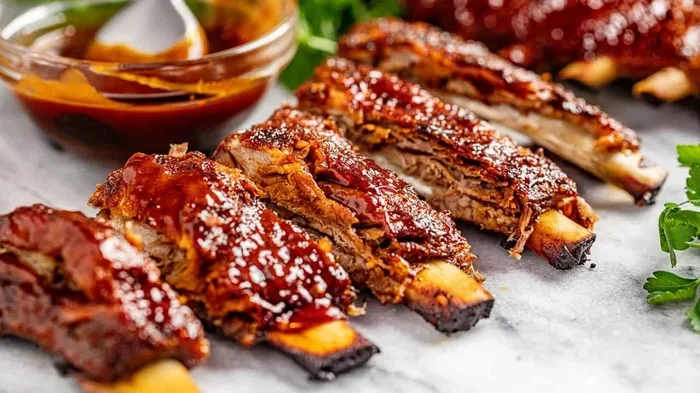
After two hours, carefully remove the ribs from the oven. Unwrap them and discard the liquid in the foil. Now it is time for the rib glaze. Brush a thin layer of your favorite barbecue sauce over all sides of the ribs. You can use a store-bought sauce or make a homemade one with ketchup, molasses, vinegar, and a touch of apple cider vinegar.
Increase the oven temperature to 375°F or 400°F for this final stage. Return the unwrapped ribs to the oven and cook for another 15 to 20 minutes. This higher heat caramelizes the glaze and develops a sticky, slightly charred exterior that looks and tastes incredible.
Step 6: Rest and Serve
Remove the ribs from the oven and let them rest for 10 minutes before cutting. This resting period allows the juices to redistribute throughout the meat. Cutting too early releases those juices onto the cutting board instead of keeping them where they belong, inside the meat.
Slice between the bones to separate individual ribs. Serve with extra barbecue sauce on the side, coleslaw, cornbread, or whatever sides you love.
Tips for Fall-Off-the-Bone Tenderness
Everyone wants ribs that are so tender they practically fall off the bone. Here are some expert-tested tips to help you get there every time you make oven ribs.
Use a Meat Thermometer
This is the single most important tool for how to make perfect ribs in the oven. Do not rely on time alone. The target internal temperature is 195°F to 205°F. At this range, the collagen has fully broken down and the meat is perfectly tender. A cheap instant-read thermometer takes the guesswork out entirely.
Embrace the 3-2-1 Method
The 3-2-1 method is a popular technique for smoked ribs that works beautifully in the oven too. You smoke or bake the ribs for three hours unwrapped, then two hours wrapped in foil, then one hour unwrapped with glaze. This layered approach builds flavor and texture step by step. Adjust the times based on your rib type and thickness.
Do Not Skip the Wrap
Some people skip the foil wrap to get a crunchier bark. That is fine if you prefer that texture. But for fall-off-the-bone ribs, the foil wrap is essential. It traps steam and creates a mini-braising environment that softens the meat fibers and melts the connective tissue.
Keep the Oven Door Closed
Every time you open the oven door, heat escapes and the temperature drops. Try to resist the urge to peek too often. Trust the process. Open the door only when it is time to check the temperature or apply the glaze. Consistent oven temperature is the backbone of great ribs.
Let the Ribs Come to Room Temperature
Take the ribs out of the refrigerator about 30 minutes before cooking. This small step helps the meat cook more evenly from edge to center. Cold meat going into a hot oven creates temperature gradients that lead to uneven cooking.
Common Mistakes That Ruin Oven Ribs
Even experienced cooks can make mistakes when making oven ribs. Knowing what to avoid saves you time, money, and disappointment.
Cooking at Too High a Temperature
This is the number one mistake people make. Cranking the oven to 350°F or higher might save time, but it dries out the meat before the collagen has a chance to break down. Low and slow is not just a catchy phrase. It is the science behind tender ribs. Stick to 275°F for the best results.
Not Removing the Membrane
The membrane on the back of the rib rack is tough and chewy. It also blocks seasoning from reaching the meat. Some people skip this step because it seems tedious. But taking five minutes to remove it makes a noticeable difference in both texture and flavor.
Over-Saucing Too Early
Barbecue sauce contains sugar, which burns easily at high heat. If you apply the glaze too early in the cooking process, it will scorch and turn bitter. Always apply the rib glaze in the last 15 to 20 minutes of cooking, at the higher temperature setting.
Cutting Into the Ribs Too Soon
It is tempting to cut into the ribs the moment they come out of the oven. Resist that urge. The resting period is critical. Cutting too early releases juices and leaves the meat drier than it should be. Wait at least 10 minutes and let the pork ribs relax.
Using Too Little or Too Much Rub
Too little rub means bland ribs. Too much rub can create a thick, pasty crust that masks the flavor of the meat. Find the right balance. A generous but even coat covers the surface without burying it under a mountain of seasoning.
Expert Insights on Mastering Oven Ribs
We spoke with pitmasters and home cooks who have spent years perfecting their oven ribs technique. Here is what they had to say.
Start with Quality Meat
No amount of seasoning or technique can compensate for poor-quality ribs. Look for locally sourced, well-raised pork or beef. The better the starting meat, the better the final result. A great ribs recipe begins with great ingredients.
Experiment with Wood Chips for Smoke Flavor
If you want to add a smoky dimension to your oven ribs, try soaking wood chips and placing them in a foil pouch on the oven floor. Hickory, applewood, and cherry chips all work beautifully. This simple trick adds a layer of complexity that elevates your bbq ribs to the next level.
Patience Is the Secret Ingredient
The most common thread among every great rib cook is patience. How to make perfect ribs in the oven requires you to resist the urge to speed things up. Low heat and long cook times transform tough cuts into melt-in-your-mouth masterpieces. Trust the process and let the oven do the work.
Conclusion
How to make perfect ribs in the oven is a skill anyone can learn. With the right rack of ribs, a well-balanced rib rub, and a little patience, you can create fall-off-the-bone tender ribs that will impress everyone at the table. The key is to keep the oven temperature low, wrap the ribs at the right time, and finish with a beautiful glaze.
Remember that great ribs come from understanding the process. Do not rush the cook. Use a meat thermometer to track progress. Avoid common mistakes like skipping the membrane or adding sauce too early. And most importantly, enjoy the experience. Cooking ribs is as much about the journey as it is about the final plate.
Now that you have all the tools and tips, it is time to put them into action. Fire up your oven, grab a rack of ribs, and start your journey toward perfect oven ribs today. Your family and your taste buds will thank you.
Frequently Asked Questions
What is the best oven temperature for ribs?
The ideal oven temperature for ribs is 275°F for the main cook. This low heat breaks down collagen slowly and creates fall-off-the-bone tender ribs. Raise the temperature to 375°F or 400°F for the final 15 to 20 minutes to caramelize the glaze.
How long does it take to make ribs in the oven?
Most pork ribs take between 2.5 and 4 hours in the oven, depending on the type and size of the rack. Baby back ribs cook faster at about 2.5 to 3 hours. Spare ribs and beef ribs may need 3.5 to 6 hours. Always use a meat thermometer to check doneness rather than relying on time alone.
Do I need to wrap ribs in foil when cooking them in the oven?
Wrapping ribs in foil is highly recommended for oven ribs. The foil traps steam, which braises the meat and keeps it juicy. This step is especially important for achieving tender ribs with a melt-in-your-mouth texture. However, if you prefer a crunchier bark, you can skip the wrap and cook uncovered the entire time.
Can I use beef ribs in the oven?
Absolutely. Beef ribs work wonderfully in the oven and offer a richer, heartier flavor compared to pork. They take longer to cook, usually 4 to 6 hours, because of their size and thicker cuts. Follow the same low-and-slow approach, and use a meat thermometer to ensure they reach the ideal internal temperature of 200°F to 205°F.
What is the best way to store leftover oven ribs?
Let the ribs cool completely, then store them in an airtight container in the refrigerator for up to 4 days. You can also freeze cooked ribs for up to 3 months. Reheat gently in the oven at 250°F wrapped in foil to keep them moist. Avoid microwaving, as it can dry out the meat quickly.
How do I know when ribs are done?
The best way to tell is by using a meat thermometer. The internal temperature should reach 195°F to 205°F. You can also check by twisting a bone gently. If it wiggles freely and the meat has pulled back from the edges, your oven ribs are ready. The meat should feel tender and springy, not tough or rubbery.