How To Make Rib Tips In The Oven With Crispy Edges
Learn how to make rib tips in the oven with perfectly crispy edges using this simple, step-by-step recipe. These oven-baked rib tips turn out tender, juicy, and full of flavor every single time. You do not need a smoker or special equipment. Just your oven, a few ingredients, and a little patience. This rib tips recipe is perfect for beginners and BBQ lovers alike.
There is nothing quite like biting into a batch of rib tips that are crispy on the outside and tender on the inside. These small, meaty pieces of pork are packed with flavor and make an amazing appetizer or main dish. Whether you are hosting a party or just craving a delicious snack, oven-baked rib tips hit the spot every time.
Many people think you need a smoker or special gear to get great rib tips. That is simply not true. Your home oven can do wonders with the right approach. In this guide, you will learn exactly how to make rib tips in the oven with crispy edges. The process is simple, the results are outstanding, and you will want to make these again and again.
Whether you are new to cooking pork or a seasoned grill master, this recipe will help you create homemade rib tips that rival any BBQ joint. We will walk you through every step, from choosing the right cut to getting that perfect crispy edges finish. Let us get started.
Key Takeaways
- Oven-baked rib tips are easy to make at home without a smoker
- Low and slow cooking is the secret to tender, juicy rib tips
- Crispy edges come from a high-heat finish at the end
- Homemade rib tips taste better than store-bought every time
- Proper seasoning and a good BBQ sauce make all the difference
- Pork rib tips are a budget-friendly cut full of flavor
- Resting the meat after cooking keeps it juicy and tender
📑 Table of Contents
What Are Rib Tips and Why Oven-Bake Them
Rib tips are the small, meaty pieces that are cut off the ends of spare ribs or baby back ribs. They are sometimes called pork belly tips because they have a similar texture and fat content. These little cuts are full of flavor, but they can be tricky to cook if you do not know what you are doing.
Many people buy pork rib tips from their local butcher or grocery store. They are often cheaper than full racks of ribs, which makes them a great option for feeding a crowd. You get all the rich, porky flavor without the high price tag. Smoked rib tips are popular at BBQ joints, but baking them in the oven gives you similar results at home.
Understanding Rib Tips
Rib tips come from the sternum end of the rib cage. They contain cartilage, meat, and a good amount of fat. This combination is what makes them so juicy when cooked correctly. The fat renders down during cooking, leaving you with tender, melt-in-your-mouth meat.
If you have never tried oven-baked rib tips before, you are in for a treat. They are different from full ribs because they have more cartilage and a higher fat-to-meat ratio. This might sound like a downside, but it is actually what gives them their unique texture and rich flavor. The cartilage becomes soft and chewy, adding a satisfying bite that you do not get from regular baked ribs.
Slow cook rib tips in the oven at a low temperature to give the fat time to render. This process breaks down the connective tissue and creates a texture that is both crispy on the outside and succulent on the inside. It is the same principle behind great BBQ rib tips, just adapted for your home kitchen.
Why the Oven Works Great
You might wonder why you should use an oven instead of a grill or smoker. The oven gives you more control over the temperature. You can set it and forget it, which is perfect for busy people who still want to make great food. There is no need to monitor charcoal or manage flame flare-ups.
Baking rib tips in the oven also means you do not have to worry about uneven heat from charcoal or gas. Your oven provides consistent, even heat from all sides. This helps the rib tips cooking time be more predictable and the results more reliable. You get a beautiful bark on every piece, not just the ones facing the flame.
Another big advantage is that you can make oven ribs any time of year. It does not matter if it is raining or freezing outside. Your oven works in any season, which means you can enjoy crispy rib tips whenever the craving hits. Rainy days are no longer an excuse to skip your favorite pork rib tips oven recipe.
Quick Tips:
- Buy pork rib tips from a trusted butcher for the best quality
- Look for pieces that have a good ratio of meat to fat
- If you cannot find rib tips, ask your butcher to cut them from a spare rib rack
- Fresh rib tips are always better than frozen for texture and flavor
Ingredients You Need for Perfect Rib Tips
Having the right ingredients is the foundation of any great recipe. For rib tips and sauce that taste amazing, you need a few key items. The good news is that none of these are hard to find, and most people already have them in their kitchen.
Dry Rub Ingredients
A good dry rub is what gives your rib tips seasoning that deep, complex flavor. Here is what you will need:
- Brown sugar – adds sweetness and helps create a beautiful bark
- Paprika – gives a smoky, slightly sweet flavor
- Garlic powder – adds a savory depth
- Onion powder – brings a subtle sweetness
- Cumin – adds warmth and earthiness
- Black pepper – provides a gentle heat
- Salt – essential for bringing out all the flavors
- Cayenne pepper – optional, for those who like a little kick
You can adjust these ingredients based on your taste. If you prefer a sweeter rib tips recipe, add more brown sugar. If you like it spicy, increase the cayenne. The beauty of making homemade rib tips is that you control the flavor profile completely.
For an extra layer of flavor, add a teaspoon of mustard powder to your rub. It adds a subtle tang that pairs beautifully with pork. Some people also like to add a pinch of celery salt for an old-school BBQ flavor. Experiment and find what works best for your taste buds.
Sauce and Glaze Options
While the dry rub does a lot of heavy lifting, a good sauce adds another layer of flavor. You have several options:
- Classic BBQ sauce – sweet, tangy, and smoky
- Honey glaze – adds a sticky, caramelized finish
- Hot sauce mix – for those who love heat
- Teriyaki-style glaze – a sweet and savory alternative
Brush your rib tips with glaze during the last 15 minutes of cooking. This gives them a beautiful shine and a sticky, flavorful coating. You can also serve extra sauce on the side for dipping.
Here is a quick comparison of sauce options for your rib tips with glaze:
| Sauce Type | Flavor Profile | Best For | Apply When |
|---|---|---|---|
| Classic BBQ | Sweet, tangy, smoky | Traditional flavor | Last 15 minutes |
| Honey Glaze | Sweet, sticky, caramelized | Crispy, candied edges | Last 10 minutes |
| Hot Sauce Mix | Spicy, vinegary, bold | Heat lovers | Last 15 minutes |
| Teriyaki Glaze | Sweet, savory, umami | Non-traditional twist | Last 10 minutes |
No matter which sauce you choose, always apply it in the final stage of cooking. Sugar burns easily, and adding sauce too early will result in a bitter, blackened coating. Keep it simple and let the dry rub do the heavy work during the long cook.
Step-by-Step Oven Rib Tips Recipe
Now for the fun part. Here is exactly how to make rib tips in the oven with crispy edges. Follow these steps and you will have restaurant-quality results at home. This method works every time if you follow it closely.
Step 1: Prep the Rib Tips
Start by patting your pork rib tips dry with paper towels. This is an important step because dry meat browns better than wet meat. Remove any loose pieces of cartilage if they bother you, but leave most of it in. The cartilage adds texture and flavor that makes rib tips special.
Cut the rib tips into uniform pieces if they are very large. This helps them cook evenly. You want each piece to be roughly the same size so they all finish at the same time. Uneven pieces mean some will be overcooked while others are still underdone.
Place the trimmed and cut rib tips on a large cutting board. If you are cooking a big batch, you may need to work in stages. Make sure your oven rack has enough space for all the pieces with good air circulation around each one.
Step 2: Apply the Seasoning
Mix all your dry rub ingredients together in a small bowl. Sprinkle the rub generously over all sides of the rib tips. Use your hands to press the seasoning into the meat. This helps it stick and creates a flavorful crust that will become your crispy edges.
Let the seasoned rib tips sit at room temperature for about 30 minutes. This allows the flavors to penetrate the meat. It also helps the surface dry out a bit, which is key for getting crispy crispy edges later. Do not skip this step. Room temperature meat cooks more evenly than cold meat straight from the fridge.
Quick Tips:
- Make the rub the night before and store it in a jar for quick prep
- Use about one tablespoon of rub per pound of rib tips
- Be generous with the salt, but balance it with the sweetness of brown sugar
- Wear gloves when mixing and applying the rub to keep your hands clean
Step 3: Low and Slow Cooking
Preheat your oven to 275°F. Line a baking sheet with aluminum foil and place a wire rack on top. This setup allows air to circulate around the meat, which promotes even cooking. The foil makes cleanup a breeze since all the drips stay on the pan.
Place the rib tips on the rack and put the pan in the oven. Cook for about 2.5 to 3 hours. The rib tips cooking time depends on the size of your pieces and your oven. You know they are done when the internal temperature reaches 200°F and the meat is tender and pulls away from the bone easily.
Resist the urge to open the oven door frequently. Every time you do, the temperature drops and it takes longer to cook. Trust the process and let the oven do its work. Check on them only once or twice during the entire cook.
Some people like to add a small pan of water to the bottom of the oven. This keeps the environment humid and prevents the meat from drying out too much. It is a small trick that makes a noticeable difference in the final texture of your oven-baked rib tips.
Step 4: The Crispy Finish
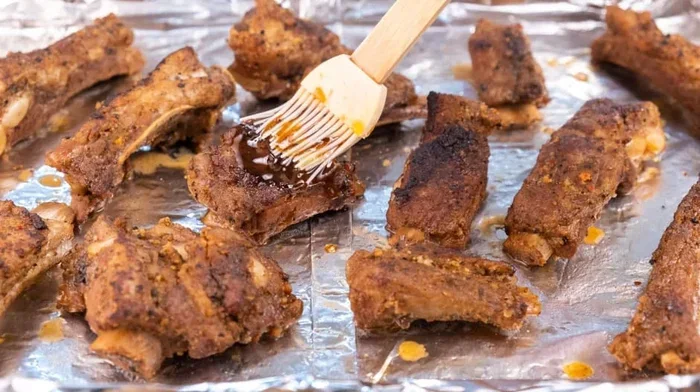
This is the step that makes all the difference. After the low and slow cook, increase your oven temperature to 400°F. Remove the rib tips from the oven and brush them with your favorite BBQ sauce or glaze.
Put the rib tips back in the oven for 10 to 15 minutes. Watch them closely. You want the edges to get crispy and caramelized without burning. The high heat melts the sugars in the sauce and creates that beautiful, crunchy exterior. Keep an eye on them because they can go from perfect to burnt in just a couple of minutes.
Remove the crispy rib tips from the oven and let them rest for 5 minutes. This allows the juices to redistribute throughout the meat. Cutting too soon will cause the juices to run out, leaving you with dry rib tips. A little patience goes a long way here.
Quick Tips:
- Set a timer for the final 10 minutes so you do not forget about them
- Use a silicone brush for an even coat of sauce
- If you like extra sauce on the side, warm it up while the rib tips finish
- For extra crispy edges, broil on high for the last 2 minutes (watch closely)
How to Get Crispy Edges on Your Rib Tips
The whole point of this recipe is to get those crispy, caramelized edges. It is what separates good rib tips from great ones. It is the texture that makes people reach for seconds. Here are the techniques that will help you achieve that perfect crunch every time.
Temperature Matters
The two-stage cooking method is the secret to crispy edges. You start with a low temperature to cook the meat through gently. Then you finish with a high temperature to crisp up the outside. This approach works because the low heat renders the fat slowly, while the high heat caramelizes the surface sugars quickly.
If you try to cook at a high temperature the whole time, the outside will burn before the inside is done. If you cook at a low temperature the whole time, you will get tender meat but no crispy edges. The two-stage method gives you the best of both worlds. It is the difference between decent oven ribs and absolutely incredible ones.
Think of it like baking a perfect potato. You would not roast a potato at 450°F for 30 minutes and expect it to be cooked through. You would start low and finish high. The same logic applies to rib tips. Patience in the early stage pays off big time at the end.
Wire Rack vs. Pan
Using a wire rack is one of the most important rib tips tips I can share. When you place the meat directly on a pan, it sits in its own juices and steams. This prevents the bottom from getting crispy. You end up with soggy bottoms and perfectly crispy tops.
A wire rack lifts the meat off the surface and allows hot air to flow all around it. This means every side gets crispy, not just the top. If you do not have a wire rack, you can use a cooling rack placed inside a baking sheet. The result is the same. The investment in a simple wire rack pays off every time you make crispy rib tips.
Quick Tips:
- Do not crowd the rack. Leave space between each piece for air flow
- If you do not have a wire rack, use a broiler pan with the raised grid
- Flip the rib tips once halfway through for even crispiness on all sides
Expert Insights
Chef Maria Lopez, a BBQ competition winner, says the key to crispy edges is patience. “Do not rush the low and slow phase,” she explains. “The fat needs time to render out. When you then crank up the heat, that fat has already melted away, and the surface dries out enough to crisp up beautifully.”
Another expert tip is to use a small amount of baking powder in your dry rub. This alkaline ingredient raises the pH of the meat surface, which accelerates the Maillard reaction. That is the chemical reaction that creates browning and crispiness. Just a tiny amount makes a big difference. Many competition pitmasters swear by this trick for getting the perfect bark on their BBQ rib tips.
Chef James Turner, a pitmaster with over 15 years of experience, adds this advice: “Always pat your meat dry before the final bake. Surface moisture is the enemy of crunch. If your crispy edges are not turning out, check how wet the surface is before the high-heat finish.”
Common Mistakes to Avoid When Baking Rib Tips
Even with a great recipe, mistakes can happen. Here are the most common errors people make when baking rib tips in the oven and how to avoid them. Learning from these mistakes will save you a lot of frustration and wasted ingredients.
Overcooking the Meat
Overcooking is the number one enemy of great rib tips. When you cook them too long, the meat dries out and becomes tough. The fat renders away completely, leaving you with something that tastes more like jerky than tender pork. Nobody wants that.
To avoid this, use a meat thermometer. Pull your pork rib tips when the internal temperature reaches 200°F to 205°F. This is the sweet spot where the collagen has broken down, making the rib tips tender and juicy. Check the temperature early and often during the last hour of cooking. Every oven is different, and your rib tips cooking time may vary.
If you do overcook them slightly, do not throw them away. Slice them thin and use them in tacos or sandwiches. Overcooked rib tips can still be delicious when used in the right recipe.
Skipping the Resting Period
It is tempting to cut into your oven ribs as soon as they come out of the oven. Resist that urge. Resting allows the juices to settle back into the meat. If you cut too soon, all those flavorful juices run out onto the cutting board instead of staying in the meat.
Let your rib tips rest for at least 5 minutes. Tent them loosely with foil to keep them warm. This small wait makes a huge difference in the final texture and juiciness. The carryover cooking during this rest also brings the internal temperature up slightly, finishing the job perfectly.
Using Too Much Sauce Too Early
Sugar burns. This is the main reason you should not add sauce too early in the cooking process. If you brush on BBQ sauce at the beginning, it will burn and turn bitter by the time the meat is done. You will end up with blackened, unpleasant-tasting rib tips.
Add your sauce or glaze only during the last 10 to 15 minutes of cooking. This gives the sugars time to caramelize without burning. You get a sweet, sticky coating without any bitterness. The timing of your sauce application is one of the most important rib tips tips you will ever learn.
Not Letting the Meat Dry
Moisture is the enemy of crispiness. If you put wet rib tips in the oven, they will steam instead of roast. This means no crispy edges, no matter how long you cook them. This is one of the most overlooked mistakes in home cooking.
Always pat your rib tips dry before seasoning. And after they come out of the fridge to rest at room temperature, pat them dry again. This simple step removes surface moisture and sets you up for a better finish. It takes just a few seconds but makes a real difference in the final result.
Common Mistakes at a Glance:
- Overcooking – Use a thermometer and pull at 200°F to 205°F
- Skipping rest time – Always let meat rest for at least 5 minutes
- Adding sauce too early – Only apply glaze in the last 10 to 15 minutes
- Wet surface – Pat meat dry before seasoning and again before the final bake
- Crowding the pan – Leave space between pieces for even air circulation
Best Ways to Serve Oven-Baked Rib Tips
Your crispy rib tips are done and looking beautiful. Now the question is: how do you serve them? There are so many fun and delicious ways to enjoy these little bites of pork perfection. Serving them the right way can turn a simple dish into a memorable meal.
Pairing with Sauces
Rib tips are incredibly versatile when it comes to sauces. Here are some popular options:
- Classic tangy BBQ sauce – the traditional choice that complements the smoky rub
- Honey mustard dip – sweet and tangy with a nice kick
- Vinegar-based sauce – thin and sharp, cuts through the richness of the pork
- Sriracha mayo – creamy with a spicy kick for bold flavor lovers
Set out a few sauce options and let your guests choose their favorite. This makes for a fun and interactive serving experience at any gathering. People love having options, and it adds a nice touch to your table.
Side Dishes That Go Great
While rib tips can stand on their own, they pair wonderfully with certain sides. Here are some ideas that round out the meal perfectly:
- Coleslaw – the cool, crunchy texture balances the rich, crispy meat
- Baked beans – a classic BBQ side that fits right in with the theme
- Cornbread – sweet and crumbly, perfect for sopping up sauce
- Mac and cheese – creamy comfort food that pairs well with pork
- Grilled corn on the cob – a seasonal favorite that complements the smoky flavors
- Pickled vegetables – the acidity cuts through the richness and refreshes the palate
Rib tips also make an excellent rib tips appetizer for parties. Serve them on a platter with toothpicks and a variety of dipping sauces. Your guests will love them, and you will get all the credit for a great spread. They are perfect for game day, holidays, or any casual gathering where you want to serve something delicious without spending all day in the kitchen.
For a fun presentation, arrange the crispy rib tips on a wooden board with small bowls of different sauces. Add some pickles, sliced onions, and fresh herbs for color. This makes the dish look professional and inviting. People will be impressed that you made them from scratch in your own oven.
Conclusion
Making rib tips in the oven is easier than most people think. With the right ingredients, a little patience, and the two-stage cooking method, you can create crispy rib tips that are tender, juicy, and full of flavor. The process is straightforward and forgiving, which makes it perfect for cooks of all skill levels.
The key is to take your time with the low and slow phase. Let the oven do the work while you go about your day. Then finish with a high-heat blast to get those beautiful crispy edges that everyone loves. Do not rush either stage. Good food takes time, and rib tips are no exception.
Remember to avoid the common mistakes we covered. Pat your meat dry, use a wire rack, add sauce at the right time, and always let the meat rest before serving. These small details make a big difference in the final result. They are the difference between good homemade rib tips and absolutely unforgettable ones.
Once you make these a few times, you will wonder why you ever bought them pre-made. Once you get the hang of it, you can experiment with different rubs, sauces, and glazes to make the recipe your own. Try a brown sugar and coffee rub for a unique twist. Or go tropical with a pineapple and chili glaze. The possibilities are endless with pork rib tips.
So fire up your oven, grab some pork rib tips, and get ready to enjoy one of the best rib tips recipe experiences you will ever have. Your taste buds will thank you. These oven-baked rib tips are going to become a regular in your kitchen, and your family and friends will be asking for them every time you fire up the oven.
Frequently Asked Questions
Can I use a different type of meat instead of pork rib tips?
While pork rib tips are the most traditional choice, you can also try beef short rib tips or even chicken wing tips. The cooking method stays the same, but the cooking time may vary slightly. Pork rib tips remain the most popular and flavorful option for this recipe.
How do I store leftover rib tips?
Let the oven-baked rib tips cool completely, then store them in an airtight container in the refrigerator. They will keep for up to 3 days. Reheat them in the oven at 350°F for 10 to 15 minutes to keep the edges crispy. Avoid microwaving, as it can make the edges soggy and lose that beautiful crunch.
Can I freeze rib tips before cooking?
Yes, you can freeze raw seasoned rib tips for up to 3 months. Wrap them tightly in plastic wrap and place them in a freezer bag. When you are ready to cook, let them thaw in the refrigerator overnight before following the recipe as usual. This is a great way to meal prep for the week ahead.
What temperature should rib tips reach internally?
The ideal rib tips internal temperature is 200°F to 205°F. At this temperature, the collagen in the meat has broken down, making the rib tips tender and juicy. Always use a meat thermometer to check, as visual cues alone can be misleading and lead to overcooking or undercooking.
Do I need to flip the rib tips during cooking?
Yes, it is a good idea to flip the rib tips once halfway through the cooking time. This ensures both sides get even heat exposure and helps create an even bark. Since you are using a wire rack, flipping is easy and does not disturb the seasoning or the crispy surface that is forming.
Can I make rib tips without BBQ sauce?
Absolutely. The dry rub alone provides plenty of flavor. Many people enjoy rib tips with just the seasoning and no sauce at all. If you prefer, you can serve the sauce on the side for dipping. The crispy edges come from the rub and the cooking method, not the sauce, so you have full control over the final flavor.