How Long To Cook Pavlova In Oven For Perfect Results
How Long To Cook Pavlova In Oven is the key to a showstopper dessert with crispy meringue and soft center. This guide reveals the exact baking time, oven temperature, and expert tips for perfect results every time. You’ll learn how to avoid common mistakes and serve a stunning pavlova that wows guests.
If you love a meringue dessert that looks like a cloud and tastes like heaven, then pavlova is your answer. Many home bakers wonder how long to cook pavlova in oven for the perfect result. The truth is, baking time and oven temperature are the secrets to a crispy shell and a marshmallowy center. This guide walks you through everything you need to know. You’ll learn the exact timing, temperature, and simple tricks that make pavlova a showstopper dessert. Whether you are a beginner or a seasoned baker, you will find practical tips here. I’ve baked hundreds of pavlovas over the years, and the one thing I’ve learned is patience. The oven does the work slowly. It gently removes moisture from the egg whites and sugar. This process creates that perfect contrast of textures. A pavlova recipe is surprisingly simple. You only need egg whites, sugar, and a few extras. But the pavlova baking time is what transforms it into magic. So let’s dive into the world of pavlova and make it perfect.
Key Takeaways
- Low and slow is essential: Bake pavlova at 250°F (120°C) for 1.5 to 2 hours for a crispy exterior and marshmallow center.
- Correct oven temperature prevents cracking: A steady low temperature ensures even drying without browning too fast.
- Use caster sugar for smooth meringue: It dissolves faster, creating a glossy, stable base for your pavlova recipe.
- Cool completely in the oven: Turn off the heat and let the pavlova cool inside to avoid collapse and cracks.
- Add cornstarch and vinegar for the perfect texture: These ingredients create a soft, chewy center while keeping the outside crisp.
- Timing varies by size: A large pavlova takes longer than individual nests, so adjust baking time accordingly.
📑 Table of Contents
What Is Pavlova and Why Oven Time Matters
Pavlova is a meringue dessert named after the Russian ballerina Anna Pavlova. It features a crisp outer shell and a soft, pillowy center. Topped with fresh berries and cream, it becomes a showstopper dessert for any occasion. The pavlova recipe is surprisingly simple. You only need egg whites, sugar, and a few extras. But the baking process is where the magic happens. Getting the oven temperature for pavlova right is crucial. Too hot, and the outside burns before the inside sets. Too cool, and it won’t crisp properly. That’s why baking time matters so much. A slow, gentle bake creates that perfect contrast. It’s all about patience and a low oven temperature.
The Story Behind Pavlova
The dessert was created in the 1930s in Australia or New Zealand, depending on who you ask. Both countries claim the recipe as their own. The story goes that a chef made it in honor of the famous ballerina Anna Pavlova during a tour. The light, airy texture was meant to mimic her delicate tutu on stage. Today, pavlova is a beloved easy dessert for holidays and family gatherings. It’s a dessert lover dream because you can decorate it however you like. The base stays crisp for hours if stored properly. That makes it perfect for dessert tables and buffets. Many families have their own twist on the classic pavlova recipe. Some add a hint of vanilla. Others use a touch of almond extract. The variations are endless. But the core technique remains the same. A low oven temperature and plenty of baking time are the non-negotiables.
Why Baking Time Is the Secret Ingredient
The pavlova baking time is the real game-changer. A slow bake allows the meringue to dry out evenly. This creates a crisp shell while the center stays soft. If you rush the process with high heat, the meringue cracks and turns brittle. A low and slow approach prevents that. The oven does the work slowly. It gently removes moisture from the egg whites and sugar. This process is called “drying” the meringue. It’s what gives pavlova its signature texture. So, when you ask how long to cook pavlova in oven, remember that time is your best friend. A slow bake at low heat is the golden rule. The oven temperature for pavlova must stay low throughout. This ensures the meringue sets without browning. The result is a pale, ivory shell with a marshmallowy heart. That contrast is what makes pavlova so special.
Key Takeaways:
- The pavlova baking time is more important than the recipe itself.
- A low and slow approach creates the perfect texture.
- The oven temperature for pavlova should never exceed 250°F.
- Patience is the most important ingredient in any pavlova recipe.
The Ideal Oven Temperature for Pavlova
The oven temperature for pavlova is always low. Most recipes call for 250°F (120°C). Some bakers go as low as 225°F (110°C). The goal is to dry the meringue without browning it. You want a pale, ivory finish. A low oven temperature ensures the egg whites set slowly. This prevents large air bubbles from forming. It also stops the sugar from caramelizing too quickly. The baking time and oven temperature work together like a team. Adjusting one affects the other. So, stick to the recommended oven temperature for pavlova for the best results.
Low and Slow Is the Golden Rule
A low and slow bake is the secret to perfect pavlova. High heat creates a hard, cracked shell. Low heat creates a gentle crisp. The meringue has time to form a stable structure. The sugar dissolves slowly, creating a smooth surface. The cornstarch and vinegar in the recipe also benefit from low heat. They activate slowly to give the center its chewiness. A slow bake also reduces the risk of the pavlova deflating. When the oven is too hot, the air bubbles expand fast and then burst. That leads to cracks. A gentle low and slow approach keeps the meringue intact. The pavlova baking time allows the moisture to escape gradually. This gradual drying is what creates the crispy exterior and soft center.
Temperature Comparison Table
Here’s a quick look at different oven temperatures and how they affect baking time. This table helps you choose the right setting for your pavlova recipe.
| Oven Temperature | Baking Time | Result |
|---|---|---|
| 225°F (110°C) | 2 to 2.5 hours | Extra crispy shell, very soft center |
| 250°F (120°C) | 1.5 to 2 hours | Classic crispy outside, marshmallow center |
| 275°F (135°C) | 1 to 1.5 hours | Faster bake, slightly chewier center |
Most bakers prefer 250°F (120°C). It offers the best balance of crisp and soft. If you want a very crispy shell, go lower and longer. The oven temperature for pavlova is a matter of preference. I recommend sticking to 250°F for consistent results. This temperature works well for both large pavlovas and small nests. It’s the sweet spot for a showstopper dessert.
Key Takeaways:
- 250°F (120°C) is the most reliable oven temperature for pavlova.
- Lower temperatures yield crispier shells but require more baking time.
- Higher temperatures speed up the process but risk a chewier center.
- Always use an oven thermometer to verify the actual oven temperature.
How Long To Cook Pavlova In Oven for Perfect Results
The pavlova baking time depends on the size of your dessert. A standard 9-inch round pavlova takes about 1.5 to 2 hours. Smaller meringue nests may need only 1 hour. Larger showstopper pavlovas can take up to 2.5 hours. The key is to bake until the outside is crisp and the center feels soft. When you pull the pavlova out, it should sound hollow when tapped. The oven temperature for pavlova stays low throughout. This slow process ensures even drying. So, how long to cook pavlova in oven varies, but the answer is always “low and slow.”
Pavlova Baking Stages
Understanding the pavlova baking time stages helps you stay calm. Here is what happens inside the oven:
- First 30 minutes: The meringue sets and begins to dry. The oven temperature is low, so the outside stays pale.
- 30 to 60 minutes: Moisture slowly escapes. The shell starts to firm up. You may see a slight ivory color.
- 60 to 90 minutes: The outer shell becomes crisp. The center is still soft and marshmallowy. This is the critical phase.
- 90 to 120 minutes: The drying process completes. The pavlova is ready when the surface is dry and hollow-sounding.
Each stage contributes to the final texture. Rushing any stage leads to a cracked or soggy pavlova. The how long to cook pavlova in oven question is answered by respecting these stages.
Standard Pavlova Baking Time
For a classic pavlova recipe, plan on 1.5 to 2 hours at 250°F (120°C). This is the standard baking time for a 9-inch round. The meringue should be pale and dry to the touch. The center will still feel soft when you press it gently. That’s perfect. It will set as it cools. The pavlova baking time starts when you put the tray in the oven. Set a timer for 1 hour, then check. The baking time can vary with your oven’s accuracy. Use an oven thermometer if you’re unsure. A reliable oven temperature for pavlova is the foundation of success.
Adjusting for Different Sizes
A small pavlova nest (4 inches) bakes faster. It may need only 45 minutes to 1 hour. A large pavlova (12 inches or more) needs more time. It can take 2 to 2.5 hours. The pavlova baking time scales with size. Always check the center with a gentle touch. The how long to cook pavlova in oven question changes with the diameter. For individual servings, 30 minutes at 250°F works well. These mini pavlovas are great for parties. They bake quickly and stay crisp for days.
Quick Tips for Timing
- Use a kitchen timer: Don’t rely on your phone alone. Set a dedicated timer for the baking time.
- Check at the halfway mark: At 1 hour, look for a pale, dry surface. The center should still be soft.
- Rotate the tray halfway: This ensures even oven temperature exposure. It prevents one side from browning more.
- Account for oven hot spots: Every oven has them. Know your oven’s quirks for perfect pavlova baking time.
- Don’t open the door early: This drops the oven temperature and causes cracks. Wait at least 1 hour.
Expert Insight: Professional pastry chefs always use an oven thermometer. Home ovens can be off by 25°F or more. That small difference can change your pavlova baking time significantly. A $10 thermometer is a baker’s best friend.
Key Takeaways:
- A standard pavlova needs 1.5 to 2 hours at 250°F.
- Small nests bake in 45 minutes to 1 hour.
- Large pavlovas can take up to 2.5 hours.
- The how long to cook pavlova in oven answer depends on size and oven accuracy.
Step-by-Step Baking Guide for Pavlova
Follow this simple pavlova recipe to get the best results. The steps are easy and the baking time is hands-off.
Meringue Ingredients Breakdown
Let’s look at the key ingredients and why they matter:
- Egg whites: Must be at room temperature. They whip to a higher volume when warm.
- Caster sugar: Dissolves faster than granulated. Creates a smoother meringue with fewer sugar crystals.
- Cornstarch: Absorbs moisture and gives the center its soft, chewy texture.
- Vinegar: A small amount stabilizes the meringue. It also helps the crust set.
- Vanilla extract (optional): Adds a subtle flavor. Use pure vanilla for the best result.
Each ingredient plays a role in the final pavlova recipe. Skipping any can affect the baking time and texture.
Preparing Your Meringue Base
Start with room-temperature egg whites. They whip up faster and smoother. Use a clean, grease-free bowl. Add a pinch of salt and cream of tartar if you have it. Beat the whites until soft peaks form. Then add caster sugar gradually, a tablespoon at a time. Keep beating until the meringue is glossy and stiff. The sugar dissolves slowly, creating a stable base. Add a teaspoon of cornstarch and a splash of vinegar. These ingredients help the center stay soft. Mix gently with a spatula. This is the base for your showstopper dessert.
Shaping and Baking
Line a baking sheet with parchment paper. Draw a 9-inch circle as a guide. Place the meringue inside the circle. Shape it with a spatula, building up the edges slightly. The center should be slightly lower than the rim. This creates a well for the cream topping and fresh berries. Slide the tray into a preheated oven at 250°F (120°C). Set the pavlova baking time for 1.5 hours. Resist the urge to open the door. The oven temperature for pavlova must stay steady. After 1.5 hours, check the pavlova. The surface should be dry and pale. If it’s not ready, bake for another 30 minutes. The how long to cook pavlova in oven question is answered by patience.
Cooling and Storing
Once the baking time is up, turn off the oven. Leave the pavlova inside with the door slightly ajar. This slow cooling prevents cracking. Let it cool completely in the oven. This can take 2 to 3 hours. The pavlova baking time includes this cooling phase. Do not rush it. Once cool, transfer the pavlova to a serving plate. Store it in an airtight container at room temperature. The crispy meringue stays crisp for up to 2 days. Add the cream topping and fresh berries just before serving. This keeps the base from getting soggy.
Freezing pavlova is possible, but it’s best to freeze it unassembled. Store the cooled meringue base in an airtight container. It keeps for up to 1 month. Add the cream topping and fresh berries only after thawing. This prevents sogginess. The crispy meringue stays crisp even when frozen.
Key Takeaways:
- Room-temperature egg whites whip better.
- Caster sugar dissolves faster than granulated.
- Cornstarch and vinegar create the soft center.
- Cooling in the turned-off oven prevents cracks.
- Freeze the base unassembled for up to 1 month.
Common Mistakes That Ruin Your Pavlova
Even with the right oven temperature for pavlova, mistakes can happen. Here are the most common ones and how to avoid them.
Opening the Oven Door Too Early
This is the number one mistake. Opening the door causes a sudden drop in oven temperature. The meringue contracts and cracks. The baking time is also disrupted. The slow drying process stops. Wait at least 1 hour before you even think about opening the door. Use the oven light to check on your pavlova recipe. That way, you can monitor progress without breaking the seal. Patience is the key to a crispy meringue with a soft center.
Using the Wrong Sugar
Not all sugars are equal. Granulated sugar takes longer to dissolve and can leave a grainy texture. Caster sugar is finer and dissolves quickly. It creates a smoother, more stable meringue. Some recipes use a mix of caster sugar and a little cornstarch. The cornstarch absorbs moisture and keeps the center soft. If you use the wrong sugar, the pavlova baking time might not fix the problem. The texture will be off no matter how long you bake it. Stick to caster sugar for the best pavlova recipe results.
Ignoring Humidity
Humidity is the enemy of pavlova. On a rainy or humid day, meringue can weep and turn sticky. The baking time may need to be extended slightly. Add an extra 15 to 30 minutes if it’s humid. You can also add a bit more cornstarch to the meringue. This helps absorb excess moisture. Always check the weather forecast before you bake. A dry, cool day is ideal for making pavlova. If you must bake on a humid day, increase the oven temperature for pavlova by 10°F and extend the baking time. Monitor closely to avoid over-browning.
Overbaking Your Pavlova
It’s easy to overbake if you set a timer and walk away. Overbaking turns the soft center into a hard, crunchy shell. The meringue becomes too dry and brittle. The pavlova baking time is a guideline, not a strict rule. Always check the center at the minimum time. The how long to cook pavlova in oven answer depends on your oven’s accuracy. If you notice the edges turning brown, reduce the temperature by 10°F and extend the time slightly.
Overbeating the Meringue
Overbeating can also ruin your pavlova. When you beat the egg whites too long, they become dry and grainy. The meringue will crack during baking. Stop beating as soon as you reach stiff peaks. The meringue should be glossy and smooth. If it looks dry or clumpy, you’ve gone too far. A slow bake won’t save overbeaten meringue. So, watch your mixer carefully. The pavlova baking time won’t matter if the base is wrong.
Quick Tips to Avoid Mistakes:
- Always preheat the oven before placing the pavlova inside.
- Use parchment paper to prevent sticking.
- Let the pavlova cool completely before topping.
- Add cream and berries just before serving.
- Store in an airtight container at room temperature.
Key Takeaways:
- Never open the oven door early.
- Caster sugar is essential for smooth texture.
- Humidity requires extra baking time.
- Stop mixing at stiff, glossy peaks.
- Check for brown edges to avoid overbaking.
How to Tell When Pavlova Is Done and Ready to Serve
Knowing when your pavlova is done is a skill. It’s not just about the clock. You need to use your senses.
Visual and Touch Cues
The pavlova baking time gives you a guideline, but visual cues are your best guide. The surface should be pale and dry. It should not look wet or shiny. When you tap the top with a finger, it should sound hollow. The center should feel soft but set. It should not wobble like liquid. If the top is still glossy, it needs more time. The how long to cook pavlova in oven is a starting point. Trust your eyes and hands. A crispy meringue with a soft center is the goal.
The Sound Test
Gently tap the side of the pavlova with a spoon. A clear, hollow sound means it’s done. If it sounds dull or flat, the center is still wet. The pavlova baking time might need a few more minutes. The sound test is a quick way to check without opening the oven. This is an expert insight that many bakers swear by. The oven temperature for pavlova remains low, so the sound will be consistent once it’s ready. A hollow sound confirms the baking time was sufficient.
The Wobble Test
Gently shake the baking sheet. The pavlova should have a slight wobble in the center. This means the inside is still soft and marshmallowy. If it’s completely firm, it may be overbaked. The pavlova baking time should leave the center with a gentle jiggle. The oven temperature for pavlova ensures the outside sets while the inside stays soft. This wobble disappears as it cools. So, don’t panic if it wobbles. That’s a sign of a perfect pavlova.
Key Takeaways:
- Pale, dry surface indicates readiness.
- Hollow sound means the center is set.
- A gentle wobble is perfect and will set as it cools.
- Trust your senses, not just the timer.
Conclusion
How Long To Cook Pavlova In Oven is really about patience and low heat. A slow bake at 250°F gives you the perfect crispy meringue with a soft, marshmallowy center. The pavlova baking time ranges from 1.5 to 2 hours for a standard size. Smaller treats need less time, while large showpieces require more. Always use caster sugar, avoid humidity, and never open the oven door too early. The oven temperature for pavlova is the foundation of success. Follow the steps, trust the process, and you’ll create a showstopper dessert every time. Now you know exactly how long to cook pavlova in oven for perfect results. Go ahead, bake a pavlova recipe tonight, and enjoy the applause. Your family and friends will love this meringue dessert. It’s an easy dessert that looks impressive but is simple to make. So, what are you waiting for? Get baking and enjoy the sweet rewards.
Key Takeaways:
- How Long To Cook Pavlova In Oven is 1.5 to 2 hours at 250°F for a standard size.
- Low and slow baking creates the perfect crispy-soft contrast.
- Caster sugar, cornstarch, and vinegar are the secret ingredients.
- Cool the pavlova in the turned-off oven to prevent cracks.
- Add cream topping and fresh berries just before serving.
Frequently Asked Questions
Can I bake pavlova at a higher temperature to save time?
You can, but it risks a cracked shell and a hard center. A higher oven temperature for pavlova speeds up the baking time but sacrifices the soft, marshmallowy interior. Stick to 250°F for the best balance of crisp and soft textures.
Why did my pavlova crack during baking?
Cracks usually happen when the oven temperature drops suddenly. This occurs if you open the door too early. The meringue contracts and cracks. Another cause is overbeating the egg whites. Keep the door closed for at least 1 hour and mix until just stiff peaks form.
How do I know if my pavlova is underbaked?
An underbaked pavlova will have a glossy, wet-looking surface. The center will wobble like liquid. Tap it gently—if it sounds dull, it needs more time. The pavlova baking time is a guide. Use visual and sound cues to confirm it’s fully dried.
Can I make pavlova ahead of time?
Yes, pavlova keeps well for up to 2 days in an airtight container at room temperature. The crispy meringue stays crisp. However, always add the cream topping and fresh berries right before serving. This prevents the base from becoming soggy.
What is the best topping for pavlova?
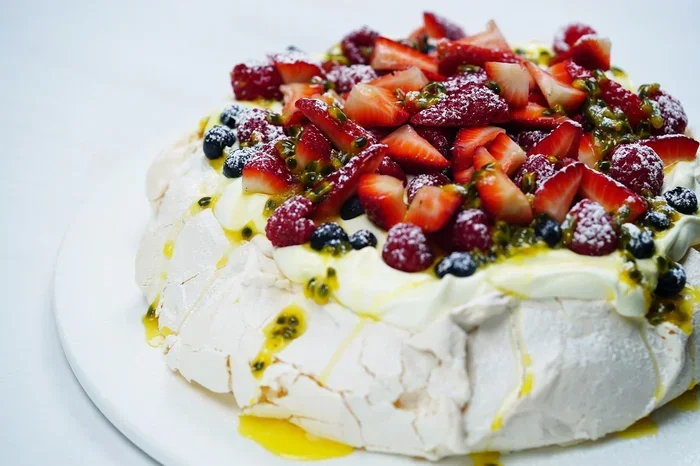
Classic cream topping with fresh berries is the most popular choice. You can also use whipped cream, passionfruit curd, or sliced kiwi. The showstopper dessert allows for endless creativity. Just remember to add the topping just before serving to keep the shell crispy.
Does humidity really affect pavlova baking time?
Yes, humidity is a major factor. Moist air makes the meringue weep and can extend the pavlova baking time by 15 to 30 minutes. On humid days, add a bit more cornstarch to the meringue and increase the oven temperature for pavlova slightly. Monitor the pavlova closely to avoid over-browning.