How To Replace Oven Bake Element Using Simple Tools
Replacing a faulty oven bake element is one of the easiest oven repairs you can do at home. With a few simple tools and about 30 minutes, you can swap out a burned-out heating coil and restore even heat to your oven. This guide walks you through every step, from safety prep to testing the new part, so you can fix your oven without calling a technician.
Your oven stops heating, and dinner plans are falling apart. Before you call an expensive repair tech, take a breath. The problem might be a burned-out bake element, and replacing it is simpler than you think. This guide shows you exactly how to replace oven bake element using basic tools you already own.
A faulty oven heating element is one of the most common reasons ovens fail to cook properly. Whether your oven runs cold or heats unevenly, the bake element is often the cause. The good news? You can fix it yourself in under an hour. No special skills. No expensive service calls. Just clear steps and a little confidence.
In this article, you will learn what the bake element does, which tools you need, and exactly how to swap it out safely. We also cover testing the new part, avoiding common mistakes, and knowing when to call for professional oven repair. Let get your oven working again.
Key Takeaways
- You can replace a bake element yourself: No professional skills needed, just basic tools and patience.
- Safety comes first: Always disconnect power before starting any oven repair work.
- Testing the new element saves time: A quick continuity check prevents returns and repeat jobs.
- Common mistakes cause repeat failures: Loose wiring and incorrect part matching are the top culprits.
- Know when to call a pro: Some oven problems go beyond a simple bake element swap.
- The right part matters: Matching your oven model ensures a perfect fit and safe operation.
📑 Table of Contents
- What Is an Oven Bake Element and Why Does It Fail?
- Tools You Will Need to Replace the Bake Element
- Step-by-Step Guide to Replacing the Oven Bake Element
- How to Test the New Bake Element Before and After Installation
- Common Mistakes to Avoid When Replacing the Bake Element
- When to Call a Professional Instead of DIY
- Maintenance Tips to Make Your New Bake Element Last Longer
- Frequently Asked Questions About Replacing the Oven Bake Element
- Conclusion
What Is an Oven Bake Element and Why Does It Fail?
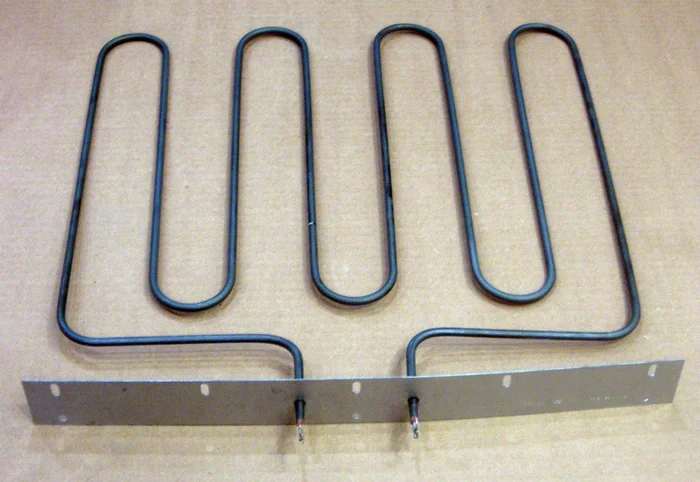
The bake element is the metal heating coil at the bottom of your oven. When you set a temperature, electricity flows through this coil. The coil glows red hot and radiates heat upward. This is how your oven bakes, roasts, and broils food evenly.
Over time, the element wears out. The metal weakens from repeated heating and cooling cycles. Eventually, it develops cracks, breaks, or burns through entirely. When this happens, the oven loses its main heat source.
Signs Your Bake Element Is Going Bad
Watch for these warning signs. They usually point to a failing heating element:
- The oven takes much longer to preheat than before.
- The top of food burns while the bottom stays raw.
- The element glows unevenly or has visible holes.
- The oven stops heating completely during baking mode.
- You see sparking or arcing on the element surface.
If you notice any of these, the oven bake element likely needs replacement. Sometimes the problem is not the element itself but a loose electrical connection at the terminal. A thermal fuse can also blow and mimic element failure. That is why testing is so important before you buy a new part.
Most bake elements last 10 to 15 years with normal use. Heavy use or frequent self-clean cycles can shorten that lifespan. The good part is that a replacement element costs between 20 and 50 dollars. You save hundreds compared to a service call.
Tools You Will Need to Replace the Bake Element
You do not need a full toolbox for this job. A few basic oven repair tools will get the job done. Here is what you need before you start.
- Screwdriver set: Both Phillips and flathead sizes. Most oven panels use Phillips head screws.
- Socket wrench set: A 1/4-inch or 5/16-inch socket works for most oven mounting bolts.
- Multimeter: This is essential for testing the new element and checking for continuity.
- Needle-nose pliers: Helpful for gripping small wires and securing connectors.
- Wire nuts or electrical tape: For securing any exposed connections safely.
- Flashlight: The oven cavity can be dark. A bright light helps you see the wiring clearly.
- Work gloves: Protect your hands from sharp edges on the old element and oven walls.
That is it. No power tools. No specialty equipment. A heating element tester built into your multimeter is the only real tech you need. If you do not own a multimeter, pick one up at any hardware store for under 20 dollars. It is a tool you will use again for other range repair tasks.
Quick Tip: Prep Your Workspace
Clear your kitchen counter near the oven. Lay down a towel or mat to protect the floor. Have your new part ready and matched to your oven model. Working in a clean, organized space makes the whole process smoother and safer.
Step-by-Step Guide to Replacing the Oven Bake Element
Now for the main part. Follow these steps carefully and you will have a new bake element installed in no time. Take your time and do not rush any step.
Step 1: Disconnect Power to the Oven
Safety is the number one priority. Before you touch anything inside the oven, cut the power. You have two options:
- Turn off the circuit breaker: Find the breaker labeled for your oven in the electrical panel. Flip it to the off position.
- Unplug the oven: If the oven plug is accessible, pull it from the wall outlet.
Never work on a live oven. Even with the oven turned off, voltage can still flow through the wiring. Use a non-contact voltage tester to confirm no power is reaching the element terminals before you proceed.
Step 2: Remove the Oven Rack and Bottom Panel
Take out the oven racks. They usually slide straight out. Next, remove the bottom panel or heat shield inside the oven cavity. This panel covers the bake element from below. Use your screwdriver to remove the screws holding it in place. Set the screws somewhere safe so you do not lose them.
Step 3: Detach the Old Bake Element
Look at the back wall of the oven cavity. You will see the oven element mounted there. Two screws or bolts hold it in place. Remove them carefully. Then, go to the back of the oven where the wiring connects to the element terminal. There are usually two wires attached to the bake terminal posts.
Use your needle-nose pliers to gently disconnect the wire connectors. Do not pull on the wires themselves. Pull on the connectors. Take a photo before disconnecting so you remember which wire goes where. This makes reinstallation much easier.
Step 4: Remove the Old Element
Once the wires are disconnected and the mounting screws are out, carefully pull the old element forward. It may be stuck or bent. Work it gently. Do not force it or you could damage the oven cavity lining. Set the old element aside.
Step 5: Install the New Bake Element
Take your new bake element replacement out of the box. Compare it to the old one to make sure the shape, size, and terminal placement match. Slide the new element into position where the old one was. Secure it with the mounting screws you removed earlier. Do not overtighten. Snug is enough.
Step 6: Reconnect the Wiring
Attach the two wires to the new element terminal posts. Push the connectors firmly onto the posts until they click into place. If your oven uses screw terminals, wrap the wire around the terminal and tighten the screw. Make sure the connection is tight and no copper wire is exposed.
Use your photo from earlier as a reference. Correct wiring is critical for safe oven operation. A loose electrical connection can cause arcing, which damages the new element quickly.
Step 7: Reassemble the Oven
Put the bottom panel back in place and secure it with screws. Slide the oven racks back in. Now you are ready to test the new element.
How to Test the New Bake Element Before and After Installation
Testing the new heating coil before installation saves you from a frustrating repeat job. Here is how to do it.
Test the Element with a Multimeter
Set your multimeter to the continuity or ohms setting. Touch one probe to one terminal post on the element. Touch the other probe to the second terminal post. You should see a reading between 20 and 40 ohms for most standard elements. If the reading shows infinite or zero, the element is defective. Return it and get a new one.
Next, test for shorts to ground. Touch one probe to a terminal post and the other probe to the metal body of the element. The reading should show no continuity (infinite ohms). If you get a reading, the element has a short and will not work safely.
Test After Installation
Once the new element is wired in and the oven is reassembled, restore power. Turn the oven on to 350 degrees Fahrenheit. Wait 10 to 15 minutes. The element should glow a bright orange-red color evenly along its length. If it glows only in spots or not at all, turn off the oven and recheck your wiring connections.
A properly functioning element heats up fast and radiates consistent heat. Your oven should reach the set temperature within 10 to 15 minutes of preheating.
Common Mistakes to Avoid When Replacing the Bake Element
Even simple jobs go wrong when you skip steps. Here are the most common mistakes people make during oven bake element replacement and how to avoid them.
Mistake 1: Not Matching the Part Number
Every oven model uses a specific bake element design. Buying the wrong part means it will not fit or work correctly. Always check your oven model number and order the exact replacement part. You can find the model number on a sticker inside the oven door or on the back of the unit.
Mistake 2: Skipping the Continuity Test
Some people install a new element without testing it first. If the new part is defective from the factory, you just wasted your time. Always test before installing. It takes two minutes and saves hours of frustration.
Mistake 3: Ignoring Loose Connections
A new element will fail quickly if the wiring connections are loose or corroded. Inspect the terminal posts and wire connectors. Clean any corrosion with a dry cloth before reconnecting. A tight, clean connection ensures the element lasts its full lifespan.
Mistake 4: Forgetting to Check the Thermal Fuse
Sometimes a blown thermal fuse mimics a bad bake element. The oven will not heat even with a brand-new element. Test the thermal fuse for continuity before replacing the element. If the fuse is blown, replacing the element alone will not solve the problem.
Mistake 5: Working on a Live Oven
This cannot be stressed enough. Always confirm the power is off before opening the oven cavity or touching any wiring. A live oven can cause serious electric shock or even death. Use a voltage tester. Never assume the oven is safe just because it is turned off.
When to Call a Professional Instead of DIY
Replacing a bake element is a straightforward DIY project for most homeowners. But not every oven problem is a simple element swap. Know when to call in a professional for range repair.
Call a technician if:
- The oven heats fine in broil mode but not in bake mode, and the new element still does not work. This could point to a faulty oven thermostat or control board.
- You smell burning plastic or see scorch marks inside the oven cavity. This suggests wiring damage beyond the element.
- The oven temperature sensor is giving inaccurate readings, causing uneven cooking even with a working element.
- You are uncomfortable working with electrical components. There is no shame in calling a pro for safety.
- The oven is still under warranty. DIY repairs may void the warranty, and a professional service visit is the safer choice.
A typical oven repair cost for a professional bake element replacement ranges from 100 to 200 dollars, including the part and labor. Doing it yourself costs only the price of the element, usually under 50 dollars. That said, your safety and comfort matter most. If something feels wrong, stop and call an expert.
Expert Insight: Why DIY Oven Repair Is Worth It
Many homeowners hesitate to open up their oven. They worry about electrical danger or making things worse. The truth is, replacing a bake element is one of the most beginner-friendly appliance repairs you can attempt. The part is accessible, the steps are simple, and the tools are basic. Thousands of people do this repair every year successfully. With the right guidance and a careful approach, you can be one of them.
Maintenance Tips to Make Your New Bake Element Last Longer
You just invested time and money into a new oven heating element. Keep it working well with these simple maintenance habits.
- Clean spills promptly: Food debris that bakes onto the element can cause hotspots and shorten its life. Wipe up spills as soon as the oven cools.
- Avoid the self-clean cycle too often: The extreme heat of self-cleaning puts stress on the element. Use it only when truly needed.
- Check connections yearly: Once a year, inspect the element terminals for corrosion or looseness. Tighten any loose connections early.
- Use the right cookware: Heavy, warped pans can block heat distribution and put extra strain on the element. Use flat, oven-safe cookware.
- Do not slam the oven door: Repeated impacts can shift the element mounting and loosen wiring over time.
These small habits add up. A well-maintained bake element can last well beyond the average 10-year lifespan. Your oven will heat evenly, cook efficiently, and save you energy bills.
Frequently Asked Questions About Replacing the Oven Bake Element
Can I replace the bake element myself if I have no electrical experience?
Yes, absolutely. Replacing a bake element is one of the simplest appliance repairs you can do. No electrical experience is needed as long as you follow the safety steps. Just remember to disconnect the power before you start, and use a multimeter to test the new part. If you can change a light fixture, you can handle this job.
How long does it take to replace an oven bake element?
Most people complete the entire replacement in 30 to 45 minutes. The actual swap takes about 15 to 20 minutes once you have the right part and tools. The rest of the time goes toward safety checks, testing the new element, and reassembling the oven. Do not rush the process and you will be done quickly and safely.
How much does a replacement bake element cost?
A new oven bake element typically costs between 20 and 50 dollars. The exact price depends on your oven brand and model. You can find the right part by searching with your oven model number. Some online retailers and appliance parts stores offer free shipping on orders over a certain amount, which saves you even more.
Why does my new bake element keep burning out?
If a new element fails quickly, the problem is usually not the part itself. Check for loose wiring connections, a short in the oven wiring harness, or a faulty control board. A blown thermal fuse or failing oven thermostat can also cause repeated element failures. Test all related components before assuming the new element is defective.
Do I need to replace both the bake and broil elements if one fails?
No, you only need to replace the one that has failed. The broil element is a separate component located at the top of the oven. However, if both elements are old and one has already burned out, it is smart to replace both at the same time. This prevents a second repair job in a few months and saves you time in the long run.
Is it safe to use the oven after replacing the bake element?
Yes, it is safe once you have properly reconnected all wiring and confirmed the element is working correctly. After installation, test the oven at a low temperature first. Check that the element glows evenly and the oven reaches the set temperature. If everything looks and works normal, your oven is ready for regular use.
Conclusion
Replacing a bake element is one of the most rewarding DIY oven repairs you can tackle. It saves you money, builds your confidence, and gets your oven back to working condition fast. With the right tools, a matched replacement part, and the steps in this guide, you can complete the job in under an hour.
Remember to always disconnect power before starting. Test the new element before installing it. Check for loose connections and inspect related parts like the thermal fuse and oven thermostat. These small precautions make all the difference between a repair that lasts and one that fails quickly.
Your oven works hard for you every day. A new bake element brings it back to life and keeps your meals cooking perfectly. You now have the knowledge and the confidence to handle this repair yourself. Go ahead, give it a try, and enjoy the satisfaction of a job well done.