How Long To Caramelize Onions In Oven For Perfect Results
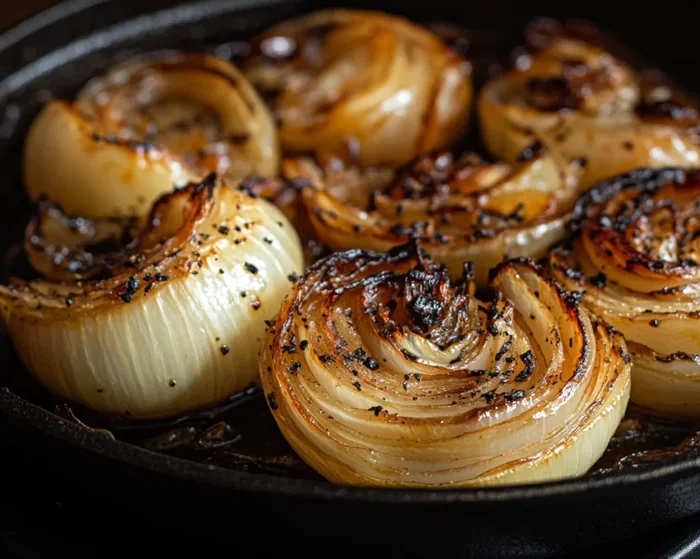
Caramelizing onions in the oven takes about 45 minutes to 1 hour at 375°F with low and slow cooking. The caramelization process transforms sharp onions into sweet, golden brown onions packed with deep flavor. Sliced onions on a baking sheet with a little olive oil make this method simple and hands-free. Whether you are meal prepping or cooking for a crowd, oven caramelized onions save time and deliver consistent results.
Key Takeaways
- Low and slow is the way to go: Cooking onions at 375°F for 45 to 60 minutes gives the best flavor and texture.
- Choose the right onions: Sweet onions like Vidalia or Walla Walla caramelize faster and taste better than sharp varieties.
- Thin slices matter: Uniformly sliced onions cook evenly and caramelize more consistently in the oven.
- Don’t skip the stir: Stirring every 15 minutes prevents burning and promotes even browning.
- Use an oven-safe dish: A rimmed baking sheet or oven-safe dish keeps everything contained and easy to manage.
- Patience is key: Rushing the caramelization process leads to burnt, bitter onions instead of sweet, tender ones.
📑 Table of Contents
- How Long To Caramelize Onions In Oven: The Complete Guide
- Why Oven Caramelized Onions Are Worth It
- Best Onions For Caramelizing In The Oven
- Step-by-Step Guide To Oven Caramelized Onions
- Common Mistakes When Caramelizing Onions In The Oven
- How To Use Your Caramelized Onions
- Expert Tips For Perfect Caramelized Onions Every Time
- Quick Tips For Oven Caramelized Onions
- Frequently Asked Questions
- Conclusion
How Long To Caramelize Onions In Oven: The Complete Guide
There is something magical about caramelized onions. They turn a simple ingredient into something extraordinary. Sweet, rich, and deeply flavorful, they elevate burgers, pizzas, salads, and so much more. But here is the question most home cooks ask: how long to caramelize onions in oven?
The answer depends on a few factors. Oven temperature, the type of onion, and how thick your slices are all play a role. In most cases, you will need about 45 minutes to 1 hour at 375°F. But do not worry. This guide covers everything you need to know. From picking the right sweet onions to avoiding common pitfalls, we have you covered. Let us dive in.
Many people think caramelizing onions is hard. It is not. You do not need to stand over a hot stove stirring for an hour. The oven method is hands-free and forgiving. You set the oven temperature, walk away, and let the caramelization process do its thing. That is the beauty of slow roasting onions in the oven. You get incredible flavor without constant attention.
Whether you are a beginner or a seasoned cook, this guide will help you master oven caramelized onions. We will cover the best onions to use, step-by-step instructions, common mistakes, and creative ways to use your finished product. By the end, you will never buy store-bought caramelized onions again.
Why Oven Caramelized Onions Are Worth It
The Flavor Difference Is Real
When you caramelize onions in the oven, the natural sugars slowly break down. This creates a complex sweetness that no shortcut can match. Stovetop methods work too, but the oven gives you more control. You spread the sliced onions in a single layer, and hot air circulates around them evenly. The result is uniform browning and a rich, golden brown color throughout.
Roasted onions also develop a jammy texture. They become soft, almost spreadable, with a deep brown butter quality. This makes them perfect for spreading on bread or mixing into dips. The caramelized onion recipe possibilities are truly endless once you nail the technique.
Hands-Free Cooking
One of the biggest advantages of using the oven is that you do not need to babysit the onions. On the stove, you need to stir every few minutes. If you walk away, they can burn. In the oven, you set a kitchen timer, and you are free to do other things. This makes the oven method ideal for busy weeknights or when you are cooking multiple dishes at once.
Plus, the oven method scales easily. You can caramelize a large batch of onions in the oven for meal prep or entertaining. A single baking sheet can hold several large onions. That means you can make enough caramelized onions to last all week.
Best Onions For Caramelizing In The Oven
Sweet Onions Are Your Best Friend
Not all onions are created equal when it comes to caramelization. Sweet onions like Vidalia, Walla Walla, and Texas 1015 have higher sugar content. This means they caramelize faster and taste sweeter. If you want the best results, start with these varieties. They are widely available at most grocery stores and well worth the small price difference.
Yellow onions are the next best option. They are affordable and work well for oven caramelized onions. Red onions can also be used, but they have a slightly sharper flavor. White onions tend to be too sharp and watery for the best results. Stick with sweet or yellow varieties for the most reliable outcome.
How Onion Size and Shape Matter
The size of your onion affects cooking time. A large onion will take longer than a small one. But more importantly, how you cut them matters. Uniform onion rings or thin slices cook at the same rate. This prevents some pieces from burning while others stay undercooked.
Use a sharp knife and a stable cutting board. Aim for slices about 1/4 inch thick. Too thick and they will not caramelize evenly. Too thin and they may dry out or burn. Consistency is the key to perfect golden brown onions every single time.
Step-by-Step Guide To Oven Caramelized Onions
Step 1: Preheat and Prepare
Start by preheating your oven to 375°F. This is the sweet spot for low and slow cooking. While the oven warms up, peel your onions and slice them thinly. Use a large oven-safe dish or a rimmed baking sheet lined with parchment paper. This makes cleanup a breeze.
Place the sliced onions in the dish and spread them out in a single layer. Do not pile them up. Overcrowding traps steam and prevents proper browning. You want each slice to have some space around it. This allows the heat to reach every piece evenly.
Step 2: Add Oil and Season
Drizzle about 1 to 2 tablespoons of olive oil over the onions. Toss them gently with your hands or a spatula to coat every slice. The oil helps conduct heat and promotes even browning. It also adds a subtle richness to the final flavor.
Season with a pinch of salt. Salt draws out moisture, which speeds up the caramelization process. You can also add a dash of black pepper or a pinch of sugar if you want extra sweetness. Some cooks like to add a splash of brown butter for extra depth. This is optional but delicious.
Step 3: Cook and Stir
Place the dish in the preheated oven. Set your kitchen timer for 15 minutes. After the first 15 minutes, pull the tray out and stir the onions. This redistributes them and ensures even cooking. Return the tray to the oven.
Repeat this process every 15 minutes. Most batches will need 45 to 60 minutes total. The onion cooking time varies based on oven accuracy, onion type, and slice thickness. Watch for the color to deepen to a rich golden brown. That is your signal that they are done.
Step 4: Cool and Store
Once the caramelized onions reach your desired color, remove them from the oven. Let them cool for at least 10 minutes. They will continue to darken slightly as they cool. Store leftovers in an airtight container in the refrigerator for up to five days.
Reheating tips: Warm them gently in a skillet over low heat. Add a tiny splash of water to refresh their texture. Avoid microwaving, as this can make them rubbery. Proper storage and reheating keep your caramelized onions recipe results tasting fresh.
Common Mistakes When Caramelizing Onions In The Oven
Using the Wrong Temperature
One of the biggest mistakes is setting the oven too hot. High heat causes the outside of the onions to burn before the inside softens. This leads to bitter, acrid flavors instead of sweet, mellow goodness. Always stick to 375°F for the best oven caramelized onions. If your oven runs hot, drop it down to 350°F and add a few extra minutes.
Overcrowding the Pan
It is tempting to cram as many onions as possible onto the tray. Resist this urge. Overcrowding creates steam, which steams the onions instead of roasting them. You end up with soggy, pale onions instead of crispy, golden ones. Use a large baking sheet or two trays if needed. The extra space makes a huge difference.
Skipping the Stir
The oven does most of the work, but it is not completely hands-off. Forgetting to stir the onions every 15 minutes leads to uneven cooking. Some pieces burn while others stay pale. Set a reminder on your phone or use a kitchen timer to stay on track. This small habit makes a big impact on the final result.
Rushing the Process
Caramelization takes time. There is no shortcut that replicates the deep, complex flavor of slowly roasted onions. If you try to speed things up with higher heat, you will get burnt onions, not caramelized ones. Patience is the secret ingredient. Trust the process and let the oven do the work.
Not Using Enough Oil
Some cooks go too light on the olive oil to save calories. This backfires. Without enough oil, the onions dry out and stick to the pan. They also brown unevenly. Use a generous but not excessive amount of oil. The onions should look lightly coated, not swimming. This balance ensures even caramelization and great flavor.
How To Use Your Caramelized Onions
Now that you have a batch of beautiful caramelized onions, what do you do with them? The options are nearly limitless. Here are some of the best ways to enjoy your homemade sweet caramelized onions:
- On burgers and sandwiches: Spread them on toasted brioche for a gourmet touch.
- On pizza: Add them as a topping along with goat cheese and fresh thyme.
- In dips and spreads: Blend them into cream cheese or Greek yogurt for a flavorful dip.
- On grilled cheese: Elevate a classic sandwich with a generous layer of oven caramelized onions.
- In pasta dishes: Toss them with ricotta, spinach, and a drizzle of balsamic glaze.
- On tacos or fajitas: Use them as a sweet contrast to spicy fillings.
- In soups and stews: Stir them in for added depth and richness.
Meal prep tip: Make a big batch on Sunday and use it throughout the week. Caramelized onions keep well in the fridge and freezer. They save time on busy nights and add restaurant-quality flavor to everyday meals.
Expert Tips For Perfect Caramelized Onions Every Time
Use a Kitchen Thermometer
Not all ovens run at the exact temperature they display. An inexpensive kitchen thermometer placed inside the oven can confirm the actual temperature. This small tool removes guesswork and ensures your oven temperature is spot-on. Accurate heat leads to more consistent results every time you make caramelized onions.
Add a Splash of Water if Needed
If your onions seem to be drying out too quickly, add a tablespoon of water to the pan. This creates steam that softens the onions without stopping the caramelization process. Once the water evaporates, the onions will continue browning. This trick is especially helpful when using thinner slices that cook faster.
Try Different Flavor Additions
Plain caramelized onions are delicious on their own. But you can take them to the next level with a few additions. A splash of balsamic vinegar adds tanginess. A sprinkle of fresh thyme brings an earthy aroma. A touch of brown butter adds nutty richness. Experiment with different combinations to find your favorite flavor profile.
Know the Difference Between Caramelizing and Browning
Caramelization and browning are not the same thing. Caramelization breaks down the natural sugars in onions into complex, sweet compounds. Browning, on the other hand, involves the Maillard reaction between sugars and proteins. Both create delicious flavors, but true caramelization takes longer and produces a sweeter, more mellow result. Understanding this difference helps you achieve exactly what you want in your caramelized onion recipe.
Double Batch for Freezing
Caramelized onions freeze beautifully. Make a double batch and freeze half for later use. Spread them on a tray to cool, then transfer to a freezer-safe bag. They keep for up to three months. When you need them, thaw overnight in the fridge and warm them in a skillet. Having ready-made caramelized onions on hand is a game-changer for quick weeknight meals.
Quick Tips For Oven Caramelized Onions
- Slice evenly: Uniform onion rings cook at the same rate for even caramelization.
- Use parchment paper: It prevents sticking and makes cleanup effortless.
- Set a timer: Stir every 15 minutes to prevent burning and promote even browning.
- Do not rush: Low and slow cooking at 375°F produces the best flavor and texture.
- Store properly: Keep leftovers in an airtight container in the fridge for up to five days.
- Experiment with flavors: Add balsamic vinegar, thyme, or brown butter for extra depth.
- Choose sweet onions: Vidalia, Walla Walla, and Texas 1015 give the sweetest results.
Frequently Asked Questions
Can I caramelize onions in the oven at a lower temperature?
Yes, you can. Lowering the oven temperature to 325°F extends the cooking time to about 90 minutes. This method produces even sweeter onions because the sugars break down more slowly. It works well if you want to set it and forget it for a longer period. Just check and stir every 20 minutes to prevent drying.
How do I know when my onions are fully caramelized?
Look for a deep golden brown color throughout. The onions should be soft, sweet, and slightly jammy in texture. They should not have any raw white or translucent areas left. Use a kitchen timer and check at the 45-minute mark. If they are not yet the right color, give them another 10 to 15 minutes and check again.
Can I use a non-stick baking sheet for oven caramelized onions?
Absolutely. A non-stick baking sheet works well and makes cleanup even easier. You can also use a silicone baking mat or parchment paper. Just avoid using dark-colored pans, as they absorb more heat and can cause the onions to burn faster. A light-colored or aluminum baking sheet reflects heat evenly for the best results.
How long do oven caramelized onions last in the fridge?
Properly stored caramelized onions last up to five days in the refrigerator. Keep them in an airtight container to maintain moisture and prevent them from absorbing other food odors. If you notice any off smell or discoloration, discard them. For longer storage, freeze them in portions for up to three months.
Why are my oven caramelized onions turning black instead of golden brown?
Black onions mean the oven temperature is too high or the onions are sitting too long without stirring. This usually happens when the heat is above 400°F or when the pan is overcrowded. Lower the temperature to 375°F, spread the sliced onions in a single layer, and stir every 15 minutes. This should fix the problem and give you perfectly golden results.
Can I add sugar to speed up the caramelization process?
You can, but it is usually not necessary. Sweet onions already contain plenty of natural sugars. Adding extra sugar can cause them to burn faster rather than caramelize properly. If you do add sugar, use just a pinch and monitor the onions closely. The best approach is to be patient and let the natural sugars do the work over 45 to 60 minutes at 375°F.
Conclusion
Mastering how long to caramelize onions in oven is one of the easiest kitchen skills to learn. With the right oven temperature, quality sweet onions, and a little patience, you can create sweet caramelized onions that taste better than anything from a jar. The oven method is simple, hands-free, and produces consistent results every time.
Remember the key points. Keep the heat at 375°F, slice your onions evenly, stir every 15 minutes, and give them the full 45 to 60 minutes they need. Avoid common mistakes like overcrowding the pan or rushing the process. And most importantly, have fun experimenting with flavors and uses.
Caramelized onions are a versatile ingredient that adds depth and sweetness to almost any dish. Once you make a batch of perfect oven caramelized onions, you will wonder how you ever lived without them. Start with this guide, practice a few times, and soon you will be a caramelized onion pro. Your taste buds will thank you.