Learn How Long To Cook Breaded Chicken Tenderloins In Oven
Learning how long to cook breaded chicken tenderloins in oven is the key to crispy, juicy chicken every time. Most breaded chicken tenderloins bake perfectly at 400°F for 18 to 25 minutes. This guide covers cooking times, temperatures, tips, and mistakes to avoid so your oven-baked chicken turns out golden brown and delicious.
There is something deeply satisfying about pulling a tray of golden brown chicken out of the oven. The aroma fills the kitchen, the crust crackles slightly, and you know you have made something truly good. How long to cook breaded chicken tenderloins in oven is one of the most common questions home cooks ask, and it is a great question to have answered.
Whether you are meal prepping for the week, making dinner for the family, or just craving crispy chicken without the hassle of deep frying, oven-baked breaded chicken tenderloins are the answer. They are easy, they are reliable, and once you nail the time and temperature, you will never go back to takeout again. This guide walks you through everything you need to know to get perfect results every single time.
Baked breaded chicken has come a long way from the dry, bland pieces many people remember from their childhood. With the right technique, you can achieve a crunchy outer coating that gives way to tender, juicy meat inside. Let us dive into the details and make sure your next batch of chicken is absolutely delicious.
Key Takeaways
- Standard bake time: Breaded chicken tenderloins cook in 18 to 25 minutes at 400°F depending on thickness.
- Internal temperature matters: Always cook chicken to 165°F internally for food safety.
- Thinner cuts cook faster: Thin tenderloins may be done in 15 minutes, while thicker pieces need closer to 25 minutes.
- Crispiness tips: Use panko breadcrumbs, light oil spray, and a wire rack for the best crunch.
- Avoid common mistakes: Don’t overcrowd the pan, skip the resting time, or undercook your chicken.
- Storage works well: Baked breaded chicken keeps in the fridge for 3 to 4 days and reheats nicely.
📑 Table of Contents
- Why Oven-Baked Breaded Chicken Tenderloins Are a Game Changer
- How Long To Cook Breaded Chicken Tenderloins In Oven
- Step-by-Step Guide to Perfect Breaded Chicken Tenderloins
- Tips for Getting Ultra-Crispy Breaded Chicken
- Common Mistakes to Avoid
- Serving Suggestions and Storage Tips
- Frequently Asked Questions
- Conclusion
Why Oven-Baked Breaded Chicken Tenderloins Are a Game Changer
Before we get into the specifics of cooking time, let us talk about why oven-baking is such a fantastic method for breaded chicken tenders. Understanding the benefits helps you appreciate why getting the time and temperature right matters so much.
The Benefits of Baking Over Frying
Frying chicken in oil works, but it comes with downsides. It creates a mess, uses a lot of oil, and can be tricky to get consistent results. Oven-baked chicken solves all of these problems.
Here is why baking wins:
- Less mess: No splattering oil to clean up after.
- Healthier: You use a fraction of the fat compared to deep frying.
- Even cooking: The oven surrounds the chicken with heat on all sides.
- Hands-off cooking: You can prep other dishes while the chicken bakes.
- Consistent results: Once you find your perfect time and temp, you can repeat it every time.
When you bake chicken tenders in the oven, you also get better control over the texture of the crust. A light coating of oil spray helps the breading crisp up beautifully without needing to submerge the chicken in a vat of hot oil.
What Makes Perfect Breaded Chicken
Great oven fried chicken starts before it ever hits the oven. The breading, the cut of meat, and your oven setup all play a role. Chicken tenderloins are ideal because they cook quickly and evenly, making them perfect for oven baking.
The best breaded chicken has three layers of success:
- A well-seasoned coating: Salt, pepper, garlic powder, and paprika go a long way in adding flavor to the breadcrumb layer.
- A good breading adhesion: Dipping the chicken in beaten egg or buttermilk before coating helps the crumbs stick during baking.
- The right oven temperature: High heat, usually around 400°F, creates that satisfying golden crust.
Getting these elements right means your breaded chicken recipe will turn out restaurant-quality results from your own kitchen. The crust stays crispy, the inside stays moist, and every bite is satisfying.
How Long To Cook Breaded Chicken Tenderloins In Oven
Now let us get to the heart of the matter. How long to cook breaded chicken tenderloins in oven depends on a few factors, but the general guidance is straightforward. Most breaded chicken tenders need between 18 and 25 minutes at 400°F.
Standard Cooking Time and Temperature
Here is the baseline you can start with:
- Temperature: 400°F (200°C)
- Standard time: 18 to 25 minutes
- Flip halfway: Turn the pieces over at the 10-minute mark
- Internal temperature: 165°F (74°C) measured at the thickest part
This works for standard-sized chicken tenderloins that are about 1/2 inch to 3/4 inch thick. Thinner pieces will cook faster, and thicker ones will need a few extra minutes. The key is always to use a meat thermometer to check doneness rather than relying solely on the clock.
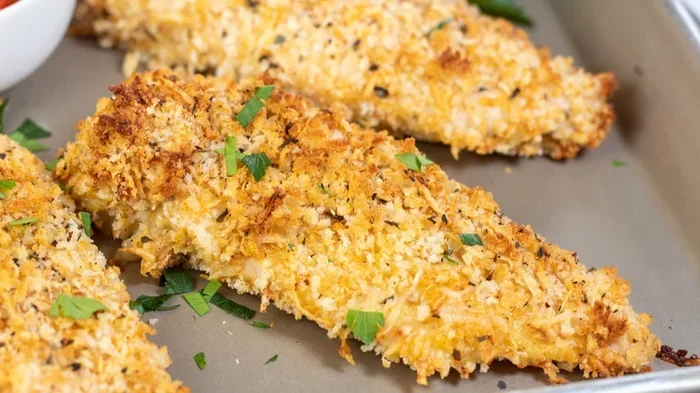
A good rule of thumb is to look at the breading. When it turns golden brown and the edges start to crisp, your chicken is likely close to done. But the visual cue should always be backed up with a temperature reading for food safety.
Factors That Affect Cooking Time
Not all chicken tenderloins are created equal, and several factors change how long your bake chicken tenders will take. Understanding these variables helps you adjust your cooking plan.
Thickness of the tenderloin: This is the biggest factor. Thin-sliced tenders from the store might be done in 15 minutes, while thicker hand-cut pieces could take 25 minutes or slightly more.
Whether you froze the chicken: Never cook frozen breaded chicken straight from the freezer without adjusting the time. You will need to add several minutes and lower the temperature slightly to make sure the inside cooks through without burning the outside.
Your oven: Every oven runs a little differently. Some ovens run hot, others run cool. Knowing your oven and making small adjustments is part of the learning process. An oven thermometer can be a cheap and useful tool for accuracy.
How many pieces you are cooking: Overcrowding the pan creates steam, which prevents the breading from crisping. More on this in the next section.
Breading thickness: A heavy coating of breadcrumb coating takes longer to crisp through than a thin, even layer. If you like a thick crust, add a couple of minutes to your cooking time.
Step-by-Step Guide to Perfect Breaded Chicken Tenderloins
Knowing the time and temperature is only half the battle. The method you use to prep and bake your chicken tenderloins makes a big difference in the final result. Here is a simple step-by-step walkthrough.
Preparing the Breading
Start by setting up your breading station. You need three shallow dishes:
- Dish 1: Flour seasoned with salt, pepper, and garlic powder.
- Dish 2: Beaten eggs or buttermilk.
- Dish 3: Panko breadcrumbs mixed with your favorite spices. Panko gives a lighter, crunchier coating than regular breadcrumbs.
Take each tenderloin and dredge it in flour first, shaking off the excess. Dip it into the egg or buttermilk, letting the excess drip off. Then press it firmly into the breadcrumb mixture, coating all sides evenly. Place the coated chicken on a clean plate or baking sheet lined with parchment paper.
Let the breaded chicken rest for about 10 minutes before baking. This resting step helps the coating set and stick better during cooking. It is a small step that makes a noticeable difference in how the breadcrumb coating holds up in the oven.
The Baking Process
Preheat your oven to 400°F while the chicken rests. Line a baking sheet with foil or parchment paper for easy cleanup, and place a wire rack on top if you have one. The wire rack allows air to circulate underneath the chicken, which promotes even crispy chicken tenders on all sides.
Arrange the breaded tenderloins on the rack or directly on the baking sheet. Make sure there is space between each piece. Even cooking depends on good air circulation, so give each piece at least an inch of space.
Lightly spray the tops of the chicken with cooking oil. This sounds counterintuitive for a healthier option, but a thin mist of oil helps the breading brown and crisp up beautifully. It is a tiny amount that makes a big impact.
Bake for 10 minutes, then flip each piece carefully. Bake for another 8 to 15 minutes depending on thickness. Check the internal temperature with a meat thermometer to confirm it has reached 165°F. Once done, remove from the oven and let the chicken rest for a few minutes before serving.
Tips for Getting Ultra-Crispy Breaded Chicken
Crispy breaded chicken is what separates a good dish from a great one. Here are some tried-and-true tips that take your oven fried chicken from average to absolutely delicious.
Choosing the Right Breading
The type of breading you use matters more than most people realize. Panko breadcrumbs are the go-to choice for crispy results. They are lighter and flakier than standard breadcrumbs, which means they crisp up better in the oven without turning soggy.
You can also mix panko with grated Parmesan cheese for extra flavor and crunch. The cheese browns beautifully and adds a savory kick that pairs perfectly with chicken. Some cooks even add a little bit of cornstarch to their breading mix for an extra-crispy texture.
The Secret to Crispiness
The single biggest secret to crispy baked chicken is air circulation. Using a wire rack instead of placing chicken directly on a baking sheet allows hot air to flow underneath, crisping both sides evenly. This one change transforms your results.
Another secret is the oil spray. A very light coating of oil on the top of the breading helps it brown and crisp. Too much oil makes things greasy, but a few quick sprays from a cooking oil bottle works wonders.
Do not skip the flip halfway through cooking. Baking on one side only creates an uneven texture, with one side perfectly crispy and the other soft or pale. Flipping ensures both sides get that satisfying crunch.
Common Mistakes to Avoid
Even experienced cooks make mistakes when baking breaded chicken tenderloins. Knowing what to avoid saves you from disappointing results and wasted ingredients.
Overcrowding the Pan
This is the number one mistake people make. When you squeeze too many pieces onto one baking sheet, the chicken steams instead of baking. The breading turns soft and soggy instead of crispy and golden. Give each piece room to breathe, and if you need to cook a large batch, use two baking sheets or bake in multiple rounds.
Skipping the Internal Temperature Check
Visual cues are helpful, but they are not foolproof. The only way to know for sure that your chicken is fully cooked is to check the internal temperature chicken with a meat thermometer. Chicken that looks done on the outside can still be undercooked inside, which is a food safety risk.
Always insert the thermometer into the thickest part of the tenderloin, avoiding contact with the bone if there is one. Wait a few seconds for the reading to stabilize. 165°F is the target every time.
Not Letting the Chicken Rest
Resting the chicken after baking lets the juices redistribute throughout the meat. If you cut into it immediately, the juices run out and the chicken dries out faster. Five minutes of resting time makes a noticeable difference in how juicy and tender your breaded chicken tenders turn out.
Serving Suggestions and Storage Tips
Your perfectly baked breaded chicken is ready, and now it is time to enjoy it. Here are some ideas for serving and storing your leftovers.
Best Dipping Sauces
The right dipping sauce takes crispy chicken tenders to the next level. Here are some crowd favorites:
- Honey mustard: Sweet and tangy, it is a classic pairing that everyone loves.
- Ranch dressing: Creamy and cool, it balances the crunch of the warm chicken perfectly.
- Barbecue sauce: Adds a smoky, slightly sweet flavor that complements the savory breading.
- Hot sauce or sriracha mayo: For those who like a little heat with their oven fried chicken.
- Lemon aioli: A garlicky, lemony sauce that adds a bright, fresh flavor.
How to Store Leftovers
Leftover baked breaded chicken stores well in the refrigerator. Place the cooled chicken in an airtight container and it will keep for 3 to 4 days. Reheating in the oven at 375°F for 8 to 10 minutes helps maintain the crispiness better than using a microwave.
You can also freeze cooked breaded chicken for up to 3 months. Wrap individual pieces tightly in plastic wrap and foil, or place them in a freezer-safe bag. Thaw overnight in the refrigerator before reheating in the oven.
Frequently Asked Questions
Can I cook breaded chicken tenderloins at a lower temperature for longer?
Yes, you can bake at 375°F instead of 400°F, but you will need to add a few extra minutes. The lower temperature cooks the chicken more gently, which can help prevent the outside from burning before the inside is done. Just keep an eye on the internal temperature and adjust the time as needed.
How do I know if my breaded chicken is done without a thermometer?
The most reliable method without a thermometer is to cut into the thickest part of the tenderloin. The meat should be white all the way through with no pink remaining. The juices should run clear, not pink or red. The breading should be golden brown and firm to the touch.
Can I use regular breadcrumbs instead of panko?
Absolutely. Regular breadcrumbs work fine, but they tend to produce a denser, heavier coating compared to panko. Panko creates a lighter, crunchier texture that many people prefer. If you only have regular breadcrumbs, they will still make delicious breaded chicken tenders, just with a slightly different texture.
Should I use frozen chicken tenderloins for this recipe?
It is best to thaw your chicken before baking for even cooking and better breading adhesion. If you cook from frozen, increase the baking time by about 5 to 10 minutes and make sure the center reaches 165°F. Thawing in the refrigerator overnight is the safest method.
Can I prep breaded chicken ahead of time and bake it later?
Yes, you can bread the chicken up to a day in advance. Store the breaded pieces on a baking sheet lined with parchment paper, cover tightly with plastic wrap, and refrigerate. When ready to bake, add a couple of extra minutes to the cooking time. This works great for meal prep and entertaining guests.
Why is my breaded chicken soggy instead of crispy?
Soggy breading usually happens for one of three reasons: the pieces were too close together on the pan, there was too much moisture, or the oven temperature was too low. Make sure to use a wire rack, give each piece space, and preheat your oven fully before baking. A quick spray of oil also helps restore crispiness.
Conclusion
Mastering how long to cook breaded chicken tenderloins in oven is one of the easiest kitchen skills you can build. With the right temperature of 400°F and a bake time of 18 to 25 minutes, you can create crispy, juicy breaded chicken tenders that rival any restaurant version. The key is paying attention to thickness, using a meat thermometer, and giving your chicken the space it needs to cook evenly.
Remember the simple steps: prep your breading, rest the coated chicken, bake on a wire rack, flip halfway through, and always check the internal temperature. Avoid the common pitfalls like overcrowding the pan or skipping the resting time. Follow these guidelines and your baked chicken tenders will be consistently delicious.
Now that you have all the knowledge you need, it is time to put it into practice. Preheat that oven, gather your ingredients, and make a batch of perfectly crispy breaded chicken tonight. Once you taste how good homemade oven-baked chicken can be, you will wonder why you ever settled for anything else. Happy cooking!