Quick Guide How To Cook Hard Boiled Eggs In Microwave Oven
Cooking hard boiled eggs in microwave oven is one of the fastest and easiest ways to prepare eggs. This guide shows you exactly how to make perfect microwave boiled eggs in minutes without any hassle. You will learn the right time, water method, and tips to avoid overcooking. Whether you want soft or fully hard boiled eggs, this guide has you covered.
There is nothing quite as frustrating as standing over a pot of boiling water, waiting for eggs to cook. The kitchen gets steamy. The timer feels like it takes forever. And sometimes, the eggs crack or the shells stick to the white. If you have ever wished for a better way, then you are in the right place. This guide will show you how to cook hard boiled eggs in microwave oven in just a few simple steps.
The microwave method is a game changer. It is fast, clean, and incredibly easy. You do not need to watch a pot or deal with a boiling-over mess. In just a few minutes, you can have perfectly cooked eggs ready to eat. Whether you are making breakfast, packing a lunch, or prepping snacks for the week, this method saves you time and effort. Let us dive into everything you need to know about making hard boiled eggs in microwave oven the right way.
Key Takeaways
- Fast and Easy: Cooking hard boiled eggs in microwave oven takes only minutes compared to stovetop boiling.
- Simple Method: You just need eggs, water, a microwave-safe bowl, and a few minutes.
- Perfect Results: Following the right time and resting steps gives you easy-to-peel eggs every time.
- Avoid Common Mistakes: Overcooking and skipping the rest time are the top errors people make.
- Versatile Use: Hard boiled eggs make great snacks, salads, and quick breakfast options.
- Safe and Practical: Using the microwave is a safe cooking method when you follow basic guidelines.
📑 Table of Contents
- Why Cook Hard Boiled Eggs In The Microwave?
- What You Need Before You Start
- Step-By-Step: How To Cook Hard Boiled Eggs In Microwave Oven
- How Long To Cook Hard Boiled Eggs In Microwave
- Common Mistakes To Avoid When Cooking Eggs In The Microwave
- Tips For Perfect Microwave Hard Boiled Eggs Every Time
- How To Use Your Microwave Hard Boiled Eggs
- Comparing Microwave Vs Stovetop Hard Boiled Eggs
- Frequently Asked Questions About Microwave Hard Boiled Eggs
- Conclusion
Why Cook Hard Boiled Eggs In The Microwave?
You might be wondering why anyone would choose a microwave over a pot of boiling water. The answer is simple: convenience. Cooking hard boiled eggs in microwave oven is faster, uses less energy, and produces less mess. Here are some reasons why this method works so well:
- Speed: A microwave can cook eggs in under 15 minutes, while stovetop boiling can take 20 to 30 minutes.
- No Waiting For Water To Boil: You skip the longest part of the traditional method entirely.
- Less Cleanup: You use one bowl instead of a pot and a strainer.
- Consistent Results: Once you learn the timing, you get the same great results every single time.
- Energy Efficient: The microwave uses less power than heating a large pot of water on the stove.
Many people also love the microwave egg hack because it works well for meal prep. You can cook several eggs at once and store them in the fridge for up to a week. This makes quick breakfast eggs available whenever you need them.
Is It Safe To Cook Eggs In A Microwave?
Yes, it is completely safe as long as you follow a few basic rules. Never microwave eggs in their shell without any water or punctures. The pressure builds up inside the egg and it can explode. But when you use the right method with water and a microwave-safe container, cooking eggs in the microwave is perfectly safe and very practical.
What You Need Before You Start
One of the best things about making microwave boiled eggs is that you need almost no special equipment. Here is a simple list of everything you will need:
- Fresh eggs: Regular large eggs work best for this method.
- A microwave-safe bowl: Use glass or ceramic. Avoid plastic containers that are not labeled microwave safe.
- Water: Enough to cover the eggs completely by about one inch.
- A lid or microwave-safe plate: This helps trap steam and cook the eggs evenly.
- A slotted spoon: For safely removing hot eggs from the water.
- A bowl of ice water: This is essential for stopping the cooking process and making peeling easier.
That is it. You do not need any fancy gadgets or special tools. A simple microwave-safe bowl and some tap water are all you need. If you want to get fancy, you can use a silicone egg cooker designed for microwaves, but it is not necessary at all.
Choosing The Right Eggs
Not all eggs are the same when it comes to microwave cooking. Older eggs peel more easily than very fresh eggs. If you have eggs that are about a week old, they will be the easiest to peel after cooking. Very fresh eggs tend to cling to the shell, which can make peeling frustrating. However, the cooking method stays the same regardless of the egg age.
Step-By-Step: How To Cook Hard Boiled Eggs In Microwave Oven
This is the core of everything. Here is the exact process for making hard boiled eggs in microwave oven that are easy to peel and perfectly cooked.
Step One: Place Eggs In The Bowl
Take your eggs and gently place them at the bottom of a microwave-safe bowl. Do not stack them on top of each other if you can avoid it. If you are cooking more than four eggs, use a larger bowl or cook them in batches. Crowding the bowl leads to uneven cooking.
Step Two: Add Water
Pour cool or room temperature water into the bowl. The water should cover the eggs by at least one inch. Some people like to add a teaspoon of salt to the water. This can help with peeling and may reduce the chance of eggs cracking during cooking.
Step Three: Cover The Bowl
Place a microwave-safe lid or a microwave-safe plate on top of the bowl. Do not seal it tightly. You want a little steam to escape. Covering the bowl traps steam, which helps cook the eggs evenly from all sides.
Step Four: Microwave On High
Cook the eggs on high power. The time depends on how many eggs you are cooking and how done you want them. For hard boiled eggs, start with 10 to 12 minutes for four eggs. We will cover exact timing in the next section.
Step Five: Transfer To Ice Water
As soon as the microwave beeps, carefully remove the bowl. Use a slotted spoon to transfer the eggs into a bowl of ice water. Let them sit for at least 10 minutes. This step is crucial. The ice water stops the cooking immediately and helps the membrane separate from the egg white. This makes peeling much, much easier.
Step Six: Peel And Enjoy
Gently tap each egg on a hard surface to crack the shell all over. Roll the egg between your hands to loosen the shell. Start peeling from the wider end where the air pocket is. The shell should come off in large pieces, not tiny frustrating bits.
How Long To Cook Hard Boiled Eggs In Microwave
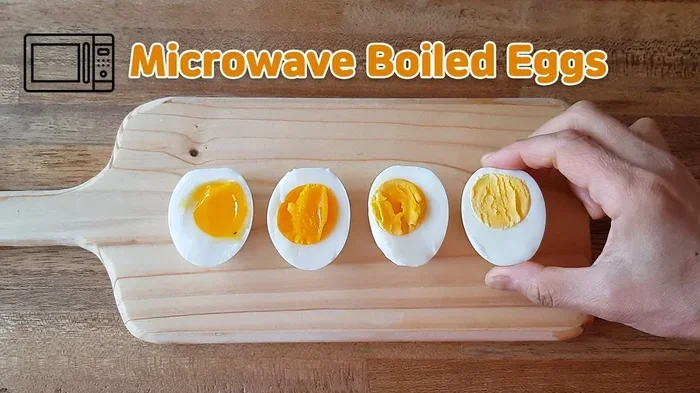
Timing is the most important part of cooking microwave hard boiled eggs. Too little time and the yolk will be runny. Too much time and the yolk turns green and the texture becomes rubbery. Here is a simple timing guide:
- 4 eggs: 10 to 12 minutes on high power for fully hard boiled eggs.
- 6 eggs: 12 to 14 minutes on high power.
- 8 eggs: 14 to 16 minutes on high power. Consider cooking in two batches for best results.
- Soft boiled eggs: 6 to 8 minutes on high power. The yolk will be slightly runny and creamy.
These times are based on a standard 1000 to 1200 watt microwave. If your microwave has a lower wattage, you may need to add a minute or two. Higher wattage microwaves may need slightly less time. Always start checking at the lower end of the range and adjust from there.
Why Resting Time Matters
After the microwave stops, the eggs continue to cook from residual heat. This is called carryover cooking. That is why the ice water bath is so important. It halts the cooking process instantly. Skipping the ice water bath often leads to overcooked eggs with a green ring around the yolk. That green ring is harmless but not very appetizing.
Common Mistakes To Avoid When Cooking Eggs In The Microwave
Even though microwave cooking is simple, there are a few mistakes that can ruin your results. Here are the most common errors people make and how to avoid them:
Mistake One: Skipping The Water
Never put dry eggs in the microwave. Without water or some liquid, the eggs will explode. The steam builds up inside the egg with nowhere to go. Always use enough water to fully cover the eggs. This is the single most important rule for safe microwave egg recipe preparation.
Mistake Two: Overcooking The Eggs
Microwaves cook eggs faster than most people expect. It is easy to go a minute or two too far. Start with the lower time and check your eggs. You can always cook them for another minute if needed. You cannot undo an overcooked egg.
Mistake Three: Not Letting Eggs Rest In Ice Water
Some people skip the ice water bath to save time. Do not do this. The resting time is what gives you easy-to-peel eggs. Without it, you will struggle with tiny pieces of shell stuck to the egg white. Ten minutes in ice water makes a huge difference.
Mistake Four: Using A Non-Microwave-Safe Container
Always check that your bowl or container is labeled microwave safe. Some plastics will melt or release harmful chemicals when heated. Glass and ceramic are the safest choices for cooking boiled eggs in microwave oven.
Mistake Five: Cooking Too Many Eggs At Once
Crowding the bowl leads to uneven cooking. Some eggs may be done while others are still undercooked. Stick to four eggs per batch for the most consistent results. If you need more, cook them in two separate rounds.
Tips For Perfect Microwave Hard Boiled Eggs Every Time
Getting great results every time comes down to a few small details. Here are some expert tips that will level up your microwave egg cooking game:
- Use older eggs: Eggs that are 7 to 10 days old peel much more easily than brand fresh eggs.
- Add salt to the water: A teaspoon of salt can help prevent cracking and make peeling smoother.
- Poke a tiny hole: Some people like to poke a small hole in the wider end of the egg with a pin before cooking. This releases steam and reduces the chance of cracking.
- Use a cover: A lid or plate traps steam and helps cook the eggs more evenly.
- Let eggs cool completely: Do not peel eggs while they are still warm. Let them cool fully in the ice water for the best peeling experience.
- Store properly: Keep peeled or unpeeled eggs in an airtight container in the fridge. They stay fresh for up to 7 days.
Quick Tips Section
Here are some fast microwave cooking tips you can remember:
- Always cover the bowl when microwaving eggs.
- Never skip the ice water bath.
- Start with less time and add more if needed.
- Use room temperature water, not ice cold water, to start.
- If an egg cracks during cooking, it is still safe to eat.
- For meal prep, cook a batch on Sunday and enjoy eggs all week long.
Expert Insights On Microwave Egg Cooking
Many cooking experts agree that the microwave is one of the best tools for making hard boiled eggs. The key is understanding how microwaves heat water and how that steam cooks the egg from the outside in. Unlike a stovetop where the water boils at 212°F consistently, microwave heating can create hot spots. This is why covering the bowl and letting the eggs rest after cooking are so important. The steam distributes heat more evenly, and the resting period allows the temperature to equalize throughout the egg.
Professional cooks also recommend adding a small amount of vinegar to the water. This helps prevent any egg that does crack from leaking out into the water. It does not affect the taste but keeps your cooking liquid clean and your eggs looking perfect.
How To Use Your Microwave Hard Boiled Eggs
Now that you know how to make them, let us talk about what to do with your hard boiled eggs in microwave oven creations. There are so many delicious ways to enjoy them:
- On their own: A simple pinch of salt and pepper makes a great snack.
- In salads: Slice them and toss into a green salad or pasta salad.
- As a breakfast option: Slice on toast with avocado and hot sauce.
- In sandwiches: Chop and mix with mayonnaise for a classic egg salad sandwich.
- On ramen: Place a halved egg on top of instant noodles for a restaurant-quality bowl.
These eggs also work wonderfully for easy egg recipe ideas throughout the week. You can meal prep on Sunday and have ready-to-eat protein available all week. This is especially helpful for people with busy mornings who need a quick and nutritious option.
Comparing Microwave Vs Stovetop Hard Boiled Eggs
You might be curious about how microwave hard boiled eggs compare to traditional stovetop boiled eggs. Here is a quick side-by-side look at the two methods:
| Feature | Microwave Method | Stovetop Method |
|---|---|---|
| Cooking Time | 10 to 15 minutes total | 20 to 30 minutes total |
| Prep Time | 2 minutes | 5 minutes |
| Cleanup | One bowl | One pot and strainer |
| Energy Use | Low | Medium to high |
| Consistency | Very consistent with practice | Can vary based on stove |
| Peeling Ease | Excellent with ice water bath | Good with ice water bath |
| Batch Size | 4 to 6 eggs per batch | Up to 12 eggs at once |
As you can see, the microwave method wins on speed and convenience. The stovetop method allows for larger batches, but for most households, cooking four to six eggs in the microwave is more than enough. The microwave egg cooker approach is simply the smarter choice for everyday cooking.
Frequently Asked Questions About Microwave Hard Boiled Eggs
Can you boil eggs in the microwave with the shell on?
No, you should never microwave eggs in their shell without water. The pressure builds up inside the egg and it will explode. Always cook eggs in a bowl of water in the microwave. This keeps the pressure balanced and the eggs safe to eat.
How do you know when microwave hard boiled eggs are done?
The easiest way to check is to carefully remove one egg with a slotted spoon and tap it on a hard surface. If the yolk feels firm and the white is completely set, the eggs are done. If the yolk still feels soft, put the eggs back in the microwave for one to two more minutes.
Why do microwave hard boiled eggs sometimes have a green ring around the yolk?
The green ring is caused by overcooking. When eggs cook too long, a chemical reaction between the iron in the yolk and the sulfur in the white creates a grayish-green compound. Prevent this by using the correct cooking time and immediately transferring eggs to an ice water bath after cooking.
How long do microwave hard boiled eggs last in the fridge?
Hard boiled eggs can be stored in the refrigerator for up to 7 days. Keep them in their shell until you are ready to eat them. Once peeled, eat them within 2 to 3 days for the best quality and freshness.
Can you cook soft boiled eggs in the microwave?
Yes, absolutely. For soft boiled eggs, reduce the cooking time to 6 to 8 minutes on high power. The yolk will be runny and creamy. The ice water bath is still important, but reduce the resting time to about 5 minutes for a soft set yolk.
Is it better to peel microwave hard boiled eggs right away or let them sit?
It is best to let the eggs cool completely before peeling. After the ice water bath, you can store them unpeeled in the fridge. Peel them just before eating for the best texture. Unpeeled eggs also last longer in the refrigerator because the shell acts as a natural protective barrier.
Conclusion
Cooking hard boiled eggs in microwave oven is one of the simplest and most useful kitchen skills you can learn. It saves time, reduces mess, and delivers consistent results every single time. With just a few minutes of effort, you can have perfectly cooked eggs ready to eat, store, or add to your favorite recipes.
Remember the key steps: use a microwave-safe bowl, cover the eggs with water, microwave for the right amount of time, and always use an ice water bath afterward. Avoid the common mistakes like skipping the water or overcooking, and you will have easy-to-peel, delicious eggs every time.
Whether you are a busy parent looking for a quick breakfast, a student needing a protein-packed snack, or someone who loves meal prep, this microwave egg recipe will become one of your go-to kitchen staples. Give it a try today and see how easy it really is to make perfect hard boiled eggs in the microwave. You will never go back to the stovetop method again.
Start with four eggs, follow the timing guide, and enjoy the satisfaction of perfectly cooked eggs in a fraction of the time. Once you master this simple technique, you will wonder how you ever managed without it. Happy cooking!