How To Finish Ribs In Oven After Smoking Like A Pro
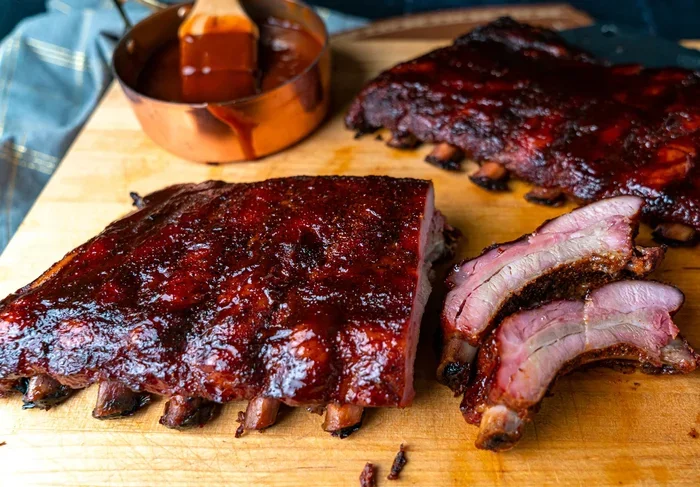
Learning how to finish ribs in oven after smoking is a game-changer for any home pitmaster. This guide covers everything from prep and oven temperature settings to wrapping methods and saucing techniques. You will walk away knowing exactly how to achieve fall-off-the-bone tender ribs with a perfect smoke ring and a beautiful glaze every single time.
There is nothing quite like the aroma of smoked ribs filling up your kitchen. Whether you started them on a charcoal grill or a smokers box, the real magic often happens when you transfer those ribs into the oven to finish. This technique, known as oven finishing, gives you more control over the final texture and keeps your ribs perfectly moist.
Many pitmasters swear by this method because it solves a common problem. Outdoor smokers can be unpredictable. Wind, rain, and temperature swings all affect your cook. By moving your ribs into the oven, you create a stable environment that lets the meat cook evenly. The result is tender ribs with a gorgeous smoke ring and a bark that cracks when you bite through it.
If you have been wondering how to get consistent results every time, you are in the right place. This guide will walk you through the entire process, from preparation to the final glaze. By the end, you will feel confident enough to finish ribs in oven after smoking like a seasoned pro.
Key Takeaways
- Oven finishing bridges the gap between smoking and serving, giving you more control over the final texture and bark.
- Low and slow is the key — keep your oven between 225°F and 275°F for the best results.
- Wrapping ribs in foil or butcher paper helps retain moisture and speeds up the cooking process.
- Always use a meat thermometer to check internal temperature, aiming for 195°F to 205°F for tender ribs.
- Apply sauce in the last 15 minutes to prevent burning and achieve a sweet, sticky glaze.
- Rest your ribs for at least 10 minutes before cutting to let the juices redistribute.
- Bone-in ribs work best for oven finishing because they hold moisture better than boneless cuts.
📑 Table of Contents
Why Finish Ribs In The Oven After Smoking
The idea of finishing ribs in the oven might seem unusual at first. After all, the whole point of smoking is to use that wonderful wood fire, right? But here is the truth. Many competitive cooks and backyard legends use the oven as the final step. It is not about replacing the smoker. It is about giving yourself more control and consistency.
When you smoke ribs outdoors, many variables come into play. Your smoker temperature might fluctuate. The wind could shift. Even the type of wood you use can create uneven smoke distribution. By moving your ribs into the oven, you eliminate most of those unpredictable elements. The oven provides steady, even heat that wraps around every bone.
Oven finishing also helps you achieve a specific texture that can be hard to get from smoking alone. You get to control the final stage of cooking more precisely. This means you can aim for that perfect fall-off-the-bone tenderness without worrying about overcooking or drying out the meat. The smoke flavor from your earlier cook stays locked in, while the oven handles the rest.
Another big reason people choose this method is timing. A full smoke can take five to eight hours. If you are cooking for a party or a family gathering, you need to know exactly when those ribs will be ready. Oven finishing lets you plan your timeline much more accurately. You can start the smoke early in the day and finish the ribs in the oven right when your guests arrive.
Preparing Your Ribs Before The Oven
Choosing The Right Ribs
Not all ribs are created equal when it comes to oven finishing. Bone-in ribs work best for this method. The bones act as natural insulators, keeping the meat moist and protecting it from the direct heat of the oven. Pork ribs are the most popular choice, and for good reason. They have the perfect balance of meat, fat, and connective tissue that breaks down beautifully during cooking.
Spare ribs are thicker and meatier, making them great candidates for oven finishing. Baby back ribs are smaller and cook a bit faster, but they still turn out beautifully. If you are new to this technique, start with a standard rack of barbeque ribs from your local butcher or grocery store. Look for ribs with a good layer of fat and bright pink meat. Avoid ribs that look dry or have a grayish color, as these will not render properly during the final cook.
Trimming And Seasoning
Before your ribs go into the oven, take a few minutes to prepare them properly. Start by removing the membrane from the back of the rack. Use a butter knife to loosen one corner, then grab it with a paper towel and pull it off. This thin membrane can block rub flavors from reaching the meat. It also creates a chewy texture that nobody wants on their plate.
Next, apply your favorite dry rub generously. A good rub should include brown sugar, paprika, garlic powder, onion powder, salt, and black pepper. Massage it into every surface of the ribs. Let the seasoned ribs sit at room temperature for about 30 minutes before they go into the oven. This helps the rub adhere better and starts the cooking process more evenly across the rack.
If you already smoked your ribs, they should be wrapped and ready to go. Place them meat-side down on a sheet of heavy-duty aluminum foil. Add a splash of apple juice, apple cider vinegar, or beef broth to the foil. This liquid creates steam that keeps the ribs moist during the final cook. Wrap the foil tightly, making sure there are no gaps where steam can escape. A tight wrap is essential for trapping moisture and creating that tender texture you are looking for.
Setting Up Your Oven For Perfect Results
Temperature Settings
The most important factor in oven finishing is the temperature. You want to keep it low and slow. Set your oven to 225°F or 250°F. This mimics the environment of a good smoker and allows the ribs to cook gently without drying out. The goal is to let the connective tissue break down slowly, which is what gives ribs their signature tender texture.
Avoid the temptation to crank up the heat. Higher temperatures might seem faster, but they will ruin your ribs. The collagen in pork needs time to convert into gelatin. This is what gives ribs that tender, juicy texture. If you cook too hot, the fat renders out too quickly and the meat becomes tough and dry. Patience is the secret ingredient in oven finishing.
Rack Position And Pan Setup
Place a rib rack on the middle oven rack. This keeps the ribs elevated and allows hot air to circulate around them evenly. If you do not have a rib rack, you can place a cooling rack inside a baking sheet. This serves the same purpose and costs much less. The key is to keep the ribs off the bottom of the pan so they do not sit in any rendered fat or liquid.
Line the baking sheet with aluminum foil for easy cleanup. Place a small pan of water on the bottom rack of the oven. This adds moisture to the cooking environment and prevents the ribs from drying out. Some cooks also place a shallow dish of water directly under the rib rack for extra humidity. This simple step can make a big difference in the final texture of your ribs.
Make sure your oven is fully preheated before the ribs go in. An oven thermometer is a great investment if you want precise results. Many ovens run hotter or cooler than their dial suggests, and even a 25-degree difference can affect your cook time and final outcome. Taking this small step can save you from a batch of unevenly cooked ribs.
Temperature, Timing, And Wrapping Methods
The Foil Wrap Method
The foil wrap method is the most popular way to finish ribs in the oven after smoking. The foil creates a tight seal that traps moisture and heat. This essentially braises the ribs, breaking down tough connective tissue and making the meat incredibly tender. It is also the fastest method, which makes it ideal for weeknight dinners or when you are short on time.
Place your wrapped ribs in the oven at 225°F to 250°F. Let them cook for about 90 minutes to two hours. The exact time depends on the thickness of the ribs and how well-done you prefer them. Check the internal temperature with a meat thermometer. You are aiming for 195°F to 205°F. At this range, the collagen in the meat has fully converted to gelatin, giving you that fall-off-the-bone texture everyone loves.
When you unwrap the ribs, you will notice they have become incredibly tender and juicy. The liquid in the foil is full of flavor. Some cooks save this liquid and drizzle it back over the ribs before saucing. It adds an extra layer of richness that is hard to beat. Just be careful not to let the liquid pool under the ribs, as this can make the surface soggy instead of forming a nice bark.
The Butcher Paper Method
If you want a slightly firmer bark, try the butcher paper method. Butcher paper is breathable, which means it lets some steam escape while still retaining most of the moisture. This creates a texture that is tender but not mushy. Many competition cooks prefer this approach because it preserves the bark better than foil does.
Wrap your smoked ribs in a double layer of pink butcher paper. Place them in the oven at 250°F. Cook for about 60 to 90 minutes. Butcher paper gives you a nice balance between the foil method and going unwrapped. It keeps the ribs moist without steaming them to death. The result is ribs with a firm exterior and a juicy, tender interior.
One advantage of butcher paper is that it absorbs excess grease. This means your ribs will have less of that greasy mouthfeel and more of a clean, meaty flavor. If you have ever had ribs that felt too slick or wet, switching to butcher paper might be the solution you need.
Going Unwrapped
Going unwrapped is the boldest option. It produces the crunchiest bark and the most concentrated flavor. However, it requires more attention because the ribs can dry out faster. This method is best for experienced cooks who are comfortable monitoring their ribs closely throughout the final cook.
If you choose this route, place the ribs directly on the rack and cook at 250°F. Check them every 30 minutes and spritz with apple juice or apple cider vinegar if the surface looks dry. Unwrapped ribs typically need about 60 to 90 minutes in the oven. Use a spray bottle to mist the ribs lightly. This keeps the surface moist without adding too much liquid and without softening the bark you worked so hard to develop during the smoke.
Saucing And Glazing For A Beautiful Finish
When To Apply Sauce
Timing is everything when it comes to sauce. The worst mistake you can make is adding BBQ sauce too early. The sugars in the sauce will burn at high temperatures, leaving you with a bitter, blackened mess. Apply your sauce in the last 10 to 15 minutes of cooking. This gives the sauce time to set without scorching.
Remove the foil or paper wrap about 15 minutes before the ribs are done. This gives the surface a chance to dry out slightly and develop a sticky base for the sauce. Then brush on a thin layer of your favorite BBQ sauce. You can apply multiple thin layers for a thicker glaze. Each layer should be thin enough to set without dripping off. Thick globs of sauce will just slide off and burn in the oven.
How To Get A Perfect Glaze
A great glaze starts with a good sauce. Look for sauces that balance sweet, tangy, and smoky flavors. Kansas City-style sauces are thick and sweet, perfect for glazing. Carolina-style vinegar sauces are thinner and tangier, which gives a different but equally delicious finish. Memphis-style sauces often include a mustard base that adds a unique kick. Experiment with different styles to find what suits your taste.
Brush the sauce on with a silicone basting brush. Work quickly and evenly. Place the ribs back in the oven uncovered for the final 10 to 15 minutes. The heat will caramelize the sugars in the sauce, creating a beautiful, glossy finish. You will know the glaze is ready when it looks shiny and slightly tacky to the touch. Do not walk away from the oven during this final stage, as the sauce can go from perfectly glazed to burnt in just a few minutes.
For extra flavor, sprinkle a light dusting of smoked paprika or a touch of brown sugar on top before the final bake. This adds a subtle crunch and enhances the sweet, smoky profile of your ribs. You can also add a drizzle of honey or maple syrup right before the ribs come out for an extra layer of sweetness that caramelizes beautifully.
Common Mistakes And How To Avoid Them
Mistake 1: Skipping The Rest Period
One of the biggest mistakes home cooks make is cutting into ribs the moment they come out of the oven. Your ribs need time to rest. When you cut too soon, the juices run out onto the cutting board instead of staying in the meat. The result is dry, less flavorful ribs that do not live up to their potential.
Let your ribs rest for at least 10 minutes after removing them from the oven. Tent them loosely with foil during this time. The internal temperature will remain high enough to continue cooking the meat gently. This rest period allows the juices to redistribute throughout the meat, giving you a much better eating experience. Think of it like letting a steak rest after grilling. The same principle applies here.
Mistake 2: Using The Wrong Oven Temperature
Cooking ribs at too high a temperature is a recipe for disaster. If you set the oven to 350°F or higher, the outside of the ribs will burn long before the inside is tender. Remember, the goal is low and slow. Keep the temperature between 225°F and 275°F at all times. This gentle heat gives the connective tissue time to break down properly.
If your oven runs hot, use an oven thermometer to verify the actual temperature. Adjust accordingly. A difference of just 25 degrees can mean the difference between perfect ribs and a disappointing batch. Do not trust your oven dial alone. A simple oven thermometer costs just a few dollars and can save you from ruined cooks.
Mistake 3: Not Using A Meat Thermometer
Guessing when ribs are done is a common pitfall. Every rack of ribs is different. Thickness, fat content, and starting temperature all vary. Instead of relying on time alone, use a meat thermometer. Insert it into the thickest part of the meat, avoiding the bone. When the internal temperature reaches 195°F to 205°F, your ribs are ready.
Another test is the bend test. Pick up the rack of ribs from one end with tongs. If the surface cracks slightly, the ribs are done. If they bend without cracking, they need more time. This visual test works well alongside the thermometer for the most accurate results. Use both methods together for the best outcomes.
Mistake 4: Over-Saucing
It is tempting to drown ribs in BBQ sauce, especially when it looks delicious in the bottle. But too much sauce can overwhelm the natural flavor of the meat and create a soggy exterior. Apply a thin, even layer and let the oven do the work of caramelizing it. Less is more when it comes to finishing sauce.
You can always add more sauce at the table. Better to start with less and let your guests add more if they want it. This approach also prevents the sauce from burning during the final bake. Keep a small bowl of extra sauce on the side for anyone who wants more.
Expert Tips For Ribs That Impress Everyone
Now that you know the basics, here are some expert tips that will take your oven-finished ribs to the next level.
- Use apple wood chips for your initial smoke. Apple wood produces a mild, sweet smoke flavor that pairs beautifully with pork ribs. It is the most versatile wood for barbecue and works well with both spare ribs and baby backs.
- Inject the ribs before smoking for extra moisture. A simple injection of apple juice, water, and a pinch of salt can make a noticeable difference in the final product. Inject into the meatiest parts of the rack for the best results.
- Let your ribs come to room temperature before putting them in the oven. Cold ribs placed in a hot oven will cook unevenly. Take them out of the fridge 30 to 45 minutes before cooking to ensure even heat distribution throughout the meat.
- Double-wrap for extra tenderness. If you prefer super soft ribs, wrap them in foil first, then wrap the foil bundle in butcher paper. This traps maximum moisture and produces incredibly tender results that practically melt in your mouth.
- Save the drippings. The liquid that collects in the foil or pan is liquid gold. Use it to make a dipping sauce or drizzle it over sliced ribs before serving. It adds depth of flavor that store-bought sauces simply cannot match.
- Experiment with different wood chips. Hickory gives a stronger, more traditional smoke flavor. Cherry adds a beautiful reddish color and a subtle sweetness. Mixing woods can create a unique flavor profile that sets your ribs apart from the rest.
- Keep a cooking journal. Write down your times, temperatures, and results every time you cook. Over time, you will develop your own perfect recipe for oven-finished ribs tailored to your specific oven and taste preferences.
Conclusion
Finishing ribs in oven after smoking is one of the best techniques you can learn as a home cook. It gives you consistent results, better texture control, and the freedom to cook ribs even when outdoor conditions are not ideal. Whether you use the foil wrap method, butcher paper, or go unwrapped, the key is patience and attention to detail throughout every stage of the cook.
Start with quality bone-in pork ribs. Prepare them with a flavorful rub. Smoke them low and slow until they have a beautiful bark and deep smoke flavor. Then transfer them to the oven to finish at a gentle temperature. Wrap them to retain moisture, or leave them unwrapped for a firmer bark. Apply your sauce in the final minutes and let the glaze caramelize to perfection.
Avoid the common mistakes that trip up most beginners. Do not skip the rest period. Use a meat thermometer to check for doneness. Keep your oven temperature steady and low. And remember, practice makes perfect. Every batch of ribs you cook will teach you something new about your oven and your preferences.
Now that you have all the tools and knowledge, it is time to put them to use. Fire up your smoker, prepare your favorite rack of ribs, and finish them in the oven like a true pitmaster. Your family and friends will not stop talking about how good those ribs turned out. Happy cooking!
Frequently Asked Questions
Can I finish ribs in the oven without smoking them first?
Yes, you can cook ribs entirely in the oven without smoking them first. However, you will miss out on the deep smoke flavor and smoke ring that make smoked ribs so special. If you go this route, add a few drops of liquid smoke to your rub or sauce to simulate some of that smoky flavor.
How long should I smoke ribs before putting them in the oven?
A typical smoke takes about three to four hours at 225°F to 250°F. You want the ribs to develop a good bark and absorb a nice layer of smoke flavor before transferring them to the oven. The internal temperature should be around 170°F to 180°F when you move them to the oven for finishing.
What is the best temperature to finish ribs in the oven?
The best temperature is between 225°F and 250°F. This low and slow approach mirrors a smoker and allows the connective tissue to break down properly. Avoid going above 275°F, as higher temperatures can dry out the meat and ruin the tender texture you are working toward.
Can I use a convection oven for finishing ribs?
Yes, a convection oven works well for finishing ribs. The fan circulates hot air evenly, which can reduce cooking time by about 15 to 20 percent. Just keep an eye on the ribs and check the internal temperature frequently. You may need to adjust the temperature down by about 25°F to account for the more efficient heat distribution.
How do I know if my ribs are done without a thermometer?
The bend test is your best friend. Pick up the rack from one end with tongs. If the surface cracks slightly, the ribs are done. Another method is to twist a bone. If it wiggles and starts to pull away from the meat, your ribs are ready. However, a meat thermometer is always the most accurate tool for checking doneness.
Can I freeze smoked ribs and finish them later?
Absolutely. You can smoke ribs ahead of time, wrap them tightly in foil and freezer paper, and freeze them for up to three months. When you are ready to eat, thaw them overnight in the refrigerator, then finish them in the oven at 225°F to 250°F until they reach an internal temperature of 195°F to 205°F. This is a great meal prep strategy for busy weeknights.