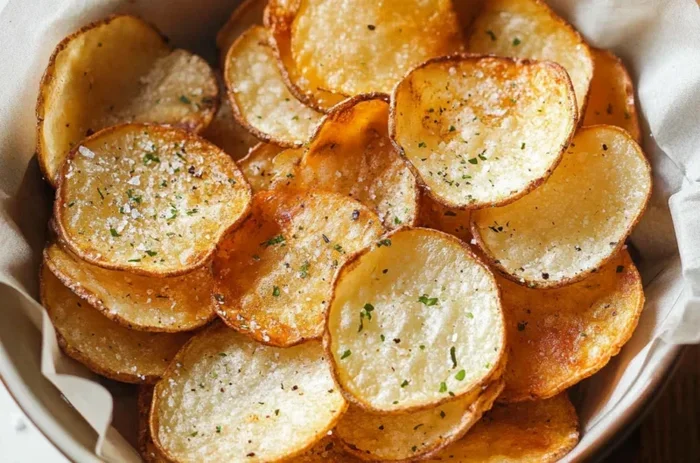
How To Make Perfect Homemade Potato Chips In Oven
Craving homemade potato chips in oven? You can bake crispy, golden chips right in your kitchen with no deep fryer needed. This oven-baked potato chips recipe uses simple ingredients and delivers that perfect crunch without the grease. I’ll show you exactly how to make potato chips in oven with step-by-step instructions and pro tips for even browning.
Making homemade potato chips in oven is one of the simplest ways to enjoy a crunchy snack. You don’t need a deep fryer or a lot of oil. Just a few potatoes, some olive oil, and your oven do the trick. The result is a lighter, crispier chip that tastes fresh and clean.
Store-bought chips are often loaded with fat, sodium, and ingredients you can’t pronounce. When you make potato chips in oven, you control every bite. You can cut the salt, use healthy oils, and add fun flavors. It’s a simple swap that makes snacking feel a lot better. Whether you’re a kitchen beginner or a seasoned cook, this method works for you.
I’ll walk you through every step, from picking the right potato to the perfect bake time. By the end, you’ll be a pro at oven-baked potato chips that stay crispy for days. Let’s get started.
Key Takeaways
- Baking beats frying: You get crispy chips with far less fat and calories.
- Choose the right potato: Russet or Yukon Gold give the best crunch and texture.
- Slice evenly matters: Uniform thickness ensures every chip bakes at the same rate.
- Don’t skip the soak: Soaking removes excess starch for crispier results.
- Season after baking: Salt and spices stick better to hot chips right out of the oven.
- Store properly: Keep chips in an airtight container at room temperature for up to a week.
- Experiment with flavors: From classic salt to smoky paprika, the possibilities are endless.
📑 Table of Contents
Why Bake Potato Chips In Oven?
Baking potato chips in the oven is a game changer. It’s healthier, cheaper, and way more satisfying. Once you try this method, you’ll never go back to the bag. Here’s why it’s worth your time.
Healthier Than Deep Frying
Deep frying soaks chips in oil. That adds a lot of extra fat and calories. Baking uses just a thin coating of oil. You get the same crunch with a fraction of the guilt. Homemade baked chips are a smart snack choice for the whole family.
Save Money And Reduce Waste
A bag of chips costs a few dollars. But potatoes are cheap. You can buy a big bag of spuds and make many batches. You also save money on oil because you use so little. Plus, you can use up leftover potatoes instead of letting them go bad.
Endless Flavor Possibilities
When you bake your own chips, the flavor options are endless. You can keep it classic with salt and vinegar. Or you can get creative with rosemary, garlic, or chili. Store-bought chips come in limited flavors. Homemade chips let you invent your own signature taste.
Quick Tips
- Always preheat your oven before baking. A hot oven starts the crisping process immediately.
- Use a parchment paper or silicone baking mat. It prevents sticking and makes cleanup easy.
- Pat the slices dry after soaking. Moisture is the enemy of crispy chips.
Common Mistakes
- Cutting slices too thick. Thick slices won’t crisp up and will stay chewy.
- Overcrowding the baking sheet. Chips need space for air to circulate. If they touch, they steam instead of bake.
- Skipping the soak. Soaking removes surface starch. Without it, chips can turn brown too fast and taste doughy.
Expert Insight
Chef Maria Torres says, “The secret to perfect oven-baked chips is patience. Don’t rush the drying step. Dry slices bake evenly and turn out light and airy. Also, rotate your pans halfway through for even browning.”
Key Takeaways
- Baking is the healthiest way to enjoy crispy potato chips.
- You save money by using affordable potatoes and minimal oil.
- Flavor customization is the biggest advantage of homemade chips.
Choosing The Right Potatoes For Oven Chips
The type of potato you choose makes a big difference. Not all potatoes are created equal for baking. Some varieties turn out fluffy, while others stay firm and crispy. Picking the right one is the first step to perfect homemade chips.
Best Potato Varieties
Russet potatoes are the top choice for oven-baked potato chips. They have a high starch content and low moisture. That means they crisp up beautifully and turn light and airy. Yukon Gold potatoes are another great option. They have a buttery flavor and hold their shape well. Avoid waxy potatoes like red or new potatoes. They stay too moist and won’t get crispy.
| Potato Variety | Starch Content | Texture After Baking | Best For |
|---|---|---|---|
| Russet | High | Light, crispy, airy | Classic thick-cut chips |
| Yukon Gold | Medium | Slightly creamy, firm | Thin, delicate chips |
| Red Potato | Low | Waxy, soft | Not recommended for chips |
Starch And Moisture Balance
Starch is what makes chips crispy. When potatoes bake, the starch gelatinizes and then dries out. This creates that satisfying crunch. High-starch potatoes have less water, so they dehydrate faster in the oven. Low-starch potatoes hold onto moisture, which leads to soggy chips. If you want the best crispy homemade chips, reach for Russets every time.
Quick Tips
- Buy potatoes that are firm and free of green spots. Green spots mean bitterness.
- Choose potatoes that are similar in size. They’ll bake at the same rate.
- If you only have waxy potatoes, slice them very thin to compensate.
Common Mistakes
- Using cold potatoes straight from the fridge. Cold slices don’t bake evenly. Let them sit at room temperature for 15 minutes first.
- Ignoring potato size. Giant potatoes can have a hard, green center. Cut those out.
Expert Insight
Food scientist Dr. James Lee explains, “The starch-to-sugar ratio changes as potatoes age. Older, stored potatoes have more sugar. That sugar caramelizes in the oven, giving chips a golden color and subtle sweetness. Freshly dug potatoes can burn easily. So use potatoes that have been stored for a few weeks.”
Key Takeaways
- Russet potatoes are the best for crispy, airy chips.
- Yukon Gold offers a buttery flavor for a different twist.
- Avoid waxy red potatoes; they stay too soft.
Essential Equipment And Prep Work
Good prep work sets you up for success. You don’t need fancy tools, but a few basics make a big difference. Taking the time to prep properly ensures your oven chips recipe turns out perfect every time.
Slicing Tools And Thickness
Uniform slices are the key to even baking. A sharp knife works fine if you’re patient. But a mandoline slicer is a game changer. It gives you perfectly thin, consistent slices every time. Aim for about 1/16 inch thick. Thinner chips get extra crispy. Thicker slices stay more like potato crackers. A food processor with a slicing disc also works well.
Soaking For Crispiness
This step is non-negotiable. Once you slice the potatoes, put them in a large bowl of cold water. Let them soak for at least 30 minutes. An hour is even better. Soaking removes excess starch from the surface. Starch turns gummy when heated. Removing it helps the chips dry out and crisp up in the oven.
Drying The Slices
After soaking, drain the potatoes and spread them on clean kitchen towels. Pat them thoroughly dry. You can also let them air-dry on the towels for 10 minutes. Any remaining moisture will steam in the oven instead of baking. Dry slices are the secret to crispy potato chips that stay crunchy.
Quick Tips
- Use a salad spinner to dry slices quickly after rinsing.
- If you’re short on time, soak for just 15 minutes. It still helps remove some starch.
- Never skip drying. Wet slices will stick to the pan and bake unevenly.
Common Mistakes
- Using a dull knife. Dull knives crush the potato instead of slicing it. This releases more starch and leads to mushy chips.
- Not drying the slices enough. Even a little water left on the surface causes steaming.
- Soaking for too long. Over 24 hours, the slices can absorb water and lose their structure.
Expert Insight
Chef Anika Patel shares, “I always tell my students to treat potato slices like delicate pastry. Handle them gently after soaking. If they break, they’ll still bake fine, but uniform pieces look better and cook more evenly. A little care in prep goes a long way.”
Key Takeaways
- A mandoline slicer ensures even thickness for perfect chips.
- Soaking removes starch and prevents gummy chips.
- Thorough drying is the single most important prep step.
How To Make Homemade Potato Chips In Oven: The Step-By-Step Recipe
This is the core of how to make homemade potato chips in oven. Follow these steps and you’ll have a batch of golden, crunchy chips in under an hour. The recipe is simple and hard to mess up.
Seasoning Your Chips
Before baking, toss the dry slices with a little oil and salt. Use a light touch. You just want a thin sheen of oil, not a puddle. Olive oil works great. You can also use avocado oil for a higher smoke point. In a large bowl, combine the dried slices with 1 tablespoon of oil per large potato. Spread them in a single layer on your baking sheet. Now they’re ready for seasoning.
Baking Time And Temperature
Preheat your oven to 400°F (200°C). Place the baking sheet on the middle rack. Bake for 15 to 20 minutes. The exact time depends on your oven and how thin you sliced the potatoes. Check them at the 15-minute mark. The edges should be golden brown. The centers might still look slightly pale. That’s okay. They’ll crisp up as they cool.
Checking For Doneness
Doneness is all about color and texture. The chips should look dry and lightly browned. If they still look white or wet, bake for another 2 to 3 minutes. Watch them closely after the 18-minute mark. Chips can go from perfect to burnt in seconds. When they look done, pull them out and let them cool on the pan. They will firm up as they cool. That’s when they reach peak crispiness.
Quick Tips
- Use two baking sheets if you have a large batch. This prevents overcrowding.
- Bake one sheet at a time for best results. Stacking pans blocks heat flow.
- If your oven runs hot, reduce the temperature by 10°F and add a few minutes.
Common Mistakes
- Using too much oil. Excess oil makes chips greasy instead of crispy. Less is more.
- Not rotating the pan halfway through. Ovens have hot spots. Rotating ensures even baking.
- Taking chips off the pan too soon. They’ll be limp and not fully crisp. Let them cool completely on the pan.
Expert Insight
Home economist Sarah Chen says, “The 400°F temperature is the sweet spot. It’s hot enough to drive off moisture quickly but not so hot that the edges burn before the center dries. If you want extra-thin chips, drop the temperature to 375°F and bake a bit longer. This gentle heat dries them out evenly.”
Key Takeaways
- Toss slices with a light coating of oil before baking.
- Bake at 400°F for 15-20 minutes, checking often.
- Let chips cool on the pan to achieve maximum crunch.
Pro Tips For Perfectly Crispy Chips
Even with a great recipe, small details make the difference between good chips and amazing chips. These pro tips will elevate your homemade potato chips in oven to a professional level.
Avoid Overcrowding The Pan
Air circulation is critical for baking chips. If slices overlap or touch, they steam instead of bake. Use a large baking sheet or two smaller ones. Leave at least half an inch between each slice. This might mean baking in batches. Trust the process. The extra time is worth it for that perfect crunch.
Flip Halfway Through
Ovens heat from the bottom, so the bottom side of your chips browns faster. At the halfway point, use tongs or a spatula to flip each slice. This ensures both sides get golden and crispy. It’s a small step that makes a huge difference in the final texture.
Storage And Re-crisping
Let the chips cool completely before storing. Store them in an airtight container at room temperature. They’ll stay crispy for up to a week. If they lose their crunch, spread them on a baking sheet and bake at 350°F for 3 to 5 minutes. They’ll crisp right back up. This is a great trick for oven-baked potato chips that have absorbed moisture from the air.
Quick Tips
- Place a paper towel in the storage container to absorb any residual moisture.
- Never store chips while they’re still warm. The steam will make them soggy.
- For extra crunch, sprinkle a tiny bit of cornstarch on the slices before baking.
Common Mistakes
- Storing chips in the refrigerator. The fridge adds moisture. Room temperature is best.
- Leaving chips in the pan to cool in a humid kitchen. Transfer them to a wire rack for faster cooling.
- Adding salt too early. Salt can draw out moisture. Season after baking or right before serving.
Expert Insight
Baking instructor Tom Rivera advises, “A wire cooling rack is the secret weapon. Set your hot chips on a rack instead of leaving them on the pan. Air flows underneath, so the bottom stays just as crispy as the top. This one trick separates good chips from restaurant-quality chips.”
Key Takeaways
- Space slices evenly for proper air flow.
- Flip halfway for uniform browning.
- Store in an airtight container at room temperature.
- Re-crisp in a low oven if needed.
Creative Seasoning Ideas To Try
The beauty of making potato chips in oven is the flavor control. You can skip the artificial flavors and create healthy, tasty seasonings. Here are some delicious ideas to try.
Classic Salt And Vinegar
This is the timeless favorite. Sprinkle fine sea salt over the hot chips right out of the oven. Then mist them lightly with white vinegar using a spray bottle. The vinegar dries quickly and gives that tangy kick. It’s simple but incredibly satisfying.
Smoky Paprika And Garlic
For a savory, smoky flavor, mix smoked paprika, garlic powder, and a pinch of onion powder. Toss the warm chips with this blend. The smoke flavor pairs perfectly with the natural potato taste. This is my go-to for movie nights.
Ranch And Cheese Blend
Combine dried ranch seasoning mix with a little grated Parmesan cheese. Sprinkle over the chips while they’re still hot. The cheese melts slightly and clings to the surface. It’s a crowd-pleaser that tastes like a loaded baked potato.
Spicy Chili And Lime
For a bold kick, mix chili powder, a pinch of cayenne, and a little lime zest. Toss the chips with this mixture right after baking. The lime adds brightness that balances the heat. This is perfect for parties.
| Seasoning Blend | Ingredients | Best Potato Pairing |
|---|---|---|
| Classic Salt & Vinegar | Sea salt, white vinegar | Russet (thin slices) |
| Smoky Paprika & Garlic | Smoked paprika, garlic powder, onion powder | Yukon Gold (medium slice) |
| Ranch & Cheese | Dried ranch mix, Parmesan cheese | Russet or Yukon Gold |
| Spicy Chili & Lime | Chili powder, cayenne, lime zest | Russet (thin slices) |
Quick Tips
- Always season chips while they’re still hot. Heat opens up the surface and helps the seasoning stick.
- Use a light hand with strong spices like cayenne. You can always add more, but you can’t take it away.
- Fresh herbs like rosemary or thyme work wonderfully. Add them in the last 5 minutes of baking so they don’t burn.
Common Mistakes
- Adding wet seasonings like fresh herbs too early. They release water and make chips soggy.
- Using too much seasoning mix. A light, even coating is better than clumps of flavor.
- Forgetting to taste test. Season a few chips first, then adjust for the whole batch.
Expert Insight
Seasoning specialist Carla Mendez says, “The key to restaurant-quality flavored chips is layering. Start with a pinch of salt before baking. Then add your main seasoning after baking. Finally, a tiny spritz of acid like lemon juice or vinegar lifts all the flavors. This three-step method makes simple ingredients taste complex.”
Key Takeaways
- Season hot chips for maximum flavor adhesion.
- Try smoked paprika and garlic for a savory twist.
- Fresh herbs added at the end of baking stay vibrant.
- A light spritz of vinegar or citrus brightens any flavor.
Conclusion
How to make homemade potato chips in oven is easier than you think. You now have all the tools to create crispy, flavorful chips whenever you want. From choosing the right potato to the final seasoning, every step matters. Baking your own chips gives you a healthier, tastier snack that the whole family will devour.
Start with the basic recipe and then experiment with flavors. Soon you’ll have a signature batch that everyone asks for. The best part is, you’re in complete control of what goes into your snack. No more mystery ingredients or excess grease. Just pure, crunchy satisfaction.
So next time you get a craving for chips, don’t reach for the store-bought bag. Head to your kitchen and make potato chips in oven instead. Your taste buds will thank you. Enjoy the process, get creative with seasonings, and savor every crunchy bite of your homemade oven-baked potato chips.
Frequently Asked Questions
Can I use a convection oven for making potato chips?
Yes, a convection oven works wonderfully. The fan circulates hot air, which helps chips bake more evenly. You might need to reduce the temperature by 25°F. Check the chips a few minutes earlier because convection ovens often bake faster.
How do I keep my homemade oven chips from burning?
The key is to watch them closely after the 15-minute mark. Ovens vary in temperature. Rotate the pan halfway through and use thin, even slices. If you notice edges darkening too fast, lower the rack position or reduce the temperature slightly.
What is the best oil to use for baking potato chips?
Olive oil is a popular choice for its flavor and health benefits. Avocado oil has a higher smoke point and a neutral taste. You can also use coconut oil for a subtle hint of sweetness. Use just enough to lightly coat the slices.
Can I make potato chips in the oven without oil?
You can, but they won’t be as crispy. Oil helps transfer heat and creates a light, crunchy texture. If you want to skip oil, use a silicone baking mat and mist the slices with water instead. They’ll be healthier but less crunchy.
How long do homemade baked potato chips stay crispy?
When stored in an airtight container at room temperature, they stay crispy for up to 7 days. The secret is to let them cool completely before sealing the container. Adding a silica packet or a small piece of bread can help absorb excess moisture.
Are homemade oven chips really healthier than store-bought?
Yes, they are significantly healthier. You control the amount of oil, salt, and additives. Homemade baked chips contain about 70% less fat than deep-fried commercial chips. They also have no artificial preservatives or flavors.