How Long To Cook Chex Mix In The Oven For Best Results
Learn how long to cook Chex Mix in the oven for the perfect crispy snack. This guide covers exact baking times, temperatures, and easy tips to avoid burning. You’ll discover the ideal oven-baked Chex Mix recipe, cooling tricks, and storage advice to keep it fresh for days.
Learning how long to cook Chex Mix in the oven is a question many snack lovers ask. The answer is simpler than you think. With the right temperature and timing, you can create a crunchy, flavorful mix that beats store-bought versions every time. This guide walks you through the exact baking process step by step.
Whether you are prepping for a game day party or just craving a salty treat, homemade Chex Mix is the way to go. The oven does all the work for you. You just need to know the perfect bake time and a few simple tricks. I will share everything you need to know right here.
By the end of this article, you will understand the ideal oven temperature, the total baking time, and how to keep your mix crispy for weeks. You will also learn how to customize flavors and avoid common mistakes. Let us dive into the world of oven-baked Chex Mix and make the best snack ever.
Key Takeaways
- Bake at 250°F: This low temperature ensures even toasting without burning the cereal, pretzels, or nuts.
- Stir every 10 minutes: Regular stirring prevents clumping and promotes uniform crispiness throughout the mix.
- Total cook time is 45–60 minutes: Depending on your oven and ingredients, the Chex Mix needs about an hour to reach perfect crunch.
- Cool completely before storing: Letting the mix cool on a baking sheet keeps it crispy and prevents sogginess.
- Store in an airtight container: Proper storage keeps your homemade Chex Mix fresh for up to two weeks.
- Customize with your favorite seasonings: Add ranch powder, garlic salt, or cinnamon sugar for a personalized flavor twist.
📑 Table of Contents
Why Homemade Chex Mix Is a Perfect Oven Snack
The Appeal of Crunchy, Savory Snacks
There is something magical about a bowl of crunchy Chex Mix. It combines salty, savory, and sometimes sweet flavors in every bite. Unlike chips, it offers a satisfying crunch without the guilt of a heavy snack. People love it for movie nights, holiday parties, and simple afternoon munching.
The beauty of homemade Chex Mix lies in its simplicity. You use a few pantry staples. You control the seasoning. You decide how crunchy you want it. No artificial preservatives. No mystery ingredients. Just real food, baked to perfection.
Store-bought versions often taste stale or overly salty. Making your own gives you a stale-free, crispy texture that stays fresh for days. It is also much cheaper. A single batch can fill a large bowl for the whole family.
What Makes Oven-Baked Chex Mix Different
Oven-baking is the traditional method for Chex Mix. It uses dry heat to toast each piece evenly. The low temperature slowly removes moisture, which creates that signature snap. Stovetop methods can burn the cereal quickly. The oven gives you gentle, consistent heat.
When you bake Chex Mix in the oven, you can spread it out on a large sheet pan. This allows air to flow around every piece. The result is a uniform crunch. No soggy patches. No burnt edges.
Quick Tip: Always use a rimmed baking sheet. It prevents cereal pieces from falling into the oven. A parchment paper lining makes cleanup a breeze.
The Ideal Oven Temperature for Chex Mix
Why Low and Slow Works Best
The secret to perfect Chex Mix is a low oven temperature. High heat will scorch the cereal and pretzels before the nuts are toasted. Low heat allows the moisture to escape slowly. This creates a light, crispy texture without any bitter burnt notes.
Most Chex Mix recipes call for 250°F (120°C). This temperature is gentle enough to toast all ingredients evenly. It also gives you a wide window to stir and check the mix. You will not have to rush. You can relax and enjoy the aroma filling your kitchen.
Expert Insight: Professional bakers often use 250°F for oven-baked snacks because it mimics the effect of a dehydrator. The slow drying process preserves the shape and crunch of each piece.
Setting Your Oven to 250°F
Before you start, preheat your oven to 250°F. Let it reach the target temperature fully. An oven thermometer can help you verify the heat. Many home ovens run hot or cold, so knowing the true temperature is important.
Place the oven rack in the center position. This ensures hot air circulates evenly around the baking sheet. Avoid placing the sheet too close to the top or bottom elements. Direct heat can create hot spots that burn your mix.
If your oven runs hot, you can drop the temperature to 225°F. If it runs cool, 275°F may work better. Adjusting slightly can make a big difference in the final texture.
How Long to Cook Chex Mix In The Oven
Step-by-Step Baking Timeline
The total baking time for Chex Mix is typically 45 to 60 minutes. This range accounts for different ovens and ingredient variations. The key is to watch the mix closely and stir it often. Do not just set a timer and walk away.
Here is a simple timeline to follow:
- Minutes 0–10: Spread the mix on the baking sheet. Put it in the preheated oven. Set a timer for 10 minutes.
- Minutes 10–20: Open the oven and stir the mix gently. Use a spatula to turn pieces over. This prevents burning on the bottom.
- Minutes 20–30: Stir again. You will notice the mix starting to look golden and dry. The aroma will fill your kitchen.
- Minutes 30–45: Continue stirring every 10 minutes. The crunch will increase. Check for any dark brown pieces and remove them.
- Minutes 45–60: The final stage. The mix should be evenly toasted and crispy. Remove it from the oven when it looks and smells perfect.
Checking for Doneness and Crispiness
How do you know when Chex Mix is done? The mix will look dry and slightly golden. The cereal pieces will feel hard and crunchy when cooled. Pretzels will be firm. Nuts will be toasted but not dark.
Let the mix cool on the baking sheet for at least 15 minutes. It will crisp up more as it cools. If it feels soft right out of the oven, give it more time. You can return it to the oven for 5 to 10 more minutes.
Common Mistake: Many people pull the mix out too early. It will seem soft and underdone. Remember that cooling is part of the process. Patience leads to the best crunch.
Adjusting Time for Different Ovens
Every oven is different. A conventional oven may bake faster than a convection oven. Gas ovens often run hotter than electric ones. These differences affect how long to cook Chex Mix in the oven.
Here is a helpful comparison table to guide you:
| Oven Type | Temperature | Baking Time | Stirring Frequency |
|---|---|---|---|
| Conventional Electric | 250°F | 50–60 minutes | Every 10 minutes |
| Gas Oven | 250°F | 45–55 minutes | Every 10 minutes |
| Convection Oven | 225°F | 35–45 minutes | Every 8 minutes |
| Toaster Oven | 250°F | 40–50 minutes | Every 8 minutes |
Convection ovens circulate hot air, so they bake faster. Use a lower temperature and check early. Toaster ovens have smaller spaces, so they heat up quickly. Watch your mix closely in a toaster oven to prevent burning.
Ingredients That Make the Best Chex Mix
The Classic Cereal Base
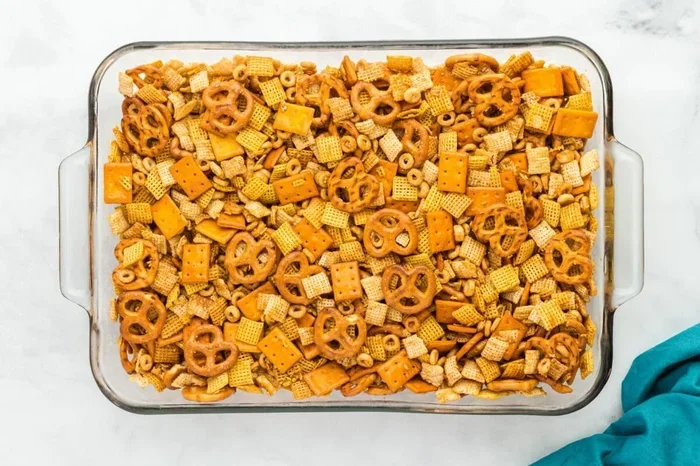
The foundation of any Chex Mix is the cereal. Traditional recipes use Chex cereal in three flavors: Wheat, Rice, and Corn. These cereals are light and crispy. They absorb seasoning beautifully without turning soggy.
You will need about 6 cups of mixed cereal for a standard batch. You can use all one flavor or combine them for a colorful mix. The cereal provides the main crunch. It is the star of the show.
Quick Tip: Pour the cereal into a large bowl first. Remove any broken pieces. This ensures every piece in the mix is fully crispy and uniform.
Adding Pretzels, Nuts, and Bagel Chips
Pretzels add a salty twist to Chex Mix. Mini pretzel twists work best. They blend in easily and offer a different texture. Add about 2 cups of pretzels to your mix.
Nuts bring a rich, buttery flavor. Peanuts are the classic choice, but you can use almonds or cashews too. Use 1 to 2 cups of nuts. Toasting them in the oven enhances their flavor and crunch.
Bagel chips are a fun addition. They add a hearty crunch and a slight tang. Use about 1 cup. You can find plain or flavored bagel chips. They pair well with savory seasonings.
Expert Insight: The ideal party snack balance is 3 parts cereal, 1 part pretzels, and 1 part nuts. This ratio gives you the perfect mix of textures and flavors.
Seasoning Blends for Flavor
The seasoning is what turns plain cereal into a delicious snack. The classic savory blend includes butter, Worcestershire sauce, and onion powder. You can also try ranch powder, garlic salt, or cayenne pepper for a kick.
For a sweet twist, use cinnamon sugar or cocoa powder. The butter helps the seasoning stick to every piece. Melted butter is the best binder. It coats the cereal evenly and helps the flavors meld together.
Here are some popular seasoning combinations:
- Ranch Style: Ranch powder, garlic salt, onion powder, and melted butter.
- Savory Classic: Worcestershire sauce, butter, onion powder, and celery salt.
- Sweet Cinnamon: Cinnamon sugar, melted butter, and a pinch of nutmeg.
- Spicy Kick: Cayenne pepper, paprika, garlic powder, and melted butter.
Easy Chex Mix Recipe and Baking Instructions
Mixing the Ingredients
Start by gathering all your ingredients. You will need cereal, pretzels, nuts, bagel chips, and your chosen seasoning. In a large bowl, combine the dry ingredients first. Toss them gently with your hands or a big spoon.
Next, melt the butter. Use about 3 tablespoons for a standard batch. Pour the melted butter over the dry mix. Add the liquid seasonings like Worcestershire sauce or ranch powder. Toss everything until the pieces are evenly coated.
Do not rush this step. Even coating means every bite is flavorful. Spread the coated mix onto a parchment-lined baking sheet. Use a large sheet pan or two smaller ones. Avoid overlapping the pieces. They need space to breathe.
Spreading on the Baking Sheet
The spread is crucial for even baking. A thin, single layer works best. If you pile the mix too high, the bottom pieces will steam instead of toast. This leads to soggy Chex Mix.
Use a spatula or your hands to spread the mix. Leave a little space between each piece. The oven air needs to flow around the cereal. This is the secret to a crispy oven-baked snack.
Quick Tip: If you only have a small baking sheet, bake in two batches. Overcrowding is the number one cause of unevenly baked Chex Mix.
The Baking Process
Place the baking sheet in the preheated 250°F oven. Set a timer for 10 minutes. When the timer goes off, pull the oven door open. Use a spatula to stir the mix gently. Scrape the edges and turn any pieces that look pale.
Repeat this process every 10 minutes for the next 45 to 60 minutes. The mix will gradually turn golden and smell toasty. Around the 30-minute mark, you will notice the cereal pieces becoming firm.
At the 45-minute mark, start checking for doneness. Pick up a piece of cereal. It should be hard and crunchy. The pretzels should be firm. If anything feels soft, give the mix 5 more minutes. Trust your senses. The aroma will tell you when it is ready.
When the mix is done, turn off the oven. Leave the door cracked open. Let the mix cool inside the oven for 10 minutes. Then transfer it to a cooling rack or a large bowl. Break up any clumps while it is still warm.
Storing and Keeping Chex Mix Crispy
Cooling Before Storage
Never store Chex Mix while it is still warm. Warm pieces create condensation inside the container. That moisture will make the cereal soggy. Let the mix cool completely at room temperature. This usually takes about 30 minutes.
Once cool, the mix should be fully crispy. If you notice any soft pieces, spread them out on a plate and let them air dry for a few more minutes. The goal is a completely dry, crunchy snack ready for storage.
Airtight Containers and Shelf Life
The best way to store homemade Chex Mix is in an airtight container. A large glass jar with a tight lid works perfectly. You can also use a plastic food storage container or a heavy-duty zip-top bag. Press out as much air as possible before sealing.
Properly stored Chex Mix stays fresh for up to two weeks. The crunch will remain intact for the first 7 to 10 days. After that, the texture may start to soften. It will still be safe to eat, but the experience is best within the first week.
Common Mistake: Storing Chex Mix in the refrigerator. The fridge introduces moisture and odors. Keep it in a cool, dark pantry instead. The pantry maintains a stable, dry environment that preserves crunch.
Reviving Stale Chex Mix
If your Chex Mix has lost its crunch, do not throw it away. You can revive it easily. Spread the stale mix on a baking sheet. Bake it at 250°F for 5 to 10 minutes. The low heat will drive out the moisture and restore the crispiness.
Let it cool completely before storing again. This trick works wonders for leftover mix or snacks that have been sitting out for a few days. Your homemade Chex Mix will taste almost as good as the day you made it.
Expert Insight: Adding a small packet of dry rice or a silica gel packet inside the storage container can absorb any residual moisture. This extends the shelf life and keeps the mix crunchy for even longer.
Conclusion: Knowing how long to cook Chex Mix in the oven is the key to a perfect homemade snack. The low temperature of 250°F and a bake time of 45 to 60 minutes create a crispy, flavorful mix that everyone loves. By following the simple steps and tips in this guide, you will avoid burning, achieve uniform crunch, and customize flavors to your liking. Whether you are making a classic savory blend or a sweet cinnamon version, the process is easy and rewarding. Store your oven-baked Chex Mix properly, and it will stay fresh for up to two weeks. Grab a bowl, share it with friends, and enjoy the satisfying crunch of your very own homemade snack.
Frequently Asked Questions
Can I bake Chex Mix at a higher temperature to save time?
You can, but it increases the risk of burning. Higher temperatures like 300°F reduce the bake time to about 30 minutes, but you must stir very frequently. The low-and-slow method at 250°F is safer and produces more even results.
How do I know when Chex Mix is done baking?
The mix will look golden brown and feel dry. When you press a piece of cereal, it should be hard and crunchy. The aroma will be toasty and rich. If anything feels soft, give it a few more minutes in the oven.
Can I make Chex Mix on the stovetop instead of the oven?
Yes, you can. Stovetop methods use a large skillet and medium-low heat. You stir constantly for about 15 minutes. However, oven-baking gives a more uniform crunch and is easier for larger batches. It also frees up the stovetop for other dishes.
What is the best way to store leftover Chex Mix?
Store it in an airtight container at room temperature. A glass jar or plastic food container works well. Keep it in a cool, dark pantry. Avoid the refrigerator, as moisture can make the mix soggy.
Can I freeze Chex Mix to make it last longer?
Yes, freezing works well. Spread the cooled mix in a single layer on a baking sheet, freeze it for one hour, then transfer it to a freezer bag. It will stay fresh for up to three months. Let it thaw at room temperature before serving.
Why is my Chex Mix soggy after baking?
Soggy Chex Mix usually means the ingredients were too wet when mixed, or the mix was stored while still warm. Make sure your butter is not too hot when you toss the cereal. Also, let the mix cool completely on a baking sheet before putting it in a container.