How To Use Air Fryer On Your Kitchenaid Oven Today
Using the air fryer function on your Kitchenaid oven is simple and transforms how you cook crispy, delicious meals at home. This guide walks you through every step, from activating the air fryer mode to choosing the right accessories and temperatures. You will learn tips, tricks, and common mistakes to avoid for perfect air frying results every time.
Have you ever wanted crispy fries, golden chicken, or perfectly roasted vegetables without the hassle of deep frying? Your Kitchenaid oven can do all of that and more. The air fryer function on Kitchenaid oven is a game changer for home cooks who love crispy food without the extra grease.
Many people already own a Kitchenaid oven but have no idea it has an air fryer mode built right in. This feature uses rapid hot air circulation to cook food evenly and give you that satisfying crunch. In this guide, we will show you exactly how to use air fryer on Kitchenaid oven in simple, easy steps. Whether you are a beginner or a seasoned cook, you will find practical tips to get the best results.
We will cover everything from turning on the air fryer mode to picking the right temperature and cook time. You will also learn about accessories, common mistakes, and pro tips that make a huge difference. By the end of this article, you will feel confident using your oven’s air fryer feature every single day.
Key Takeaways
- Air Fryer Mode Activation: Most Kitchenaid ovens have a dedicated air fryer setting that uses hot air circulation for crispy results.
- Right Accessories Matter: Using the air fryer basket or accessory tray makes a big difference in cooking quality.
- Temperature and Time Control: Lower temperatures and shorter cook times work best for air frying on your Kitchenaid oven.
- Versatile Cooking: You can air fry chicken, vegetables, fries, and more using your oven’s air fryer function.
- Easy Cleanup: The air fryer components are typically dishwasher safe and simple to maintain.
- Energy Efficient: Air frying on your Kitchenaid oven uses less energy than a standalone deep fryer or heating a full conventional oven.
📑 Table of Contents
- Understanding Your Kitchenaid Oven Air Fryer Feature
- Setting Up Your Air Fryer Accessory
- Step-by-Step Guide on How to Use Air Fryer on Kitchenaid Oven
- Best Foods to Air Fry in Your Kitchenaid Oven
- Tips and Tricks for Perfect Air Frying Results
- Common Mistakes to Avoid When Air Frying
- Maintenance and Care for Your Kitchenaid Air Fryer Oven
- Conclusion
Understanding Your Kitchenaid Oven Air Fryer Feature
Before you start cooking, it helps to understand what the air fryer feature actually does on your Kitchenaid oven. This mode uses a fan to push hot air around the food at high speed. The result is crispy, golden exteriors with juicy interiors, all without submerging food in oil.
Not all Kitchenaid ovens are exactly the same. Some models come with a built-in air fryer accessory, while others need you to use a separate air fryer pan or basket. Let us break down the different types so you know exactly what you are working with.
How the Air Fryer Mode Works
The air fryer mode on a Kitchenaid oven works through convection heating. A heating element surrounds the fan, and the fan blows hot air directly onto the food. This creates a crispy outer layer through a process called the Maillard reaction. The food cooks faster than a traditional oven because the hot air moves so efficiently.
Here is what happens inside your oven during air frying:
- The fan spins at high speed to circulate hot air
- The heating element warms the air to the set temperature
- Hot air flows evenly around the food on all sides
- Excess moisture and grease drip away through the tray
- The food develops a crispy golden crust without flipping
Which Kitchenaid Oven Models Support Air Fryer Mode
Most modern Kitchenaid wall ovens include an air fryer function. Popular models like the KCO255BM, KCO255BAS, and KSDB900KR series all feature this capability. If you are unsure whether your model has it, check your oven’s control panel for an air fryer icon or setting.
You can also find this information in your owner’s manual or on the Kitchenaid website. Some older models may not have the air fryer function, but you can still achieve similar results using the convection bake setting with an air fryer accessory.
Setting Up Your Air Fryer Accessory
To get started with air frying on Kitchenaid oven, you need the right accessory in place. This step is simple but very important for getting the best results.
Using the Air Fryer Basket
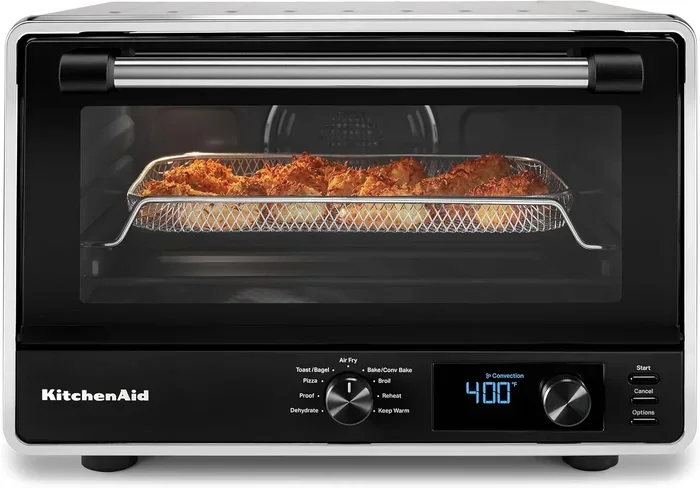
If your Kitchenaid oven came with an air fryer basket, place it on the middle rack position. The basket allows air to flow freely around the food from all directions. Make sure the basket sits securely on the rack and does not wobble.
Do not overcrowd the basket. Leave space between each piece of food so the hot air can reach every surface. Overcrowding leads to uneven cooking and soggy results instead of that perfect crisp.
Using the Air Fryer Accessory Tray
Some Kitchenaid ovens use a flat accessory tray instead of a basket. This tray has small perforations that let air pass through and grease drip below. Place the tray on the middle oven rack and arrange your food in a single layer on top.
The accessory tray works great for items like roasted vegetables, cheese crisps, and smaller portions of protein. It gives you a larger cooking surface compared to the basket but still delivers excellent air frying results.
Positioning the Rack Correctly
The middle rack position is generally best for air frying. It allows hot air to circulate evenly above and below the food. Avoid using the top or bottom racks, as they can lead to uneven cooking or burning.
Make sure there is enough clearance above and below the accessory. You need at least two inches of space on each side for proper air flow. Blocking the air flow will reduce the effectiveness of the air fryer mode.
Step-by-Step Guide on How to Use Air Fryer on Kitchenaid Oven
Now that your oven and accessory are ready, let us walk through the actual process. Following these steps will help you achieve consistent, delicious air fried meals every time.
Step 1: Preheat the Oven
Preheating is key for air frying. Set your Kitchenaid oven to the air fryer mode and choose the desired temperature. Most recipes call for preheating for about three to five minutes. This ensures the cooking chamber is hot before the food goes in.
Preheating helps food start cooking immediately. It reduces overall cook time and promotes even browning. Skip this step, and you may end up with unevenly cooked or soggy food.
Step 2: Prepare Your Food
While the oven preheats, prepare your food. Pat proteins dry with a paper towel. This removes surface moisture and helps create a crispier crust. Lightly coat vegetables or proteins with a thin layer of oil for the best results.
Season your food generously. Salt, pepper, garlic powder, paprika, and dried herbs all work wonderfully in air frying. Toss everything together in a bowl before placing it in the basket or on the tray.
Step 3: Load the Food Properly
Place your prepared food into the air fryer basket or tray. Spread items in a single layer with space between them. Do not stack or overlap pieces of food. The goal is maximum exposure to the circulating hot air.
For larger batches, cook in multiple rounds instead of cramming everything in at once. This small change makes a big difference in the texture and quality of your finished dish.
Step 4: Set the Temperature and Time
Close the oven door and set the air fryer mode. Most air frying temperatures on a Kitchenaid oven range from 350°F to 400°F. Cook times typically range from 10 to 20 minutes depending on the food.
Here is a quick reference for common air fried foods:
- French Fries: 400°F for 12 to 15 minutes, shake halfway
- Chicken Wings: 400°F for 18 to 22 minutes, flip halfway
- Roasted Vegetables: 375°F for 10 to 15 minutes, toss halfway
- Chicken Breast: 390°F for 15 to 18 minutes, flip halfway
- Fish Fillets: 380°F for 10 to 12 minutes
Step 5: Shake or Flip Halfway Through
About halfway through the cooking time, open the oven and shake the basket or flip the food. This ensures even browning on all sides. It is a simple step that prevents one side from burning while the other stays pale.
If you are using the accessory tray, use tongs or a spatula to gently turn each piece. This takes just a few seconds but dramatically improves the final result.
Step 6: Check for Doneness and Serve
When the timer goes off, check your food for doneness. Chicken should reach an internal temperature of 165°F. Vegetables should be tender and lightly browned. Fries should be golden and crispy.
Let the food rest for a minute or two before serving. This allows the juices to redistribute in proteins and helps the crust stay crispy. Transfer food to a plate lined with a paper towel to absorb any excess grease.
Best Foods to Air Fry in Your Kitchenaid Oven
The air fryer mode on your Kitchenaid oven opens up a world of cooking possibilities. Some foods work especially well with this method. Here are some of the best options to try.
Crispy Chicken and Poultry
Air fried chicken is one of the most popular reasons people use this feature. Chicken wings, drumsticks, and breast pieces all come out crispy on the outside and juicy on the inside. Marinating the chicken beforehand adds extra flavor and moisture.
For the crispiest skin, pat the chicken dry before seasoning and use a light coat of oil. The air fryer does an amazing job of crisping up poultry skin without the need for deep frying.
Roasted Vegetables
Vegetals like broccoli, Brussels sprouts, carrots, and sweet potatoes turn out beautifully in the air fryer. They come out caramelized and crispy on the edges while staying tender inside. Toss them with olive oil, salt, and your favorite seasonings before cooking.
Roasting vegetables in the air fryer takes about half the time compared to a conventional oven. The results are consistently delicious with minimal effort.
Frozen Foods and Snacks
Frozen fries, mozzarella sticks, onion rings, and chicken nuggets all cook wonderfully in the air fryer mode. These convenience foods turn out crispy without the need for deep frying or excessive oil. Simply place them in the basket, set the temperature and time, and enjoy.
Frozen foods are a great starting point for beginners who are just learning how to use air fryer on Kitchenaid oven. They require minimal preparation and deliver satisfying results every time.
Reheating Leftovers
One of the best uses of the air fryer mode is reheating leftovers. Pizza, fried chicken, and roasted vegetables all reheat beautifully without becoming soggy. The circulating hot air restores the crispy texture that microwaves tend to destroy.
Reheat at 350°F for 3 to 5 minutes. Check halfway through to make sure nothing is overheating or drying out. This method keeps leftovers tasting almost as good as fresh.
Tips and Tricks for Perfect Air Frying Results
Getting the most out of your Kitchenaid oven air fryer feature comes down to a few simple techniques. These tips will help you elevate your cooking and avoid common pitfalls.
Do Not Skip the Light Oil Coating
Even though air frying uses much less oil than deep frying, a light coating of oil helps achieve the best crispiness. Use a spray bottle or brush to apply a thin layer of oil to your food. Too much oil will make food greasy instead of crispy.
A tablespoon of oil or a quick spray is usually enough for a full batch. Focus on getting an even, thin layer over all surfaces of the food.
Season Before Cooking
Always season your food before placing it in the air fryer basket. The dry heat of air frying enhances flavors beautifully. Salt, pepper, garlic powder, onion powder, cumin, and smoked paprika are all excellent choices.
For marinades, make sure the food is mostly dry before placing it in the oven. Excess liquid will create steam and prevent crisping. Pat marinated food dry with a paper towel for the best results.
Keep an Eye on Smaller Items
Small items like baby carrots, peas, or thin chicken strips can cook very quickly. Set a timer and check them a few minutes early. It is easier to add a few more minutes than to rescue burnt food.
Smaller foods benefit from slightly lower temperatures and shorter cook times. Start checking at the lower end of the recommended time range and adjust as needed.
Use the Air Fryer Lid or Accessory Correctly
If your Kitchenaid oven comes with a dedicated air fryer lid or accessory, make sure it is properly seated. A loose or misaligned accessory can reduce air flow and lead to uneven cooking. Always lock the accessory in place before starting the air fryer mode.
Clean After Every Use
Grease and food particles can build up quickly in the air fryer basket or tray. Clean these components after every use to maintain performance and hygiene. Most Kitchenaid air fryer accessories are dishwasher safe, making cleanup a breeze.
Wipe down the interior of the oven with a damp cloth after cooking. This prevents grease buildup and keeps your oven running efficiently for years to come.
Common Mistakes to Avoid When Air Frying
Even with the best oven, mistakes can happen. Knowing what to avoid will save you time, food, and frustration.
Overcrowding the Basket
The number one mistake people make is packing too much food into the basket. This blocks air flow and leads to uneven cooking. Food ends up steaming instead of crisping, which defeats the purpose of air frying.
Always leave at least half an inch of space between each piece of food. If you need to cook a large batch, do it in two or three rounds. The extra patience pays off with much better results.
Using Too Much Oil
Air frying is not deep frying. You do not need a lot of oil. Using too much oil makes food greasy and can cause smoking inside the oven. A light spray or brush is all you need.
If a recipe calls for deep frying, you can still achieve a similar texture with air frying using just a fraction of the oil. This is one of the biggest benefits of using the air fryer mode on your Kitchenaid oven.
Not Adjusting Cook Times from Conventional Recipes
Air frying is faster than conventional oven cooking. If you follow a regular oven recipe without adjusting the time, you will likely overcook your food. Always reduce cook times by about 20 to 25 percent when air frying.
Start checking for doneness a few minutes before the recipe says. You can always cook a little longer, but you cannot undo overcooked food.
Ignoring the Preheat Step
Some people skip preheating to save a few minutes. This is a mistake. Preheating ensures the oven reaches the right temperature before food goes in. Without preheating, food takes longer to cook and may not crisp properly.
Set a three to five minute preheat timer every time. This small habit makes a noticeable difference in the quality of your air fried dishes.
Maintenance and Care for Your Kitchenaid Air Fryer Oven
Taking care of your Kitchenaid oven will keep it performing at its best for years. Regular maintenance ensures the air fryer function continues to deliver excellent results.
Cleaning the Air Fryer Accessory
After each use, remove the basket or tray and wash it with warm soapy water. For tough grease stains, let the accessory soak for 15 minutes before scrubbing. Most Kitchenaid air fryer parts are dishwasher safe, but hand washing helps preserve the nonstick coating longer.
Never use abrasive scrubbers or steel wool on the air fryer accessory. These can scratch the surface and reduce its effectiveness over time. Use a soft sponge or cloth instead.
Cleaning the Oven Interior
Wipe down the interior of the oven with a damp cloth after the oven has cooled. Grease splatter can build up on the walls and ceiling of the oven cavity. Regular wiping prevents this buildup from becoming difficult to remove.
For stubborn stains, use a paste of baking soda and water. Apply it to the stain, let it sit for 15 minutes, then wipe clean. This natural cleaning method is safe and effective.
Checking the Fan and Heating Element
The fan and heating element are the heart of the air fryer function. Periodically check these components for any food debris or grease buildup. A clean fan spins more efficiently and distributes heat more evenly.
If you notice unusual noises or uneven cooking, inspect the fan area for obstructions. Removing debris usually solves the problem quickly and easily.
Conclusion
Using the air fryer on your Kitchenaid oven is one of the easiest ways to cook delicious, crispy meals at home. With just a few simple steps, you can transform your oven into a powerful air frying machine. From crispy chicken to roasted vegetables and reheated leftovers, the possibilities are endless.
Remember to preheat your oven, use the right accessory, and avoid overcrowding the basket. These small habits make a huge difference in the quality of your air fried food. With practice, you will become more confident and creative with your air frying recipes.
Now that you know how to use air fryer on Kitchenaid oven, it is time to start cooking. Try one of the recipes or tips from this guide today and enjoy the delicious results. Your Kitchenaid oven is more versatile than you ever imagined, and the air fryer feature is just the beginning.
Frequently Asked Questions
Can I use regular aluminum foil in the air fryer basket of my Kitchenaid oven?
Yes, you can use a small piece of aluminum foil in the air fryer basket. However, do not cover the entire basket or block the air holes. Foil can restrict airflow and lead to uneven cooking. Use it only to line the basket for easier cleanup, and make sure it stays below the rim of the basket.
What temperature should I set my Kitchenaid oven to for air frying?
Most air frying recipes work best between 350°F and 400°F on your Kitchenaid oven. The exact temperature depends on the type of food you are cooking. Always start with the recommended temperature and adjust slightly based on your results over time.
Do I need to flip food when air frying in my Kitchenaid oven?
Yes, flipping or shaking food halfway through cooking is recommended for even browning. The air fryer mode circulates hot air from all directions, but flipping ensures both sides get equal exposure. This simple step makes a noticeable difference in the final texture.
Can I air fry frozen food directly in my Kitchenaid oven?
Absolutely. You can place frozen food directly into the air fryer basket without thawing first. Just add a few extra minutes to the cook time. Frozen foods like fries, chicken nuggets, and vegetables work great with the air fryer mode on your Kitchenaid oven.
Is air frying healthier than deep frying?
Yes, air frying is significantly healthier than deep frying. It uses up to 80 percent less oil while still delivering crispy results. The air fryer function on your Kitchenaid oven allows you to enjoy your favorite fried foods with much less fat and fewer calories.
How do I clean the air fryer accessory after use?
Most Kitchenaid air fryer baskets and trays are dishwasher safe. For hand washing, use warm soapy water and a soft sponge. Let the accessory soak for a few minutes if there is stubborn grease. Always let the accessory cool completely before cleaning it.