How Long Do You Bake Shrimp In The Oven For Juicy Results
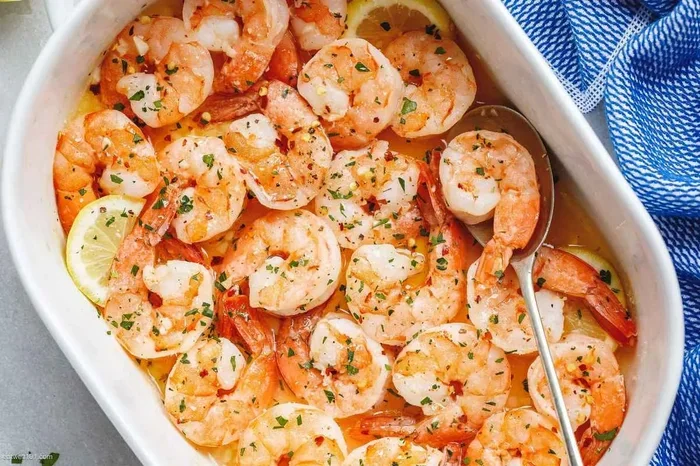
Baking shrimp in the oven is one of the fastest and easiest ways to cook delicious seafood at home. Most shrimp bake perfectly in 10 to 15 minutes at 400°F, depending on size and whether they are peeled or raw. This guide covers everything you need to know about how long you bake shrimp in the oven, from timing and temperature to seasoning and serving tips.
There is something magical about pulling a tray of oven-baked shrimp out of the oven. The kitchen fills with a warm, savory aroma, and within minutes, you have a restaurant-quality meal on the table. Whether you are a weeknight dinner hero or a weekend entertainer, learning how to bake shrimp properly changes everything.
How long do you bake shrimp in the oven? The short answer is 10 to 15 minutes at 400°F. But the full answer depends on a few key factors. Shrimp size, whether they are raw or pre-cooked, and what you pair them with all play a role. This guide walks you through every detail so you get perfectly juicy shrimp every single time.
We will cover temperatures, timing, seasoning ideas, common mistakes, and much more. By the end, you will feel confident enough to make baked shrimp your go-to weeknight dinner. Let us dive in.
Key Takeaways
- Bake shrimp at 400°F for 10–15 minutes for juicy, tender results every time.
- Large shrimp take longer than small or medium shrimp, so size matters for timing.
- Preheat your oven before placing shrimp on the baking sheet for even cooking.
- Don’t overcook shrimp — they turn rubbery and tough when baked too long.
- Season simply with olive oil, garlic, lemon, and salt for classic flavor.
- Use a wire rack for crispier results and better air circulation around the shrimp.
- Check internal temperature — shrimp are done at 120°F to 145°F depending on preference.
📑 Table of Contents
The Best Oven Temperature for Baking Shrimp
Getting the temperature right is the foundation of great oven-baked shrimp. Too hot and they dry out. Too low and they take forever. The sweet spot for most shrimp recipes is 400°F (200°C). This heat cooks the shrimp quickly while keeping them moist and tender.
Here is why 400°F works so well for baked shrimp recipes:
- Fast cooking time: High heat seals the outside quickly, locking in juices.
- Even browning: The shrimp develop a light golden color without burning.
- Flexible timing: At 400°F, you can bake small shrimp in 8–10 minutes and large shrimp in 12–15 minutes.
- Minimal risk of overcooking: The window between done and overdone is wider at this temperature.
Some recipes call for 375°F or 425°F. Both work fine. At 375°F, add a couple of extra minutes to the cook time. At 425°F, check the shrimp a minute or two earlier. But 400°F remains the most reliable temperature for consistently great results.
Can You Bake Shrimp at 350°F?
Yes, you can bake shrimp at 350°F, but it takes longer. Expect an extra 3 to 5 minutes compared to 400°F. The lower temperature gives you a wider window, which can be helpful if you are new to cooking shrimp in the oven. Just keep an eye on them and check for doneness early.
What About 450°F for Crispy Shrimp?
For extra crispy oven-baked shrimp, 450°F can work wonders. The higher heat creates a slightly crunchier exterior while keeping the inside tender. This method works best with larger shrimp and when you are using a wire rack over a baking sheet. The crispier texture is amazing for appetizers and snacks.
How Long to Bake Shrimp Based on Size
Shrimp size is the biggest factor that changes your bake time. Shrimp are labeled by count per pound, and this number tells you how big they are. Smaller numbers mean bigger shrimp, and bigger numbers mean smaller shrimp. Understanding this helps you nail the timing every time.
Here is a simple breakdown of bake times by shrimp size:
| Shrimp Size | Count Per Pound | Bake Time at 400°F | Best For |
|---|---|---|---|
| Small | 51–60 | 8–10 minutes | Appetizers, salads |
| Medium | 41–50 | 10–12 minutes | Pasta dishes, stir-fries |
| Large | 31–40 | 12–15 minutes | Main dishes, skewers |
| Extra Large | 21–30 | 14–17 minutes | Plated entrees, grilling |
These times assume raw, peeled shrimp. If you are using pre-cooked frozen shrimp, reduce the time by about 3–5 minutes since they only need to heat through. Overcooking pre-cooked shrimp is the fastest way to ruin them.
Raw vs. Pre-Cooked Shrimp: Timing Differences
Raw shrimp need more time in the oven because they go from uncooked to fully cooked during baking. Pre-cooked shrimp, often labeled “already cooked” or “ready to eat,” just need to warm up. This is a big difference that many people overlook when they first start making shrimp oven recipes.
If you buy raw shrimp, look for a slight translucent gray color. When done, they turn opaque pink or red. For pre-cooked shrimp, they are already pink when you take them out of the package. They just need 5–8 minutes in a hot oven to warm and absorb your seasonings.
Step-by-Step Guide to Baking Shrimp
Now that you know the temperature and timing, let us walk through the actual process. Baking shrimp is incredibly simple, but a few small steps make a huge difference in flavor and texture.
Step 1: Prep the Shrimp
Start by rinsing your shrimp under cold water and patting them dry with paper towels. If they still have shells, peel them off and devein the dark vein running along the back. Removing the vein is optional for taste, but it improves the look of your finished dish. For the best oven-baked shrimp, leave the tails on if you are serving them as appetizers. The tail makes them easy to pick up and adds a nice presentation touch.
Step 2: Season Generously
Place the shrimp in a large bowl. Add olive oil, salt, pepper, and any seasonings you like. Toss them until every piece is coated evenly. Do not be shy with the seasoning — shrimp are mild and love bold flavors. Some popular choices for shrimp bake recipes include garlic powder, paprika, cumin, and chili flakes.
Step 3: Arrange on a Baking Sheet
Spread the shrimp in a single layer on a lined baking sheet. Do not crowd them. Overlapping shrimp steam instead of roast, which leads to soggy results. If you are baking a large batch, use two sheets or work in two rounds. Space each shrimp about half an inch apart for the best airflow.
Step 4: Bake and Watch Closely
Place the baking sheet on the center rack of your preheated oven. Set a timer for the recommended time based on your shrimp size. Check the shrimp a minute or two before the timer goes off. You want them just done, not overcooked.
Step 5: Rest and Serve
Remove the shrimp from the oven and let them rest for 2–3 minutes. This allows the juices to redistribute. Serve immediately with lemon wedges, cocktail sauce, or your favorite dipping sauce.
Pro Tip: Use a Wire Rack
Placing shrimp on a wire rack set over a baking sheet is a game-changer. The hot air circulates around the shrimp from below, giving you a more even cook and a slightly crispier texture. This is one of the best tips for baking shrimp that restaurant kitchens use every day.
Best Seasonings and Flavor Combinations for Baked Shrimp
One of the best things about oven-baked shrimp is how versatile they are. You can go from mild and buttery to spicy and bold with just a few ingredient swaps. Here are some tried-and-true flavor combinations that work beautifully.
Classic Garlic Butter: Mix melted butter, minced garlic, parsley, salt, and a squeeze of lemon. Toss the shrimp in this mixture before baking. This is the most popular shrimp oven recipe for a reason — it is simple and unforgettable.
Lemon Herb: Combine olive oil, lemon zest, dried oregano, thyme, salt, and pepper. This light, fresh flavor pairs perfectly with salads and grilled vegetables.
Spicy Cajun: Add paprika, cayenne pepper, garlic powder, onion powder, and a pinch of brown sugar. This seasoning gives you a bold, smoky kick that works great on shrimp skewers.
Asian-Inspired: Use soy sauce, sesame oil, ginger, and a touch of honey. Finish with sliced scallions and sesame seeds after baking. This combination turns simple baked shrimp into something extraordinary.
Mediterranean: Toss shrimp with olive oil, sun-dried tomatoes, kalamata olives, feta cheese, and fresh basil. This creates a vibrant, flavorful dish that feels like a vacation on a plate.
Quick Tips for Seasoning Shrimp
- Marinate for 15–30 minutes for deeper flavor, but no longer or the acid can start to “cook” the shrimp.
- Season just before baking if you are short on time — salt draws out moisture, so adding it too early can make shrimp soggy.
- Add a drizzle of honey or brown sugar to any savory seasoning for a subtle caramelized glaze.
- Fresh herbs always win over dried when it comes to finishing baked shrimp.
Common Mistakes to Avoid When Baking Shrimp
Even though baking shrimp is simple, there are a few mistakes that can ruin your results. Avoiding these pitfalls will help you serve perfect shrimp every time.
Mistake 1: Overcrowding the Pan
When shrimp are too close together, they steam instead of roast. This creates a soggy, rubbery texture instead of the tender bite you want. Always give each shrimp space on the baking sheet. If your pan is small, use two pans or bake in batches.
Mistake 2: Cooking Too Long
This is the number one mistake people make with oven-baked shrimp. Shrimp go from perfectly done to overcooked in under a minute. Overcooked shrimp turn white and rubbery, and they lose all their juicy sweetness. Set your timer, check early, and pull them out the moment they turn fully opaque.
Mistake 3: Skipping the Pat-Dry Step
Moisture on the surface of the shrimp creates steam in the oven, which prevents browning and crisping. Always pat your shrimp dry with paper towels before seasoning and baking. This one small step makes a noticeable difference in texture.
Mistake 4: Using a Cold Baking Sheet
If you place shrimp on a room-temperature or cold baking sheet, they start cooking slowly and release liquid before the oven heat kicks in. This leads to steamed shrimp instead of roasted shrimp. Use a room-temperature sheet or preheat it slightly for better results.
Mistake 5: Not Checking for Doneness
Every oven is different, so the suggested time is just a guideline. Start checking your shrimp a couple of minutes before the minimum time. Look for an opaque pink color and a firm but springy texture. If you have a meat thermometer, the internal temperature should read 120°F to 145°F.
Expert Insight: The Curl Test
Professional chefs often use the “C” shape test to check shrimp doneness. When shrimp are perfectly cooked, they curl into a loose “C” shape. If they curl tightly into an “O,” they are overcooked. This visual cue is one of the fastest ways to tell if your baked shrimp are ready without cutting into them.
Serving Suggestions and Meal Pairings
Oven-baked shrimp pair wonderfully with a wide variety of sides and dishes. Here are some ideas to build a complete meal around your shrimp.
With Pasta: Toss baked shrimp over spaghetti, linguine, or penne with a light garlic butter sauce. Add cherry tomatoes and fresh basil for a bright, summery dish.
With Rice: Serve shrimp over jasmine rice, cilantro lime rice, or coconut rice for a tropical twist. The rice soaks up all the delicious juices from the baking sheet.
With Vegetables: Roast asparagus, zucchini, bell peppers, or broccolini on the same sheet pan as the shrimp. Just add the vegetables a few minutes earlier so everything finishes at the same time.
In Tacos: Serve baked shrimp in warm tortillas with shredded cabbage, avocado, salsa, and a squeeze of lime. This makes for a fun and casual dinner that everyone loves.
As an Appetizer: Serve skewered shrimp with a tangy cocktail sauce or creamy garlic aioli. Baked shrimp appetizers are perfect for parties and gatherings because they are easy to make ahead.
Meal Prep and Storage Tips
Can you eat baked shrimp the next day? Absolutely. Store leftover oven-baked shrimp in an airtight container in the refrigerator for up to 3 days. Reheat gently in the oven at 300°F for 5–7 minutes. Avoid microwaving, which can make the shrimp rubbery.
Can you freeze baked shrimp? Yes, you can freeze cooked shrimp for up to 3 months. Thaw them in the refrigerator overnight before reheating. The texture may be slightly softer after freezing, but the flavor stays great.
Frequently Asked Questions
Can you bake frozen shrimp without thawing them first?
Yes, you can bake frozen shrimp directly from the freezer, but you will need to add a few extra minutes to the cook time. Spread the frozen shrimp on a baking sheet and bake at 400°F for about 15–20 minutes, depending on size. The outside may cook slightly faster than the inside, so check for doneness by cutting into the thickest piece. For the best results, thaw shrimp in cold water for 10–15 minutes before baking, but it is not strictly necessary.
What is the internal temperature for fully cooked shrimp?
Shrimp are fully cooked when they reach an internal temperature of 145°F (63°C). However, many people prefer to pull shrimp at 120°F to 130°F because they continue to cook from residual heat after leaving the oven. This method keeps shrimp juicier and more tender. Look for an opaque pink color and a firm but springy texture as visual cues alongside the temperature reading.
How do you keep baked shrimp from getting rubbery?
The key to avoiding rubbery oven-baked shrimp is not overcooking them. Set a timer, check early, and remove them from the oven the moment they turn fully opaque pink. Also, make sure not to crowd the pan, as overcrowding causes steaming instead of roasting. Pat the shrimp dry before seasoning, and use a wire rack for better air circulation around each piece.
Can you put raw and cooked shrimp in the same oven recipe?
It is best to avoid mixing raw and pre-cooked shrimp in the same recipe because they need different bake times. Pre-cooked shrimp only need to warm up, while raw shrimp need time to cook through. If you must combine them, add the pre-cooked shrimp to the pan about 5 minutes after the raw shrimp go in. This way, everything finishes at roughly the same time.
Is it better to bake shrimp with or without the shell?
Baking shrimp with the shell on locks in more moisture and adds a subtle smoky, grilled flavor from the shell. However, peeled shrimp cook faster and are easier to eat, especially in pasta dishes or tacos. For the best of both worlds, try baking shrimp with the shell on and peeling them after they come out of the oven. This works especially well for shrimp skewers and appetizer-style servings.
What sides go best with oven-baked shrimp?
Oven-baked shrimp pair well with rice, pasta, roasted vegetables, crusty bread, and fresh salads. For a light summer meal, serve them over a bed of mixed greens with cherry tomatoes and a lemon vinaigrette. For a heartier option, pair baked shrimp with garlic mashed potatoes or a warm grain bowl. The versatility of baked shrimp makes them a great match for almost any side dish you enjoy.
Conclusion
Baking shrimp in the oven is one of the simplest and most rewarding things you can do in the kitchen. The answer to how long do you bake shrimp in the oven comes down to size, temperature, and a watchful eye. At 400°F, most shrimp bake perfectly in 10 to 15 minutes, whether you are cooking small appetizer-sized pieces or large entree-worthy shrimp.
Remember to pat your shrimp dry, season them well, and give them space on the pan. Avoid the common mistakes of overcrowding and overcooking, and you will have juicy, flavorful shrimp that rival anything from a restaurant. Use the seasoning combinations and serving ideas from this guide to make every batch feel fresh and exciting.
Oven-baked shrimp is a dish you can make any night of the week. It is fast, it is forgiving, and it is endlessly customizable. Once you master the basic technique, you will find yourself making baked shrimp more often than you ever expected. So preheat that oven, grab some shrimp, and get cooking. Your next favorite meal is just one tray away.