How To Clean Microwave Oven With Lemon And Baking Soda
Learn how to clean microwave oven with lemon and baking soda using this simple, natural, and highly effective method. This guide walks you through every step, from steam cleaning with fresh lemon to scrubbing stubborn stains with a baking soda paste. You will discover how to remove tough grease, eliminate bad smells, and keep your microwave sparkling clean without any harsh chemicals.
Your microwave is one of the most used appliances in any kitchen. It heats up your food in seconds and makes life so much easier. But here is the thing. Over time, it gets messy. Food splatters cover the inside. Stains build up on the walls. And sometimes, there is a weird smell that just does not go away. If you have been wondering how to clean microwave oven with lemon, you are in the right place. This guide will show you a simple, natural, and effective way to get your microwave sparkling clean. The best part? You probably already have everything you need in your kitchen right now.
Using lemon and baking soda to clean your microwave is one of the easiest and safest methods. No harsh chemicals. No strong fumes. Just a natural cleaning solution that works incredibly well. Lemon cuts through grease and leaves a fresh scent behind. Baking soda tackles tough stains and absorbs odors. Together, they make a powerful microwave cleaning team. In this article, we will walk you through every step. You will learn exactly how to use these household items to make your microwave look and smell like new again.
Key Takeaways
- Natural Cleaning Power: Lemon and baking soda work together as a powerful, chemical free cleaning solution for your microwave.
- Steam Cleaning Method: Heating lemon water creates steam that loosens grime, making it easy to wipe away food splatter and grease.
- Tough Stain Removal: A baking soda paste targets stubborn stains and burnt residue without scratching the interior surface.
- Odor Elimination: Lemon neutralizes bad microwave smells naturally, leaving a fresh citrus scent behind.
- Quick and Affordable: This method uses items you already have at home and takes less than 15 minutes.
- Safe for Your Family: No toxic chemicals or harsh residues come in contact with your food preparation surfaces.
- Regular Maintenance Matters: Simple daily habits like wiping spills right away keep your microwave clean between deep cleaning sessions.
📑 Table of Contents
- Why Lemon And Baking Soda Are The Best For Microwave Cleaning
- What You Need Before You Start
- Step By Step Guide To Clean Your Microwave With Lemon
- How To Remove Tough Stains And Stubborn Grease
- How To Eliminate Bad Smells And Odors From Your Microwave
- Tips For Keeping Your Microwave Clean Every Day
- Common Mistakes To Avoid When Cleaning Your Microwave
- Conclusion
Why Lemon And Baking Soda Are The Best For Microwave Cleaning
You might be thinking, why not just use a store bought cleaner? Well, there are many great reasons to choose lemon and baking soda instead. First, they are completely natural. You do not have to worry about chemical residue getting into your food. Second, they are affordable. A single lemon and a box of baking soda can clean your microwave several times over. Third, they are gentle on surfaces. Unlike some abrasive cleaners, lemon and baking soda will not scratch or damage the interior of your microwave.
Lemon contains citric acid, which is a natural degreaser. It breaks down food splatters and grease easily. The acid also helps dissolve stubborn stains that have been baked on over time. Baking soda, on the other hand, is a mild abrasive. It scrubs away dirt without scratching surfaces. It also neutralizes odors, which is why it is so popular for microwave odor removal. When you combine the two, you get a natural cleaner that handles both stains and smells at the same time.
The Science Behind The Cleaning Power
Let us talk a little bit about why this works so well. Citric acid, found in lemon juice, reacts with grease and grime. It breaks the bonds that hold dirt to surfaces. This makes it easy to wipe away even the toughest spots. Baking soda, also known as sodium bicarbonate, has a slightly rough texture. This texture helps it scrub away residue without damaging the surface. When you heat lemon juice with water in the microwave, it creates steam. This steam loosens dried food particles and makes them much easier to remove. The combination of steam, citric acid, and baking soda is incredibly effective for microwave cleaning.
The steam cleaning method is not just about hot water. The lemon adds a cleaning agent right into the steam itself. As the steam condenses on the cooler walls of the microwave, it carries citric acid with it. This means the cleaning action happens everywhere the steam touches. It is a brilliant and simple approach to kitchen appliance cleaning that has been used for generations.
Benefits Of Using Natural Cleaning Methods
- Safe for your family: No toxic chemicals around food preparation areas.
- Budget friendly: You already have these items in your kitchen.
- Eco friendly: No harmful chemicals go down your drain.
- Fresh scent: Lemon leaves your microwave smelling wonderful.
- Gentle on surfaces: No risk of scratches or damage to the interior.
- Quick results: Most of the work is done by steam and natural reactions.
- Versatile: The same cleaning solution works on many other household surfaces too.
What You Need Before You Start
Before you begin how to clean microwave oven with lemon, gather your supplies. You do not need anything fancy or expensive. Here is your simple shopping list.
- One or two fresh lemons (or bottled lemon juice if you prefer)
- Baking soda (about two to three tablespoons)
- A microwave safe bowl or measuring cup
- A clean cloth or soft sponge
- A small bowl of warm water
- A soft microfiber towel for drying
- Optional: white vinegar for extra degreasing power
That is it. You do not need any special cleaning solution or expensive products. Everything you need is likely already in your kitchen. If you do not have fresh lemons, bottled lemon juice works just as well. The key is the citric acid content, and bottled juice has plenty of it.
Quick tip: Use a microwave safe bowl that is large enough to hold at least two cups of water. A glass measuring cup works perfectly. Make sure the bowl can handle the heat of boiling water without cracking. Never use a metal bowl or any container that is not labeled as microwave safe. Safety always comes first when working with heat and electrical appliances.
Also, keep a separate sponge or cloth just for cleaning your microwave. This prevents cross contamination from raw food residues. A dedicated household cleaning cloth for your microwave keeps things hygienic and simple.
Step By Step Guide To Clean Your Microwave With Lemon
Now that you have everything ready, let us get started. This how to clean microwave oven with lemon guide is simple and straightforward. Follow these steps and your microwave will look brand new in just minutes.
Step One: Prepare The Lemon Steam Solution
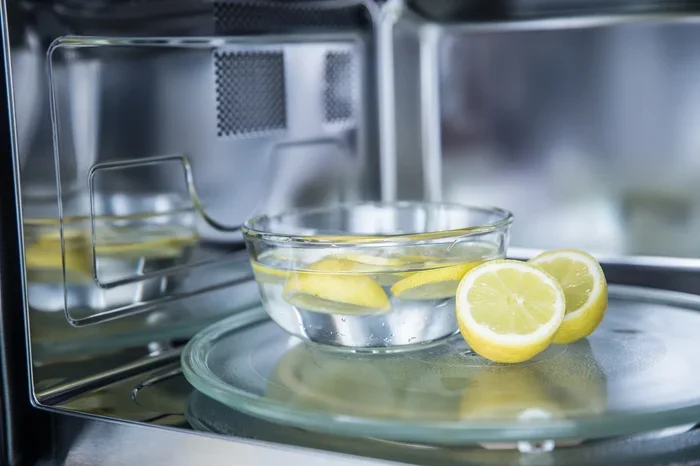
Fill your microwave safe bowl with about two cups of water. Squeeze the juice of one or two fresh lemons into the water. You can also drop the lemon halves directly into the bowl. The peel adds extra cleaning power because it contains natural oils. Place the bowl inside your microwave.
Make sure the bowl is placed on the center of the turntable. If your microwave does not have a turntable, just place it on the floor of the microwave. The goal is to heat the water and lemon juice until it boils and creates plenty of steam. The steam will reach every corner of the microwave interior, softening all the dried food splatters and grease.
Step Two: Heat The Solution For Three To Five Minutes
Turn on your microwave and heat the lemon water on high power for three to five minutes. You want the water to boil vigorously and fill the inside of the microwave with steam. The steam will soften all the dried food splatters and grease on the walls and ceiling.
Be careful when you open the door. There will be hot steam inside. Let the bowl sit for an extra minute or two after the microwave beeps. This gives the steam extra time to work on the grime. The lemon steam also helps with microwave odor removal, so your microwave will start smelling fresh right away. This steam cleaning step is the foundation of the entire process. Do not skip it or rush through it.
Step Three: Wipe Down The Interior
Carefully remove the hot bowl from the microwave. Use oven mitts or a towel to protect your hands. Now, wipe down the interior walls, ceiling, and floor of the microwave with a clean cloth or sponge. The steam has loosened most of the grime, so it should come off very easily.
You will likely see the dirt and grease wipe away in one smooth motion. For any remaining spots, dip your sponge in warm water and gently scrub. There is no need to use any harsh scrubbing pads. The lemon steam does most of the heavy lifting. Pay extra attention to the corners and the area around the microwave door hinge, where grime tends to accumulate the most.
Step Four: Make A Baking Soda Paste For Stubborn Stains
For any tough stains that did not come off with the steam, it is time to bring out the baking soda. Mix about two tablespoons of baking soda with a small amount of water. Stir it until you form a thick paste. The consistency should be similar to toothpaste.
Apply the baking soda paste directly to the stubborn stains. Let it sit for about five minutes. The baking soda will work on breaking down the stain. After five minutes, use a damp cloth to scrub the area gently. The mild abrasive quality of baking soda will lift the stain without scratching the surface. For really tough stains, you can let the paste sit for up to fifteen minutes before scrubbing.
Step Five: Clean The Turntable And Accessories
Remove the turntable (the rotating glass plate) from the microwave. Wash it with warm soapy water in your sink. Use a sponge to clean both sides. If there are any baked on food particles, the baking soda paste works great for these too. Rinse thoroughly and dry with a clean towel before placing it back in the microwave.
Do not forget to clean the microwave cover or the roller ring if your model has one. These small parts often collect grease and food debris. A quick wash with warm soapy water keeps everything fresh. Also, check the microwave filter if your model has one. Some microwaves have a charcoal or grease filter that needs occasional cleaning. Soak it in warm soapy water and rinse it well.
Step Six: Wipe Down The Exterior
Now that the inside is clean, do not forget the outside. Wipe down the door, the handle, and the control panel with a damp cloth. For the glass door, use a mixture of lemon juice and water. Spray it on and wipe with a clean cloth. This removes fingerprints and smudges, leaving your microwave looking polished from every angle. A clean exterior makes the whole appliance look new and well maintained.
How To Remove Tough Stains And Stubborn Grease
Sometimes, your microwave has stains that just will not budge with steam alone. These are usually the spots where food has been splattered and baked on multiple times. Here is how to handle them using lemon and baking soda.
The Baking Soda And Lemon Scrub Method
For the most stubborn microwave stains, combine lemon juice and baking soda directly on the stain. Squeeze a little lemon juice onto the spot and sprinkle baking soda on top. Let the mixture fizz for a minute or two. The chemical reaction helps break down the grime. Then, use a damp cloth to scrub the area in circular motions. Repeat if necessary for really tough stains. This method is especially effective on dried sauce splatters and hardened grease spots.
Using A Microwave Safe Bowl With Vinegar
If you want to try a variation, you can add a splash of white vinegar to the lemon steam solution. The vinegar adds extra degreasing power. Heat the mixture for three to five minutes just like before. The combined steam from lemon juice and vinegar loosens even the most stubborn food splatter and microwave grease. This method is especially useful for microwaves that have not been cleaned in a long time. The vinegar also helps disinfect the surface as it cleans.
Dealing With Burnt Food Residue
Burnt food can be the hardest to remove. For burnt spots, make a thick baking soda paste and apply it generously. Let it sit for ten to fifteen minutes. The baking soda will absorb moisture and begin to break down the burnt residue. After soaking, use a soft sponge to scrub the area. You may need to repeat this process once or twice for completely burnt spots, but it will work. The key is patience. Let the baking soda paste do its work before you start scrubbing.
When To Replace Your Microwave
Sometimes, despite your best efforts, the microwave interior is just too damaged to clean properly. If you notice deep scratches, chipping paint, or persistent odors that do not go away, it might be time to consider a replacement. A damaged microwave interior can harbor bacteria and affect how your microwave heats food. For most microwaves though, the lemon and baking soda method will handle any cleaning challenge you face.
How To Eliminate Bad Smells And Odors From Your Microwave
One of the best things about using lemon to clean your microwave is the fresh scent it leaves behind. But sometimes, odors are deeply embedded and need extra attention.
Why Your Microwave Smells Bad
Microwaves develop bad smells because of food splatters and spills that are not cleaned up quickly. When food residue heats up over and over, it creates a lingering odor. Grease buildup also contributes to unpleasant smells. Even small splashes of sauce or soup can cause a persistent microwave smell if they are not wiped away. The microwave interior absorbs these odors over time, making the appliance itself smell bad even when it is not running.
The Lemon Steam Method For Odor Removal
The lemon steam method is the best way to eliminate microwave odor naturally. Simply follow the same steps as before. Heat lemon juice and water for three to five minutes. The steam carries the fresh lemon scent throughout the entire interior. It also loosens the odor causing residue so you can wipe it away. For really bad smells, use two lemons instead of one. The extra citric acid and natural oils from the peel do a better job of neutralizing strong odors.
Extra Tips For Persistent Odors
- Leave the lemon halves inside the microwave overnight with the door closed. This gives the citric acid extra time to absorb odors.
- Place an open box of baking soda inside the microwave when it is not in use. This helps absorb any lingering smells between uses.
- Clean your microwave regularly. Prevention is the best way to avoid bad odors in the first place.
- Wipe up spills immediately after they happen. This stops odors from developing in the first place.
- Avoid heating strong smelling foods like fish without a cover. If you do, do a quick lemon steam session afterward.
Tips For Keeping Your Microwave Clean Every Day
Once your microwave is sparkling clean, you want to keep it that way. Regular maintenance makes future microwave cleaning sessions much easier and faster.
Clean Spills Right Away
The single best habit you can develop is wiping up spills immediately. When food splatters happen, take a damp cloth and wipe them down right away. This prevents stains from setting in and odors from developing. It takes only seconds and saves you a lot of effort later. Keep a small damp cloth near your microwave so you can quickly wipe up any messes.
Cover Your Food When Heating
Use a microwave safe lid or a microwave safe plate to cover your food. This prevents splatters from reaching the walls and ceiling of the microwave. It is a simple step that makes a huge difference in keeping your appliance clean. There are many reusable microwave covers available that are easy to clean and last for years.
Do A Quick Weekly Wipe Down
Once a week, give the inside of your microwave a quick wipe with a damp cloth. This takes less than two minutes and keeps buildup from accumulating. If you do this regularly, your monthly deep cleaning sessions will be much faster and easier. A little maintenance goes a long way with kitchen appliance cleaning.
Use A Microwave Safe Cover
Invest in a reusable microwave cover. These are made from microwave safe materials and fit over your bowls and plates. They catch splatters and keep the interior clean. They are inexpensive and last for years. Some covers even have steam vents built in, which prevents pressure buildup while still keeping your microwave splatter free.
Schedule A Monthly Deep Clean
Set a reminder to do a thorough how to clean microwave oven with lemon session once a month. This deep clean removes any buildup that your weekly wipes might have missed. It also keeps the microwave filter and other parts in good condition. A monthly routine ensures your microwave always looks and smells its best.
Common Mistakes To Avoid When Cleaning Your Microwave
Even when you are trying to clean your microwave properly, some common mistakes can cause problems. Here is what to watch out for.
Using Abrasive Scouring Pads
Never use steel wool or harsh scouring pads inside your microwave. These can scratch the interior surface. Scratches trap food particles and make future cleaning harder. Stick to soft cloths, sponges, or microfiber towels. They clean effectively without causing damage to the microwave interior.
Using Harsh Chemical Cleaners
Avoid using strong chemical cleaners inside your microwave. Residue from these products can transfer to your food. Lemon and baking soda are just as effective without the health risks. They are natural cleaners that are completely safe for food preparation surfaces. Your family deserves a cleaning method that is both effective and safe.
Forgetting To Clean The Turntable And Rollers
The turntable and roller mechanism are easy to forget. But food debris and grease can build up here too. Remove the turntable regularly and wash it thoroughly. This ensures your microwave heats food evenly and stays hygienic. A dirty turntable can also cause scratching on the microwave floor as it rotates.
Not Letting The Steam Work Long Enough
A common mistake is not letting the lemon steam sit long enough after heating. The steam needs time to soften the grime. After heating the lemon water, let the microwave sit with the door closed for two to three minutes before opening it. This extra time makes a big difference in how easily the grime comes off. Patience is key when it comes to steam cleaning.
Using Too Much Water In The Bowl
While you want enough water to create steam, using too much can cause overflow when it boils. Stick to about two cups of water. This is enough to generate plenty of steam without creating a mess inside your microwave. If the water overflows, it can push food debris into areas that are harder to reach.
Conclusion
How to clean microwave oven with lemon and baking soda is one of the simplest and most effective cleaning methods you can use. It requires no special products, no harsh chemicals, and no expensive equipment. Just a lemon, some baking soda, and a few minutes of your time. The steam from lemon juice loosens grime, the citric acid cuts through grease, and the baking soda scrubs away stubborn stains. Together, they leave your microwave clean, fresh, and sparkling.
Remember to clean your microwave regularly to prevent buildup. Wipe up spills right away, cover your food when heating, and do a quick weekly wipe down. These small habits keep your microwave in great shape and make deep cleaning sessions a breeze. Try this natural cleaning method today and see the difference for yourself. Your microwave will thank you, and so will your nose. Once you see how easy and effective this approach is, you will never go back to harsh chemical cleaners again.
How to clean microwave oven with lemon and baking soda is truly the best way to maintain a fresh and hygienic kitchen. It is safe, affordable, and incredibly effective. Start today and enjoy the results every time you open your microwave door.
Frequently Asked Questions
Can I use bottled lemon juice instead of fresh lemons for cleaning my microwave?
Yes, absolutely. Bottled lemon juice works just as well as fresh lemons for microwave cleaning. The key ingredient is the citric acid, and bottled juice contains plenty of it. Simply mix the juice with water and follow the same steam cleaning steps. It is a convenient alternative when fresh lemons are not available.
How often should I deep clean my microwave with lemon and baking soda?
A deep clean once a month is ideal for most households. However, if you use your microwave daily or cook messy foods often, you may want to clean it every two weeks. Regular microwave maintenance keeps buildup from becoming stubborn. A quick wipe after each use also helps reduce the need for deep cleaning sessions.
Is it safe to put lemon and baking soda inside a microwave?
Yes, both lemon and baking soda are completely safe to use inside a microwave. They are non toxic and food safe. Unlike chemical cleaners, they do not leave behind harmful residues. Just make sure the bowl you use is microwave safe and can handle boiling water without cracking.
Can lemon and baking soda remove burnt food from a microwave?
Yes, they can. For burnt food residue, make a thick paste of baking soda and water. Apply it to the burnt spot and let it sit for ten to fifteen minutes. The paste will absorb moisture and break down the burnt material. Then scrub gently with a damp cloth. You may need to repeat the process for severely burnt spots, but it will work effectively.
What if my microwave still smells after cleaning with lemon?
If the smell persists, try leaving lemon halves in a bowl of water inside the microwave overnight. The extended steam cleaning time allows the citric acid to penetrate deeper. You can also place an open box of baking soda inside the microwave when it is not in use to absorb lingering odors. Regular cleaning prevents most odor problems from developing in the first place.
Can I use this method to clean other kitchen appliances too?
Absolutely. The lemon and baking soda cleaning method works well for many kitchen appliances. It is effective for cleaning ovens, toaster ovens, and even coffee makers. The natural cleaner approach is versatile and safe for most food contact surfaces. Just adjust the method slightly depending on the appliance and the type of buildup you are dealing with.