How To Roast Chicken Quarters In Oven For Beginners
Learning how to roast chicken quarters in oven is one of the easiest and most rewarding cooking skills you can pick up. This guide walks you through everything from choosing the right chicken quarters to achieving crispy, golden-brown skin and perfectly juicy meat. Whether you are a total beginner or just looking to refine your technique, you will find clear, simple steps that deliver restaurant-quality results at home.
There is something truly satisfying about pulling a tray of roast chicken quarters in oven out of the heat. The skin is golden and crackly. The kitchen smells incredible. And the best part? You do not need to be a skilled cook to pull this off. Roasting chicken quarters in oven is one of the simplest dinner ideas you can master, and once you nail it, you will never go back to dry, boring chicken again.
Chicken quarters include the thigh and drumstick connected together. They are bone-in, which means more flavor and juiciness compared to boneless cuts. Bone-in chicken quarters also cost less than breasts or tenders, making them a smart choice for budget-friendly family dinners. This guide covers everything you need to know about oven roasted chicken from start to finish.
Key Takeaways
- Bone-in chicken quarters are forgiving and flavorful, making them ideal for oven roasting beginners.
- High heat roasting at 425°F to 450°F delivers crispy skin and juicy meat in under an hour.
- Proper seasoning and marinating before roasting builds deep flavor layers that elevate simple chicken quarters.
- A meat thermometer is essential to ensure your chicken reaches a safe internal temperature of 165°F.
- Resting the chicken after roasting keeps the juices locked in for maximum moisture.
- Simple pantry ingredients like olive oil, garlic, and paprika create restaurant-quality results.
- Leftover roasted chicken quarters store well and make quick meals throughout the week.
📑 Table of Contents
- Why Chicken Quarters Are Perfect for Oven Roasting
- What You Need to Get Started
- Step-by-Step Guide to Roasting Chicken Quarters
- Temperature and Timing Guide for Perfect Results
- Tips for Crispy Skin and Juicy Meat
- Common Mistakes to Avoid When Roasting Chicken Quarters
- Serving Ideas and Storage Tips
- Final Thoughts on Roasting Chicken Quarters
Why Chicken Quarters Are Perfect for Oven Roasting
Not all chicken cuts are created equal when it comes to roasting. Chicken quarters have a few big advantages that make them the go-to choice for home cooks. Let us break down why this cut works so well in the oven.
More Flavor Because of the Bone
When you roast bone-in chicken, the bone itself adds flavor to the meat. It acts like a natural conductor of heat, cooking the chicken more evenly. Boneless cuts can dry out fast, but bone-in quarters stay moist and tender. The bone also gives you a richer, more developed taste that you simply cannot get from boneless pieces.
Forgiving Cook Time
Chicken quarters are more forgiving than thin cuts like breasts. If you accidentally cook them a few minutes longer, they still stay juicy. This makes them perfect for beginners who are still getting comfortable with poultry roasting times and temperatures. You have a wider window of doneness, which takes the pressure off.
Budget-Friendly Protein
Let us be real. Chicken quarters are one of the most affordable cuts at the grocery store. A whole bird costs less per pound than individual breasts. When you buy quarters, you get more meat for your dollar. This makes oven baked chicken quarters a great option for feeding a family without breaking the bank.
Versatile and Easy to Season
The thick meat of a chicken quarter holds onto seasoning beautifully. Whether you use a simple salt and pepper rub or a complex spice blend, the flavors stay put during roasting. You can go smoky, spicy, herb-heavy, or classic. The options for chicken seasoning are nearly endless, which keeps your meals exciting week after week.
What You Need to Get Started
Before you turn on the oven, you need a few basic ingredients and tools. The good news is that you probably already have most of these in your kitchen. Here is what you will need for perfect roast chicken quarters in oven.
Ingredients for Basic Roasted Chicken Quarters
- Chicken quarters (bone-in, skin-on) about 4 to 6 pieces
- Olive oil or melted butter (2 to 3 tablespoons)
- Salt (1 to 1.5 teaspoons)
- Black pepper (half a teaspoon)
- Garlic powder (1 teaspoon)
- Paprika (1 teaspoon for color and flavor)
- Onion powder (half a teaspoon)
- Fresh herbs like rosemary or thyme (optional but recommended)
- Lemon halves for the pan (optional)
Tools You Will Need
- A rimmed baking sheet or roasting pan
- Parchment paper or aluminum foil for easy cleanup
- A wire rack (optional but helpful for even cooking)
- A meat thermometer (this is non-negotiable)
- Tongs for handling hot chicken
- A small bowl for mixing your seasoning blend
Pro Tip: Do not skip the meat thermometer. It is the single best tool for ensuring your oven roasted chicken is safe and perfectly cooked every time. Guessing leads to either undercooked or overcooked meat, and nobody wants either of those.
Step-by-Step Guide to Roasting Chicken Quarters
Now for the fun part. Here is the full walkthrough for how to roast chicken quarters in oven like a pro. Follow these steps and you will have delicious, crispy-skinned chicken on your table in less than an hour.
Step 1: Preheat Your Oven
Start by preheating your oven to 425°F (220°C). A hot oven is the secret to crispy chicken skin. When the heat hits the skin right away, it begins to render the fat underneath and crisp up beautifully. If your oven runs cool, you may want to bump it up to 450°F, but 425°F is the sweet spot for most home ovens.
Step 2: Prep the Chicken Quarters
Take your chicken quarters out of the refrigerator about 20 to 30 minutes before cooking. Letting them come to room temperature helps them cook more evenly. Pat them dry with paper towels. This step is crucial for crispy skin. Moisture on the surface creates steam, which prevents the skin from getting properly crunchy.
Step 3: Season Generously
In a small bowl, mix your salt, pepper, garlic powder, paprika, and onion powder. Drizzle the olive oil over the chicken quarters, then sprinkle the seasoning blend evenly over all sides. Use your hands to rub the oil and seasoning into the skin. Do not be shy with the salt. Seasoning chicken quarters well is what separates bland results from bold, flavorful ones.
If you have fresh herbs, tuck them under the skin or into the pan. Rosemary and thyme pair wonderfully with roasted chicken. The aroma alone is worth the extra effort.
Step 4: Arrange on the Baking Sheet
Line your baking sheet with parchment paper or foil for easy cleanup. Place the chicken quarters skin-side up, leaving space between each piece. You want air to circulate around the chicken so the skin crisps evenly. If you are using a wire rack, place it on top of the baking sheet and set the chicken on the rack. This allows hot air to reach the bottom of the pieces too, giving you evenly golden brown chicken all around.
Step 5: Roast in the Oven
Place the baking sheet on the middle rack of your oven. Roast the chicken quarters for about 35 to 45 minutes. The exact time depends on the size of your pieces and your oven. Flip the chicken halfway through cooking for even browning. This simple step ensures both sides get that beautiful, crispy finish.
Step 6: Check the Internal Temperature
This is the most important step. Use your meat thermometer to check the thickest part of the thigh, making sure it does not touch the bone. The internal temperature should read 165°F (74°C). If it is not there yet, keep roasting for 3 to 5 more minutes and check again. Chicken cooking time varies, so always rely on temperature, not just the clock.
Step 7: Rest Before Serving
Once the chicken reaches 165°F, take it out of the oven and let it rest for 5 to 10 minutes. This resting period allows the juices to redistribute throughout the meat. If you cut into it right away, the juices run out and your chicken can turn dry. A little patience here makes a big difference in the final result.
Temperature and Timing Guide for Perfect Results
Getting the roasting temperature and timing right is the key to juicy chicken with crispy skin. Here is a detailed breakdown to take the guesswork out of the process.
Recommended Temperatures
- 425°F (220°C): The standard temperature for oven roasted chicken. It crisps the skin well and cooks the meat through in 35 to 45 minutes.
- 400°F (200°C): A slightly lower option that works well for larger batches. Cooking time increases to about 45 to 55 minutes.
- 375°F (190°C): A slower roast that works if you are cooking at high altitude or have particularly large quarters. Expect 50 to 60 minutes.
Timing Based on Quantity
The number of quarters you are roasting affects the cook time. A single tray of 4 to 6 quarters at 425°F takes about 35 to 45 minutes. If you are doubling the batch and using two pans, add 5 to 10 minutes because the oven temperature can drop when you load it up. Avoid overcrowding the pan, as this creates steam and prevents the skin from crisping.
Visual and Tactile Cues
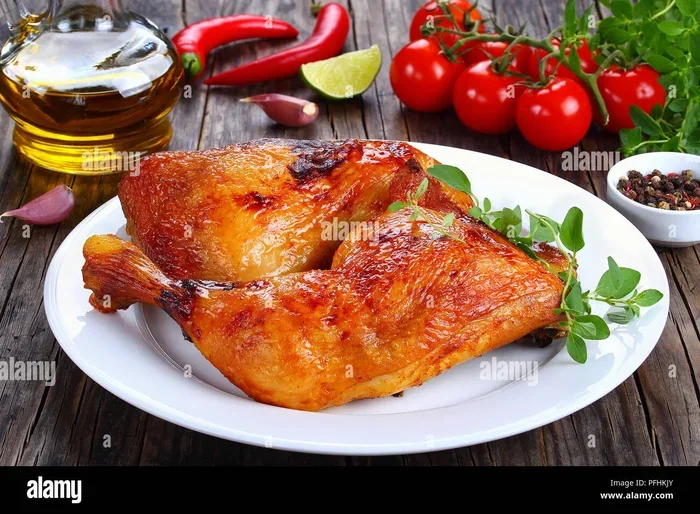
Beyond the thermometer, there are other signs your pan roasted chicken is done. The skin should be deep golden brown and slightly blistered. When you press the thickest part of the thigh, it should feel firm, not soft or rubbery. Juices that run clear (not pink) are another good indicator. But always trust the thermometer over visuals. It is the most reliable way to confirm your chicken is done.
Tips for Crispy Skin and Juicy Meat
Everyone wants that perfect balance of crunchy skin and tender, juicy meat. Here are some tried-and-true tips that separate good roasted chicken from great roasted chicken.
Dry the Skin Before Seasoning
This cannot be overstated. Moisture is the enemy of crispy skin. After patting the quarters dry with paper towels, you can place them uncovered in the refrigerator for a few hours or even overnight. This air-drying step removes even more surface moisture and leads to extra crispy chicken skin when it hits the hot oven.
Use a Wire Rack
Roasting on a wire rack set over a baking sheet allows hot air to flow all around the chicken. The skin on the bottom gets just as crispy as the top. Without a rack, the quarters sit in their own juices, which can make the bottom skin soggy.
Do Not Over-Salt the Seasoning
Wait, did I just say be generous with salt and now tell you not to over-salt? Let me clarify. Season generously, but spread the salt evenly. Clumps of salt on one spot can make that area overly salty while other spots taste bland. A light, even coat of seasoning across all surfaces gives you the best flavor distribution.
Brush with Butter for Extra Crispiness
If you want to take your crispy skin chicken to the next level, brush the skin with melted butter before roasting. The butter adds fat which browns and crisps beautifully. It also carries flavor deeper into the seasoning. A thin layer is all you need. Too much butter can cause excessive smoking in the oven.
Let the Chicken Rest
I mentioned this earlier, but it deserves repeating. Resting your oven-baked chicken quarters for at least 5 minutes after pulling them from the oven keeps the meat juicy. The residual heat continues to cook the chicken slightly, and the juices settle back into the muscle fibers. This one simple step makes a noticeable difference in texture.
Common Mistakes to Avoid When Roasting Chicken Quarters
Even easy recipes can go wrong if you skip a step or make a common error. Here are the mistakes most people make when roasting chicken quarters in oven and how to avoid them.
Skipping the Preheat
Putting cold chicken into a cold oven leads to uneven cooking. The outside takes forever to brown while the inside struggles to reach a safe temperature. Always preheat your oven fully before the chicken goes in. This ensures a hot start that sears the skin immediately and locks in moisture.
Overcrowding the Pan
It is tempting to fit as many quarters as possible onto one sheet pan. But overcrowding traps steam and prevents proper air circulation. The result is steamed, pale skin instead of crispy, golden-brown chicken. Give each piece room to breathe. Use two pans if you need to cook more at once.
Not Using a Meat Thermometer
guessing when chicken is done is risky and unreliable. Undercooked chicken is a food safety hazard. Overcooked chicken is dry and tough. A meat thermometer takes all the guesswork out. It is a small investment that pays off every single time you roast chicken.
Cutting Into the Chicken Too Soon
We all get excited when the timer goes off. But slicing into your roasted chicken quarters immediately releases all those precious juices onto the cutting board instead of keeping them in the meat. Wait the full 5 to 10 minutes. Your patience will be rewarded with juicier, more flavorful chicken.
Forgetting to Flip Halfway
If you do not flip the quarters at the halfway mark, one side will be much darker than the other. Flipping ensures even browning and cooking. Use tongs to carefully turn each piece. This is a quick step that makes a big visual and flavor difference.
Serving Ideas and Storage Tips
Your roast chicken quarters in oven are done and looking beautiful. Now what? Here are some ideas for serving them and storing leftovers so nothing goes to waste.
Easy Serving Suggestions
- Serve with roasted vegetables like carrots, potatoes, or Brussels sprouts on the same pan
- Pair with a simple green salad for a light, healthy dinner
- Add to wraps or sandwiches with your favorite sauce and fresh veggies
- Serve over rice or mashed potatoes for a comforting weeknight meal
- Top with a squeeze of fresh lemon and chopped herbs for brightness
Storing Leftovers
Cooked chicken quarters keep well in the refrigerator for up to 4 days. Store them in an airtight container. For longer storage, you can freeze cooked quarters for up to 3 months. Reheat in the oven at 350°F for about 15 minutes to keep the skin from getting too soft. Microwaving works in a pinch, but the oven helps maintain better texture.
Quick Tip: Shredded leftover roasted chicken makes excellent salads, soups, and quesadillas. Do not let any leftovers go to waste. Repurposing cooked chicken is one of the easiest ways to stretch your dinner into multiple meals.
Final Thoughts on Roasting Chicken Quarters
By now you should feel confident about how to roast chicken quarters in oven for yourself. It really is one of the simplest and most rewarding things you can cook. The combination of crispy skin, juicy meat, and minimal effort makes oven roasted chicken a staple recipe worth mastering.
Start with the basic seasoning blend and technique outlined in this guide. Once you are comfortable, experiment with different spice mixes, marinades, and herb combinations. Try adding a drizzle of honey before roasting for a sweet and savory glaze. Or sprinkle cayenne pepper for a kick of heat. The possibilities are endless.
The beauty of roasting chicken quarters in oven is that it works for almost any occasion. Weeknight dinners. Sunday family meals. Meal prep for the work week. It is versatile, affordable, and delicious. Once you make this recipe a regular part of your rotation, you will wonder how you ever managed without it.
So go ahead. Preheat that oven. Grab some chicken quarters. And enjoy the process of creating something truly satisfying from scratch. Your kitchen and your taste buds will thank you.
Frequently Asked Questions
What temperature should I roast chicken quarters at?
The recommended temperature for roasting chicken quarters in oven is 425°F (220°C). This high heat crisps the skin quickly while cooking the meat through evenly. If you prefer a slower roast, 400°F works well too but adds about 10 minutes to the cook time.
How long does it take to roast chicken quarters in the oven?
At 425°F, bone-in chicken quarters typically take 35 to 45 minutes to roast. The exact time depends on the size of the pieces and your specific oven. Always use a meat thermometer to confirm the internal temperature reaches 165°F in the thickest part of the thigh.
Should I cover chicken quarters when roasting?
No, you should roast chicken quarters uncovered for crispy skin. Covering traps steam and prevents the skin from becoming golden and crunchy. If your skin is browning too quickly, you can loosely tent the pan with foil, but this is usually not necessary at the recommended temperature.
Can I use frozen chicken quarters for oven roasting?
It is best to thaw chicken quarters before roasting for even cooking. If you roast them frozen, the outside will overcook while the inside remains undercooked. Thaw them in the refrigerator overnight for the safest and most even results. Always pat them dry before seasoning and roasting.
What is the best way to check if roasted chicken quarters are done?
The only reliable way to check doneness is with a meat thermometer. Insert it into the thickest part of the thigh, avoiding the bone. The internal temperature should read 165°F (74°C). Visual cues like golden-brown skin and clear juices are helpful, but the thermometer is the most accurate tool for food safety.
How do I store leftover roasted chicken quarters?
Let the oven roasted chicken cool completely, then store it in an airtight container in the refrigerator. It keeps for up to 4 days. For longer storage, freeze the quarters for up to 3 months. Reheat in the oven at 350°F for about 15 minutes to maintain crispy skin and juicy meat.