How To Make Okra In The Oven And Get It Perfectly Crispy
Learning how to make okra in the oven is one of the easiest ways to enjoy this nutritious vegetable without the extra oil and mess of deep frying. This guide walks you through a simple baked okra recipe that delivers golden, crunchy results with minimal effort. Whether you use fresh or frozen okra, you will get a healthy, crispy side dish that everyone will love.
There is something magical about how to make okra in the oven and turn a vegetable many people avoid into a crunchy, addictive snack. Okra often gets a bad reputation because of the slimy texture it can have when boiled or overcooked. But when you roast it in the oven, something amazing happens. The outside turns golden and crispy, and the inside stays tender and full of flavor. Once you try this method, you will never go back to boiling okra again.
The beauty of oven-roasted okra lies in its simplicity. You need just a few ingredients, a baking sheet, and about 30 minutes. No special equipment. No deep fryer. No mess. This baked okra recipe is perfect for beginners and seasoned cooks alike. It works as a side dish, a snack, or even a healthy appetizer. If you have been looking for a way to enjoy healthy okra recipes without the guilt, you are in the right place.
Key Takeaways
- Oven-roasted okra is a healthier alternative to traditional fried okra with fewer calories and less oil.
- High heat and proper prep are the secrets to getting perfectly crispy okra every single time.
- Both fresh and frozen okra work great in the oven, making this recipe accessible year-round.
- Seasoning and breading options are endless, allowing you to customize the flavor to your liking.
- Quick tips like avoiding overcrowding and using parchment paper prevent soggy okra.
- This recipe takes under 40 minutes from start to finish, making it perfect for busy weeknights.
- Oven-roasted okra pairs well with many meals, from barbecue to grilled chicken and seafood.
📑 Table of Contents
- Why Oven-Roasted Okra Is Worth Trying
- What You Will Need To Get Started
- Step-By-Step Guide To Making Okra In The Oven
- Tips For Getting Perfectly Crispy Okra Every Time
- Delicious Variations And Flavor Combinations
- Common Mistakes To Avoid
- Nutritional Benefits Of Oven-Roasted Okra
- Serving Suggestions And Pairings
- Storage And Reheating Tips
- Conclusion
Why Oven-Roasted Okra Is Worth Trying
Okra is one of the most nutritious vegetables you can eat. It is rich in fiber, vitamin C, and antioxidants. The problem is that traditional preparation methods like frying add a lot of calories and fat. When you learn how to make okra in the oven, you keep all the nutrition while cutting out the unnecessary grease.
Here are some reasons why oven-roasted okra deserves a spot on your plate:
- It is much healthier than fried okra. Baking uses a fraction of the oil, making it a better choice for your heart and waistline.
- The texture is incredible. Properly roasted okra has a crispy exterior and a tender interior that is completely different from boiled okra.
- It is incredibly easy to make. Toss, season, and bake. That is all it takes.
- It works with any budget. Okra is affordable and available fresh or frozen in most grocery stores.
- It is versatile. You can eat it as a side, a snack, or add it to salads and bowls.
Many people who say they do not like okra have only ever tried it prepared the wrong way. Oven-roasted okra changes everything. The high heat removes moisture quickly, which is exactly what prevents that slimy texture. Once you experience the difference, you will understand why this cooking method has become so popular among healthy okra recipes enthusiasts.
What You Will Need To Get Started
Before you start, gather your ingredients and tools. Having everything ready makes the process smooth and enjoyable. The good news is that you do not need anything fancy. This baked okra recipe uses simple pantry staples.
Ingredients For Crispy Oven Okra
- Fresh or frozen okra – about 1 pound. Fresh works best, but frozen is a great option too.
- Olive oil – 2 tablespoons for coating. You can also use avocado oil.
- Salt – 1 teaspoon or to taste.
- Black pepper – half a teaspoon for a mild kick.
- Garlic powder – 1 teaspoon adds wonderful depth.
- Paprika – 1 teaspoon for color and smoky flavor.
- Bread crumbs (optional) – 3 tablespoons for extra crunch.
- Lemon juice – 1 tablespoon for brightness.
Tools You Will Need
- A baking sheet or sheet pan.
- Parchment paper or a silicone baking mat.
- A large mixing bowl.
- A spatula or tongs for tossing.
- An oven that can reach 400°F to 425°F.
For the best results, make sure your okra is dry before it hits the oil. Moisture is the enemy of crispiness. If you are using fresh okra, wash it and pat it thoroughly with paper towels. If you are using frozen okra, thaw it first and spread it on a towel to absorb excess water. This small step makes a huge difference in your final result.
Step-By-Step Guide To Making Okra In The Oven
Now comes the fun part. How to make okra in the oven is simpler than most people think. Follow these steps, and you will have a batch of crispy, delicious okra in no time.
Step 1: Preheat Your Oven
Turn your oven to 425°F. Preheating is important because it ensures the okra starts cooking immediately when it goes in. This quick blast of heat helps create that crispy exterior we are after. While the oven heats up, you can prep the okra.
Step 2: Prep The Okra
Rinse your okra and cut off the stem ends. Slice the pods into 1-inch pieces or leave them whole, depending on your preference. Smaller pieces tend to crisp up faster and more evenly. Place the cut okra into a large mixing bowl.
Step 3: Season And Coat
Add the olive oil, salt, pepper, garlic powder, and paprika to the bowl. Toss everything together until the okra is evenly coated. If you want extra crunch, sprinkle in the bread crumbs and toss again. Add the lemon juice for a fresh zing. The mixture should look glossy and well-seasoned.
Step 4: Arrange On The Baking Sheet
Spread the okra in a single layer on your parchment-lined baking sheet. This is a crucial step. Do not crowd the pan. Overcrowding traps steam, and steam makes okra soggy. If you need to use two baking sheets, that is perfectly fine. Giving each piece space allows hot air to circulate and crisp everything up.
Step 5: Bake
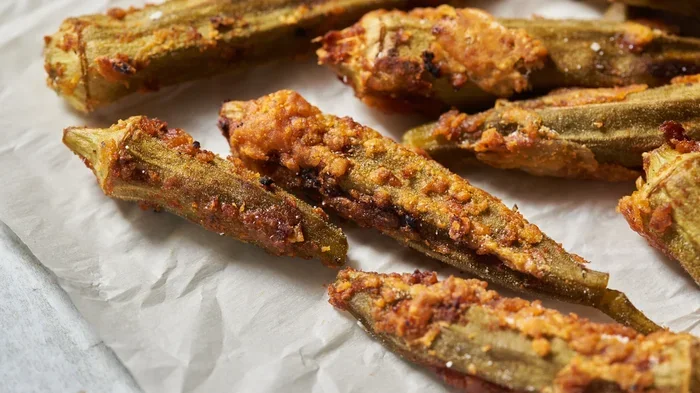
Place the baking sheet on the middle rack of your oven. Bake for 25 to 30 minutes. At the 15-minute mark, use a spatula to flip the pieces. This ensures even browning on all sides. The okra is done when it is golden brown and feels firm to the touch.
Step 6: Serve And Enjoy
Remove the okra from the oven and let it cool for a few minutes. It will crisp up even more as it sits. Serve it warm as a side dish or let it cool for a crunchy snack. Oven-roasted okra is best enjoyed fresh, but it stores well in the fridge for a day or two.
Tips For Getting Perfectly Crispy Okra Every Time
Getting the perfect crunch is all about technique. Even a small mistake can lead to limp, soggy okra. Here are some tried-and-true tips that will elevate your baked okra recipe every single time.
- Dry the okra completely. This is the single most important tip. Any remaining moisture will steam the okra instead of roasting it. Use paper towels and be thorough.
- Use high heat. A temperature of 425°F is ideal. Lower temperatures will cause the okra to release moisture and become soft.
- Do not overcrowd the pan. Give each piece room to breathe. Use two pans if necessary.
- Flip halfway through. This ensures both sides get crispy and golden.
- Use a wire rack. If you have one, placing the okra on a wire rack over the baking sheet allows air to flow underneath, which prevents the bottom from getting soggy.
- Do not skip the oil. A light coating of oil helps the seasoning stick and promotes browning. Too much oil will make things greasy, but too little will lead to dry okra.
- Let it rest after baking. Okra continues to crisp as it cools slightly. Cutting into it right away might give you a softer texture than expected.
These tips apply whether you are making a simple seasoned version or a breaded one. The okra cooking time and okra temperature matter, but so do these smaller details. Master them, and you will never make bad okra again.
Delicious Variations And Flavor Combinations
One of the best things about learning how to make okra in the oven is that you can customize it endlessly. Once you have the basic method down, experiment with different flavors to keep things interesting.
Southern-Style Okra
For a taste of the South, mix your breadcrumbs with a little cayenne pepper, onion powder, and a pinch of sugar. This gives you a savory, slightly sweet crust that reminds you of traditional southern okra without all the frying. It pairs beautifully with barbecue or fried chicken.
Spicy Cajun Okra
If you like heat, this one is for you. Add Cajun seasoning, a dash of hot sauce, and extra black pepper to your okra before baking. The result is a bold, spicy snack that goes great with cold beer or as a topping for salads.
Italian-Inspired Okra
Try adding dried oregano, basil, and a sprinkle of parmesan cheese. A drizzle of balsamic glaze after baking adds a sophisticated touch. This variation works wonderfully as a side dish alongside pasta or grilled fish.
Simple Seasoned Okra
Sometimes simple is best. Just use olive oil, salt, pepper, and a little garlic powder. Let the natural flavor of the okra shine through. This is the perfect option if you want a clean, low-carb side dish that complements any meal.
Air Fryer Option
If you have an air fryer, you can use the same seasoning and breading. Cook at 400°F for 12 to 15 minutes, shaking the basket halfway through. The air fryer okra comes out incredibly crispy with even less oil than the oven method. It is a great alternative if you want even faster okra preparation.
Each variation brings something unique to the table. The beauty of oven-roasted okra is that it takes on whatever flavors you give it. Feel free to mix and match seasonings to create your own signature version.
Common Mistakes To Avoid
Even the best recipes can go wrong if you make common errors. Here are mistakes people frequently make when making oven roasted okra and how to avoid them.
Mistake 1: Skipping The Drying Step
This is the number one reason okra turns out soggy. Wet okra steams instead of roasts. Always pat your okra dry with paper towels before seasoning and placing it on the pan. If you skip this step, you will end up with soft, limp okra instead of the crispy texture you want.
Mistake 2: Using Too Much Oil
A little oil goes a long way. Too much oil makes the okra greasy and prevents it from crisping properly. Two tablespoons for a pound of okra is the sweet spot. You want the okra lightly coated, not swimming in oil.
Mistake 3: Overcrowding The Pan
When pieces are too close together, they steam each other. The hot air cannot circulate properly, and you get uneven cooking. Spread the okra out in a single layer. If your baking sheet is full, use a second one. The extra dish is worth the crispy result.
Mistake 4: Cutting The Okra Too Thick
Thick pieces take longer to cook and may not crisp evenly on the inside. Cutting the okra into 1-inch pieces ensures uniform cooking. You get crispy edges and a tender center every time.
Mistake 5: Not Flipping Halfway
Baking on one side only leads to uneven browning. Some pieces will be dark and others pale. Flipping at the halfway mark ensures all sides get equal exposure to the heat. This small action makes a noticeable difference in the final product.
Avoiding these mistakes puts you well on your way to perfectly crispy okra. Most of these errors come from rushing the process. Take your time, follow the steps, and the results will speak for themselves.
Nutritional Benefits Of Oven-Roasted Okra
Beyond its great taste and texture, okra packs a serious nutritional punch. When you compare oven roasted okra to fried okra, the health benefits become even more impressive.
- Low in calories. A serving of baked okra has significantly fewer calories than fried okra because it uses minimal oil.
- High in fiber. Okra is an excellent source of dietary fiber, which supports digestive health and helps you feel full longer.
- Rich in vitamins. Okra contains vitamin C, vitamin K, and folate, all of which play important roles in your overall health.
- Low in carbohydrates. This makes it a great option for those following a low carb okra diet or watching their carb intake.
- Contains antioxidants. The compounds in okra help fight free radicals and reduce inflammation in the body.
- Supports heart health. The fiber and antioxidants in okra contribute to healthy cholesterol levels and blood pressure.
Because you are using minimal oil in the oven, you preserve more of these nutrients compared to deep frying. This makes how to make okra in the oven not just a tastier choice but a smarter one for your health. Whether you are cooking for yourself or your family, oven-roasted okra is a nutritious addition to any meal.
Serving Suggestions And Pairings
Oven-roasted okra is delicious on its own, but it also pairs wonderfully with many dishes. Here are some serving ideas to inspire your next meal:
- As a side dish. Serve it alongside grilled chicken, BBQ ribs, or roasted turkey for a complete meal.
- In a salad. Add cooled okra to a mixed greens salad for extra crunch and nutrition.
- With rice and beans. This is a classic combination that works especially well with the Cajun-spiced variation.
- As a snack. Serve it with a dipping sauce like ranch, aioli, or a spicy mayo for a party-friendly appetizer.
- On a charcuterie board. Pair it with cheeses, cured meats, and crackers for a unique and healthy addition.
- With seafood. Okra and seafood are a natural pairing. Try it alongside fried shrimp, grilled fish, or a seafood stew.
The versatility of oven-roasted okra means you can enjoy it in many different ways. It is not just a side dish. It is a crowd-pleaser that works in a variety of settings and cuisines. Keep it simple or get creative. Either way, it is a winner.
Storage And Reheating Tips
If you have leftovers (which is rare because this okra disappears fast), here is how to store and reheat it properly:
- Store in an airtight container in the refrigerator for up to 3 days.
- Reheat in the oven at 375°F for 5 to 7 minutes. This helps restore the crispiness better than a microwave.
- Do not store while still hot. Let the okra cool to room temperature before sealing it in a container. Moisture trapped inside will make it soggy.
- Freezing is not recommended. The texture changes significantly after freezing and reheating, so it is best to enjoy it fresh.
Following these storage tips ensures that your leftover oven baked okra stays as close to crispy as possible. Reheating in the oven is the key to maintaining that satisfying crunch you loved the first time around.
Conclusion
How to make okra in the oven is one of the simplest and most rewarding cooking skills you can learn. It transforms a humble vegetable into a crispy, flavorful treat that works as a side dish, snack, or appetizer. With just a few basic ingredients and a hot oven, you can create a healthy, delicious alternative to fried okra that the whole family will enjoy.
The key is in the details. Dry your okra thoroughly, use high heat, avoid overcrowding, and flip halfway through. These small steps make all the difference between soggy and perfectly crispy. Once you master the basics, the flavor possibilities are endless. Try different seasonings, experiment with breadings, and find your personal favorite.
Oven-roasted okra is more than just a recipe. It is a way to enjoy one of nature’s most nutritious vegetables in the most delicious way possible. Whether you are a longtime okra fan or someone who has never tried it before, this method will change your mind. Give it a try tonight, and you will wonder why you ever boiled okra in the first place.
So preheat that oven, grab some okra, and get ready to make the crispiest, most flavorful batch you have ever tasted. Your taste buds will thank you.
Frequently Asked Questions
Can I use frozen okra for this recipe?
Absolutely. Frozen okra works great for oven baking. Just make sure to thaw it first and pat it completely dry with paper towels. Removing excess moisture is the key to getting crispy results, whether you use fresh or frozen okra.
How long does oven-baked okra last in the fridge?
Leftover oven-baked okra stays fresh in an airtight container in the refrigerator for up to 3 days. Reheat it in the oven at 375°F for about 5 to 7 minutes to restore its crispiness. Avoid storing it while it is still warm, as trapped moisture will make it soggy.
What temperature should I bake okra at?
The ideal okra temperature for oven baking is 425°F. This high heat helps the outside crisp up quickly while keeping the inside tender. Baking at lower temperatures can cause the okra to release moisture and become soft instead of crunchy.
How do I prevent slimy okra when baking?
The secret to avoiding slimy okra is high heat and dry preparation. Make sure your okra is completely dry before seasoning, spread it in a single layer on the baking sheet, and bake at 425°F. The rapid evaporation of moisture at high temperatures prevents that slimy texture you might associate with boiled okra.
Can I make this recipe gluten-free?
Yes, you can easily make this recipe gluten free okra by using gluten-free breadcrumbs or skipping the breadcrumbs altogether. The seasoned okra with just olive oil and spices is naturally gluten-free and still turns out crispy and delicious.
Is oven-baked okra healthy?
Oven-baked okra is one of the healthiest ways to prepare this vegetable. It uses minimal oil compared to frying, which significantly reduces calories and fat. Okra is naturally high in fiber, vitamins, and antioxidants, making it a nutritious choice for any meal.
=== CONCLUSION ===
How to make okra in the oven is a skill that will change the way you enjoy this versatile vegetable forever. With the right technique, a hot oven, and a little patience, you can achieve perfectly crispy okra that rivals any fried version but with a fraction of the oil and calories. This baked okra recipe is easy to follow, customizable to your taste, and packed with nutrition.
Remember the key principles: dry the okra, use high heat, avoid overcrowding, and flip halfway. These simple steps guarantee great results every time. Experiment with different seasonings and flavor combinations to keep things exciting. Whether you prefer a classic seasoned version or a bold Cajun kick, oven-roasted okra delivers every single time.
Now that you know how to make okra in the oven and get it perfectly crispy, there is no reason not to try it this week. Grab some fresh or frozen okra, preheat your oven, and enjoy a healthier, crunchier version of one of the world’s most underrated vegetables. Your kitchen (and your taste buds) will thank you.